In this article, how to send email in laravel 9 using mailgun. we will learn laravel 9 to send emails using mailgun. Mailgun is an email delivery service that provides developers an easy API to send out transactional emails from their website. It's powerful APIs that enable you to send, receive, and track email effortlessly.
So, let's see, send mail using mailgun in laravel 9 and how to send email using mailgun in laravel 9.
Step 1: Create a Mailgun Account
Step 2: Setup .env file Configuration
Step 3: Create Mailable Class
Step 4: Create Blade File
Step 5: Create Route
In this step, we will create a mailgun account. So, open mailgun and create an account.
After successful registration, you will get redirected to Mailgun's dashboard page. Then, click on the "Overview" link from the left sidebar under the section labeled "Sending." On this page, you will see two ways to send emails, i.e., API and SMTP.
Click on the SMTP box and get the SMTP details.
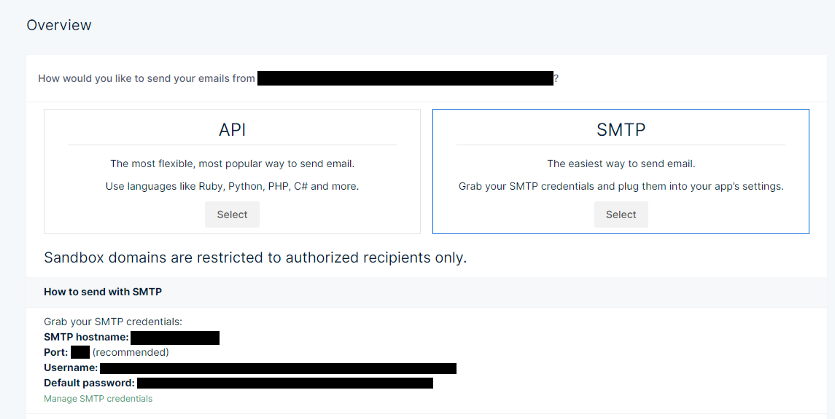
If you want to test the emailing feature, you can add a recipient email to the "Authorized Recipients" section available on the "Overview" page in the right sidebar.
Note: The email feature is restricted to authorized recipients for free accounts.
Now, we will set up mail configuration in the .env file.
MAIL_MAILER=mailgun
MAIL_HOST=smtp.mailgun.org
MAIL_PORT=587
[email protected]g
MAIL_PASSWORD=xxxxxxxxxxxxxxxxxxxxxxxxxxxxxxxxxxxxxxx
MAIL_ENCRYPTION=SSL
MAIL_FROM_ADDRESS="[email protected]"
MAIL_FROM_NAME="${APP_NAME}"
MAILGUN_DOMAIN=Your mailgun domain name
MAILGUN_SECRET=Your mailgun API KeyIn this step, we will create a mailable class using the laravel artisan command.
php artisan make:mail TestMail This command will create a new file app/Mail/TestEmail.php.
<? php

namespace App\Mail;

use Illuminate\Bus\Queueable;
use Illuminate\Mail\Mailable;
use Illuminate\Queue\SerializesModels;
use Illuminate\Contracts\Queue\ShouldQueue;

class TestMail extends Mailable{

    use Queueable, SerializesModels;

    public $user;

    public function __construct($user){

        $this->user = $user;

    }

    public function build(){

        return $this->subject('This Is Mailgun Testing Mail')
                    ->view('emails.test');
    }
} Let's create a file under app/resources/views/emails/test.blade.php and add this code.
<!DOCTYPE html>
<html>
<head>
    <title>How To Send Email In Laravel 9 Using Mailgun - Websolutionstuff</title>
</head>
<body>
    <h5>{{ $user['name'] }}</h5>
    <p>{{ $user['info'] }}</p>
    <p>Thank you</p>
</body>
</html> In this step, we will create a route for sending emails.
routes/web.php
Route::get('send-mail', function () {

    $user = [
        'name' => 'Websolutionstuff',
        'info' => 'This is mailgun example in laravel 9'
    ];

    \Mail::to('[email protected]')->send(new \App\Mail\TestMail($user));

    dd("Successfully send mail..!!");

});
You might also like:
- Read Also: How To Send Email With Attachment Using Node.js
- Read Also: Paypal Payment Gateway Integration In Laravel 8
- Read Also: How To Show Loading Spinner In Ajax jQuery
- Read Also: Laravel 9 AJAX CRUD Example