Link bài viết gốc: Bài 13 - Ansible with Terraform
Chào các bạn tới với series về Terraform, ở bài trước chúng ta đã tìm hiểu về A/B Testing Deployment. Ở bài này chúng ta sẽ tìm hiểu về một chủ đều khá thú vị là sử dụng kết hợp Terraform với Ansible.
Problem
Trước khi tìm hiểu về cách dùng Ansible trong Terraform, ta sẽ nói qua một vấn đề mà ta sẽ gặp khi ta xài Terraform, đó là sau khi ta tạo hạ tầng bằng Terraform xong rồi thì làm sao ta có thể config cho nó? Ví dụ là khi bạn dùng Terraform để tạo EC2 trên AWS xong, ta muốn cài những thứ mà ta hay xài là nano, net-tools, docker thì ta làm thế nào?
Đối với EC2 thì ta có thể xài user_data, nhưng nếu ta xài user_data thì cho dù đoạn script trong user_data đó có chạy thành công hay thất bại thì Terraform cũng báo lại cho ta là resource EC2 đã tạo thành công. Nhưng thứ ta muốn lại là ta tạo EC2 xong, ta chắc chắn rằng tất cả đoạn script mà ta cần chạy trên con EC2 đó thành công hết thì Terraform mới báo lại cho ta là đã tạo resource thành công.
Để giải quyết vấn đề đó thì Terraform sinh ra tính năng tên là Provisioners.
Provisioners
Provisioners là một tính năng cho phép ta thực thi đoạn script ở dưới máy local, hoặc chạy đoạn script ở trên remote resource. Thường được sử dụng để cấu hình hạ tầng sau khi hạ tầng được tạo ra. Provisioners có hai loại là:
- local-exec: dùng để chạy script ở dưới máy local mà Terraform đang chạy, ta sẽ dùng này để chạy Ansible.
- remote-exec: dùng để chạy script ở máy remote. Ví dụ ta tạo EC2 xong thì ta sẽ dùng remote-exec để chạy đoạn script ở trên con EC2 mới tạo.
Ví dụ ta sẽ dùng remote-exec để cài Apache HTTP Server lên con EC2, tạo một file tên là main.tf.
provider "aws" {
  region = "us-west-2"
}
Tiếp theo, ta tạo SSH key pair cho con EC2 ta cần tạo.
provider "aws" {
  region = "us-west-2"
}

resource "tls_private_key" "key" {
  algorithm = "RSA"
}

resource "aws_key_pair" "key_pair" {
  key_name   = "ansible-key"
  public_key = tls_private_key.key.public_key_openssh
}
Cấu hình Security Group cho phép ssh vào EC2.
...
resource "aws_security_group" "allow_ssh" {
  ingress {
    from_port   = 22
    to_port     = 22
    protocol    = "tcp"
    cidr_blocks = ["0.0.0.0/0"]
  }

  ingress {
    from_port   = 80
    to_port     = 80
    protocol    = "tcp"
    cidr_blocks = ["0.0.0.0/0"]
  }

  egress {
    from_port   = 0
    to_port     = 0
    protocol    = "-1"
    cidr_blocks = ["0.0.0.0/0"]
  }
}
Tạo EC2.
...
data "aws_ami" "ami" {
  most_recent = true

  filter {
    name   = "name"
    values = ["amzn2-ami-hvm-2.0.*-x86_64-gp2"]
  }

  owners = ["amazon"]
}

resource "aws_instance" "ansible_server" {
  ami                    = data.aws_ami.ami.id
  instance_type          = "t3.micro"
  vpc_security_group_ids = [aws_security_group.allow_ssh.id]
  key_name               = aws_key_pair.key_pair.key_name

  tags = {
    Name = "Apache Server"
  }
}
Oke, giờ ta sẽ dùng remote-exec như sau.
...
resource "aws_instance" "ansible_server" {
  ami                    = data.aws_ami.ami.id
  instance_type          = "t3.micro"
  vpc_security_group_ids = [aws_security_group.allow_ssh.id]
  key_name               = aws_key_pair.key_pair.key_name

  provisioner "remote-exec" {
    inline = [
      "sudo yum update -y",
      "sudo yum install -y httpd.x86_64",
      "sudo systemctl start httpd",
      "sudo systemctl enable httpd"
    ]

    connection {
      type        = "ssh"
      user        = "ec2-user"
      private_key = tls_private_key.key.private_key_pem
      host        = self.public_ip
    }
  }

  tags = {
    Name = "Apache Server"
  }
}
Ở trên ta xài provisioner với loại remote-exec, để provisioner có thể kết nối được với máy remote, ta cần phải cấu hình authentication cho nó ở block connection.
provisioner "remote-exec" {
    ...

    connection {
      type        = "ssh"
      user        = "ec2-user"
      private_key = tls_private_key.key.private_key_pem
      host        = self.public_ip
    }
}
Block inline sẽ chứa những câu lệnh ta cần thực thi ở máy remote, ở trên là những câu cli dùng để cài apache server.
provisioner "remote-exec" {
    inline = [
      "sudo yum update -y",
      "sudo yum install -y httpd.x86_64",
      "sudo systemctl start httpd",
      "sudo systemctl enable httpd"
    ]

    ...
}
Giờ ta chạy câu lệnh init và apply nào.
$ terraform init && terraform apply
Lúc này bạn sẽ thấy sau khi EC2 được tạo ra, terraform sẽ kết nối tới nó và chạy các câu CLI, sau đó nếu các câu lệnh chạy xong hết thì terraform mới báo lại là EC2 đã được tạo thành công.
...
aws_instance.ansible_server: Provisioning with 'remote-exec'...
aws_instance.ansible_server (remote-exec): Connecting to remote host via SSH...
aws_instance.ansible_server (remote-exec):   Host: 35.86.209.174
aws_instance.ansible_server (remote-exec):   User: ec2-user
aws_instance.ansible_server (remote-exec):   Password: false
aws_instance.ansible_server (remote-exec):   Private key: true
aws_instance.ansible_server (remote-exec):   Certificate: false
aws_instance.ansible_server (remote-exec):   SSH Agent: false
aws_instance.ansible_server (remote-exec):   Checking Host Key: false
aws_instance.ansible_server (remote-exec):   Target Platform: unix
aws_instance.ansible_server (remote-exec): Connected!
...
Apply complete! Resources: 2 added, 0 changed, 0 destroyed.

Outputs:

ec2 = "44.235.74.32"
Oke, ta đã sử dụng provisioner để cấu hình cho EC2 thành công 😁. Nếu ta EC2 của ta chỉ cần cấu hình đơn giản thì ta chỉ cần dùng remote-exec để chạy mấy câu CLI đơn giản như vậy là được, nhưng nếu EC2 của ta cần cấu hình phức tạp hơn nhiều thì ta không thể chỉ sử dụng mấy câu CLI được, mà ta cần dùng công cụ gọi là Configuration Management.
Ansible
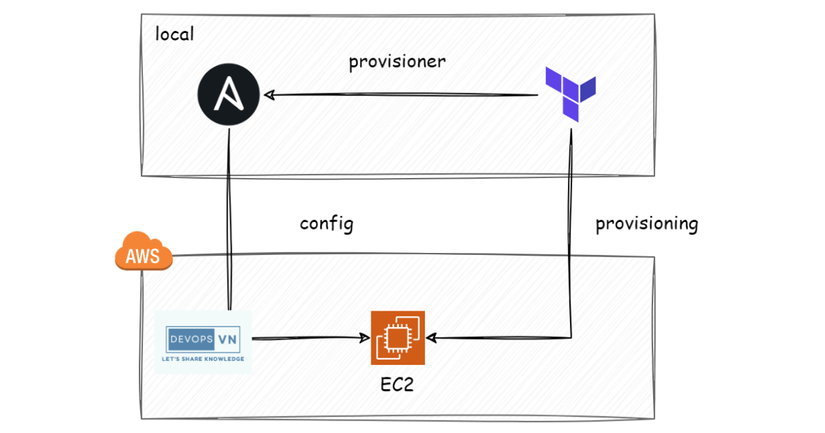
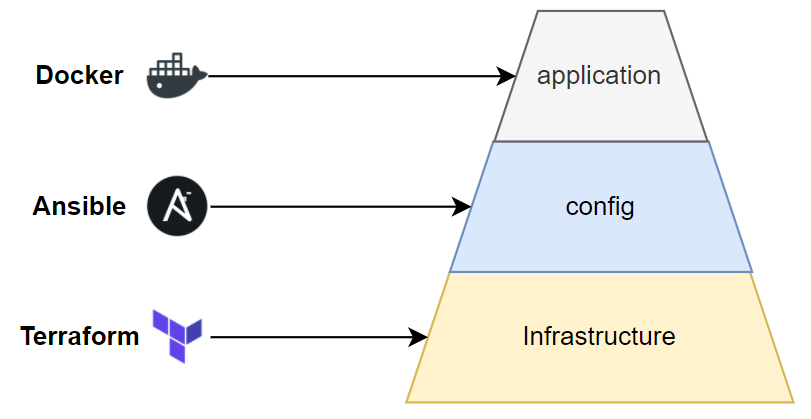
Khi ta dùng Terraform, ta chỉ sử dụng nó cho việc provisioning hạ tầng, còn việc cấu hình hạ tầng thì ta không nên dùng Terraform vì đó không phải lĩnh vực của nó, mà ta nên dùng configuration management. Trong những công cụ configuration management thì có lẽ Ansible là được sử dụng rộng rãi nhất. Mô hình phổ biến như sau.
Để sử dụng Ansible trong Terraform, đầu tiên ta phải dùng remote-exec để cài Ansible lên trên remote server, sau đó ta sẽ dùng local-exec để thực thi Ansible playbook ở dưới máy local.
Ví dụ ta tạo EC2 và dùng Ansible để cài Nginx lên trên nó, tạo hai file tên là main.tf và playbook.yaml.
provider "aws" {
  region  = "us-west-2"
}

resource "tls_private_key" "key" {
  algorithm = "RSA"
}

resource "local_sensitive_file" "private_key" {
  filename        = "${path.module}/ansible.pem"
  content         = tls_private_key.key.private_key_pem
  file_permission = "0400"
}

resource "aws_key_pair" "key_pair" {
  key_name   = "ansible"
  public_key = tls_private_key.key.public_key_openssh
}

resource "aws_security_group" "allow_ssh" {
  ingress {
    from_port   = 22
    to_port     = 22
    protocol    = "tcp"
    cidr_blocks = ["0.0.0.0/0"]
  }

  ingress {
    from_port   = 80
    to_port     = 80
    protocol    = "tcp"
    cidr_blocks = ["0.0.0.0/0"]
  }

  egress {
    from_port   = 0
    to_port     = 0
    protocol    = "-1"
    cidr_blocks = ["0.0.0.0/0"]
  }
}

data "aws_ami" "ubuntu" {
  most_recent = true

  filter {
    name   = "name"
    values = ["ubuntu/images/hvm-ssd/ubuntu-focal-20.04-amd64-server-*"]
  }

  owners = ["099720109477"]
}

resource "aws_instance" "ansible_server" {
  ami                    = data.aws_ami.ubuntu.id
  instance_type          = "t3.micro"
  vpc_security_group_ids = [aws_security_group.allow_ssh.id]
  key_name               = aws_key_pair.key_pair.key_name

  provisioner "remote-exec" {
    inline = [
      "sudo apt update -y",
      "sudo apt install -y software-properties-common",
      "sudo apt-add-repository --yes --update ppa:ansible/ansible",
      "sudo apt install -y ansible"
    ]

    connection {
      type        = "ssh"
      user        = "ubuntu"
      private_key = tls_private_key.key.private_key_pem
      host        = self.public_ip
    }
  }

  tags = {
    Name = "Ansible Server"
  }
}

output "ec2" {
  value = aws_instance.ansible_server.public_ip
}
Code ở trên cũng tương tự khi nãy, chỉ khác ở một chỗ là ta thêm vào một resource là local_sensitive_file, dùng để output ra file pem mà ta sẽ dùng nó cho Ansible.
...
resource "local_sensitive_file" "private_key" {
  filename        = "${path.module}/ansible.pem"
  content         = tls_private_key.key.private_key_pem
  file_permission = "0400"
}
...
Sau đó để xài ansible, ta dùng local-exec như sau.
...
resource "aws_instance" "ansible_server" {
  ami                    = data.aws_ami.ubuntu.id
  instance_type          = "t3.micro"
  vpc_security_group_ids = [aws_security_group.allow_ssh.id]
  key_name               = aws_key_pair.key_pair.key_name

  provisioner "remote-exec" {
    inline = [
      "sudo apt update -y",
      "sudo apt install -y software-properties-common",
      "sudo apt-add-repository --yes --update ppa:ansible/ansible",
      "sudo apt install -y ansible"
    ]

    connection {
      type        = "ssh"
      user        = "ubuntu"
      private_key = tls_private_key.key.private_key_pem
      host        = self.public_ip
    }
  }

  provisioner "local-exec" {
    command = "ANSIBLE_HOST_KEY_CHECKING=False ansible-playbook -u ubuntu --key-file ansible.pem -T 300 -i '${self.public_ip},', playbook.yaml"
  }

  tags = {
    Name = "Ansible Server"
  }
}
Đây là đoạn ta sẽ thực thi Ansible.
provisioner "local-exec" {
    command = "ANSIBLE_HOST_KEY_CHECKING=False ansible-playbook -u ubuntu --key-file ansible.pem -T 300 -i '${self.public_ip},', playbook.yaml"
}
Nhớ là dưới máy ta cần cài Ansible trước nhé. Sau đó ta cập nhật file playbook.yaml là chứa code của Ansible.
- name: Install Nginx
  hosts: all
  become: true
  tasks:
    - name: Install Nginx
      apt:
        name: nginx
        state: present
    - name: Add index page
      template:
        src: index.html
        dest: /var/www/html/index.html
    - name: Start Nginx
      service:
        name: nginx
        state: started
Nếu bạn chạy ansible trên centos thì sửa chỗ apt thành yum nhé. Tiếp theo ta tạo một file index.html để Ansible copy nó lên trên server.
<!DOCTYPE html>
<html>
  <style>
    body {
      background-color: green;
      color: white;
    }
  </style>
  <body>
    <h1>Ansible</h1>
  </body>
</html>
Giờ ta chạy câu lệnh init và apply nào.
terraform init && terraform apply
Bạn sẽ thấy local-exec sẽ thực thi ansbile.
...
aws_instance.ansible_server: Provisioning with 'local-exec'...
aws_instance.ansible_server (local-exec): Executing: ["/bin/sh" "-c" "ANSIBLE_HOST_KEY_CHECKING=False ansible-playbook -u ubuntu --key-file ansible.pem -T 300 -i '35.87.91.3,', playbook.yaml"]

aws_instance.ansible_server (local-exec): PLAY [Install Nginx] ***********************************************************

aws_instance.ansible_server (local-exec): TASK [Gathering Facts] *********************************************************
aws_instance.ansible_server: Still creating... [1m30s elapsed]
aws_instance.ansible_server (local-exec): ok: [35.87.91.3]

aws_instance.ansible_server (local-exec): TASK [Install Nginx] ***********************************************************
aws_instance.ansible_server: Still creating... [1m40s elapsed]
aws_instance.ansible_server: Still creating... [1m50s elapsed]
aws_instance.ansible_server (local-exec): changed: [35.87.91.3]

aws_instance.ansible_server (local-exec): TASK [Add index page] **********************************************************
aws_instance.ansible_server: Still creating... [2m0s elapsed]
aws_instance.ansible_server (local-exec): changed: [35.87.91.3]

aws_instance.ansible_server (local-exec): TASK [Start Nginx] *************************************************************
aws_instance.ansible_server (local-exec): ok: [35.87.91.3]

aws_instance.ansible_server (local-exec): PLAY RECAP *********************************************************************
aws_instance.ansible_server (local-exec): 35.87.91.3                 : ok=4    changed=2    unreachable=0    failed=0    skipped=0    rescued=0    ignored=0

aws_instance.ansible_server: Creation complete after 2m7s [id=i-0fd0e63361c597de1]

Apply complete! Resources: 2 added, 0 changed, 0 destroyed.

Outputs:

ec2 = "35.87.91.3"
Sau khi nó chạy xong thì truy cập vào IP của EC2 ta vừa tạo, bạn sẽ thấy nginx server đang host file index.html của ta.

Oke, vậy là ta đã kết hợp được Terraform và Ansible 😁.
Github của toàn bộ series https://github.com/hoalongnatsu/terraform-series.
Deep into Provisioners
Ta sẽ nói rõ hơn về provisioners một chút, do bài này tiêu đề là về Terraform với Ansible mà nói lý thuyết nhiều quá chắc các bạn sẽ chán, nên mình làm ví dụ phần chính trước rồi sẽ nói kĩ phần lý thuyết sau, ai cần sẽ đọc để đi phỏng vấn thôi :)))).
Creation-Time and Destruction-time
Ở trên ta đã dùng provisioner để thực thi các câu CLI, và hầu hết nó đều chạy ở lúc terraform tạo resource, và provisioner cũng có thể cấu hình để chạy lúc terraform destroy resource để ta clear up server. Provisioner sẽ được thực thi ở hai lifecycle sau:
- Creation-time provisioners.
- Destruction-time provisioners.
Với creation-time provisioners thực thi lúc resource được tạo ra và destruction-time provisioners thực thi lúc resouce được xóa đi.
Ví dụ:
resource "google_project_service" "enabled_service" {
  for_each = toset(local.services)
  project  = var.project_id
  service  = each.key

  provisioner "local-exec" {
    command = "sleep 60"
  }

  provisioner "local-exec" {
    when    = destroy
    command = "sleep 15"
  }
}
Creation-time provisioners.

Destruction-time provisioners.
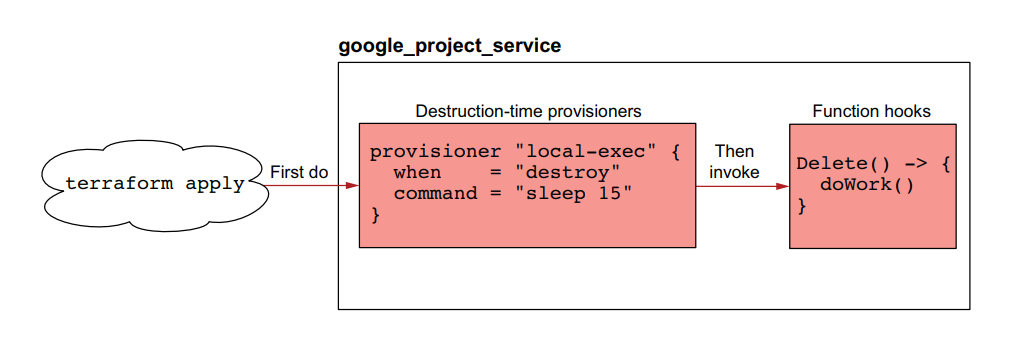
Với destruction-time provisioners thì ta sẽ thêm trường when = destroy vào, lúc này terraform sẽ hiểu ta cần chạy provisioner này ở lúc destroy resource.
Failure Behavior
Nếu provisioner của ta chạy thất bại thì sao? Mặc định nếu ta dùng provisioner thì khi nó chạy thất bại, resource của ta sẽ bị đánh là fail luôn. Ta có thể cấu hình nếu provisioner thất bại thì terraform sẽ xem resource đó là thất bại luôn, hay là resource đó vẫn được terraform đánh là tạo ra thành công và chạy tiếp.
Ta sẽ dùng thuộc tính on_failure của provisioner để cấu hình việc này, nó có hai giá trị là continue và fail, mặc định là fail. Ví dụ, ta cấu hình như sau để khi provisioner có chạy thất bại thì terraform vẫn coi nó là thành công.
resource "aws_instance" "web" {
  ...

  provisioner "local-exec" {
    command    = "echo The server's IP address is ${self.private_ip}"
    on_failure = continue
  }
}
Kết luận
Vậy là ta đã tìm hiểu xong về provisioner và cách dùng nó đẻ kết hợp Terraform với Ansible 😁. Nếu có thắc mắc hoặc cần giải thích rõ thêm chỗ nào thì các bạn có thể hỏi dưới phần comment.
Mục tìm kiếm đồng đội

Team công nghệ Hoàng Phúc của bọn mình được thành lập với nhiệm vụ là xây dựng một hệ thống công nghệ nội bộ cho công ty, Hoàng Phúc là một công ty bán lẻ trong lĩnh vực thời trang và có hơn 30 năm tuổi đời, với chuỗi cửa hàng rất nhiều trên toàn quốc, nên việc vận hành của Hoàng Phúc là rất lớn và việc xây dựng được một hệ thống công nghệ để đáp ứng việc vận hành nội bộ cho công ty là một công việc rất thử thách, đây là một quá trình chuyển đổi số và team bọn mình đã làm được những bước ban đầu.
Thứ mà team mình thấy cấn duy nhất là cái website, đây là trang web mà trước khi team mình được thành lập đã có một đội outsource khác làm, và những gì họ để lại cho bọn mình là một trang web với đống bùi nhùi, với số điểm từ google là 1 trên 100. Vậy bọn mình sẽ làm gì với trang web này đây, nản chí sao? Điều đó không có trong từ điển của hai sếp mình, và với sự dẫn dắt của hai sếp team mình sẽ biến đống website bùi nhùi đó thành kim cương, như cách bọn mình đã cải thiện hệ thống nội bộ. Bọn mình đang cải thiện trang web hằng ngày và hằng ngày, từ 1 điểm bọn mình đã cải thiện nó lên 70 điểm, và mục tiêu là trên 90 điểm.
Hiện tại team bọn mình đang cần các đồng đội tham gia để cải thiện lại trang web với số lượng người dùng truy cập khá lớn, đây là một thử thách rất thú vị, có bao giờ các bạn được tham gia thiết kế một hệ thống lớn từ đầu chưa, mình khá chắc là số lượng đó rất ít. Bọn mình đã có khách hàng, những gì còn lại là cần những đồng đội để cùng nhau phát triển một hệ thống để phục vụ rất nhiều người dùng. Mục tiêu của công ty Hoàng Phúc là trở thành nhà bán lẻ về thời trang lớn nhất Việt Nam, hãy tham gia với bọn mình nhé. Một thành viên trong team mình không yêu cần phải giỏi, chỉ cần hòa đồng, hợp tác và sẵn sàng hợp tác với nhau. Có thể bạn không là giỏi nhất nhưng nếu gia nhập với bọn mình thì bạn sẽ tạo ra được những thứ giá trị nhất.
Đồng đội Backend Engineer (Magento - PHP).
Đồng đội Senior Backend Engineer.
Đồng đội Senior Frontend Engineer.