Hiện nay, Google Spreadsheet có vẻ như đã quá quen thuộc, nhất là với những người làm kiểm thử như chúng ta.
Nó là một công cụ hữu ích và tiện lợi. Đặc biệt có thể chia sẻ online các trang tính với nhau. Nhiều công ty vẫn sử dụng nó để lưu trữ các test cases, test reports hay những thông tin cần thiết.
Ngoài ra, nó có vẻ như còn là một công cụ hỗ trợ tốt cho chúng ta lưu trữ các thông tin cần thiết để sử dụng trong data driven framework. Nó có thể là một công cụ tốt để thay thế cho các external files khác như excel, csv, SQL server, ....
Ưu điểm rất lớn của nó là chúng ta có thể gửi cho người khác xem chỉ với một đường link. Sẽ tiện hơn so với các external files khác rất nhiều.
Thay vì sử dụng Apache POI để thao tác với excel, sao ta không sử dụng luôn Google Spreadsheet nhỉ? 
Hãy cùng tìm hiểu một vài câu lệnh cơ bản để thao tác với Google Spreadsheet API nhé.
Bài toán ví dụ: Ở đây mình sẽ demo về một trường hợp của data-driven testing với external file. Đăng ký tài khoản tại site demo http://demo.guru99.com/v4/
- Tạo một Google SpreadSheet mới để lưu trữ thông tin account
- Click vào visit here
- Nhập một email bất kỳ
- Lấy userID và password được hệ thống generate và ghi nó vào Google Sheet đã tạo phía trên
- Lấy các userID và password đã tạo để login vào hệ thống và xác minh đăng nhập thành công.
Bắt đầu nào. Ở đây mình sẽ demo với class dạng step by step. Các bạn tự apply vào design pattern riêng nhé
I. Cấu hình các thông tin cần thiết
1. Enable the Google Sheets API
Việc đầu tiên là phải bật chức năng này trong account của bạn lên và download file credentials.json này về
-
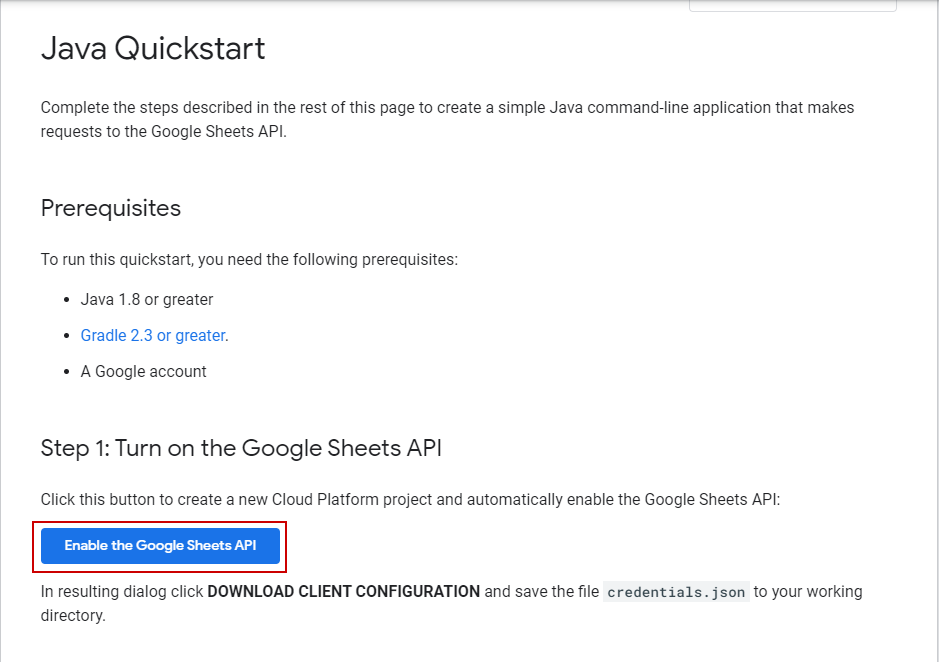
Truy cập https://developers.google.com/sheets/api/quickstart/java và chọn "Enable the Google Sheets API"
![]()
-
Tiếp theo điền thông tin project name mà bạn muốn > Next
![]()
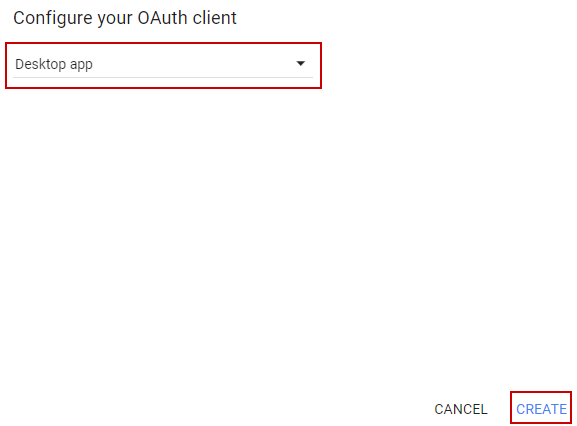
-
Lựa chọn 1 loại app mà bạn đang muốn phát triển (Ở đây mình chọn Desktop Application) và chọn "Create"
![]()
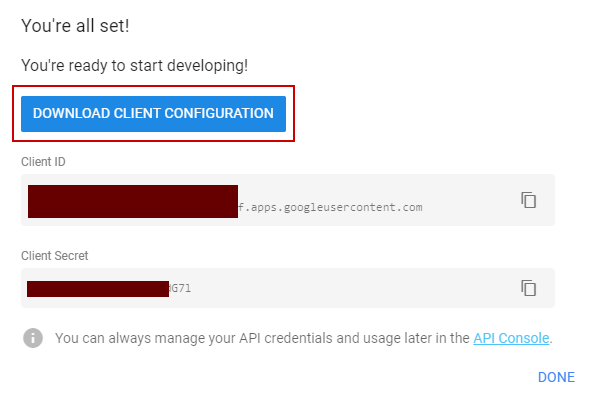
-
Trong pop-up tiếp theo sẽ chứa các thông tin account của bạn. Hãy chọn "DOWNLOAD CLIENT CONFIGURATION"
![]()
-
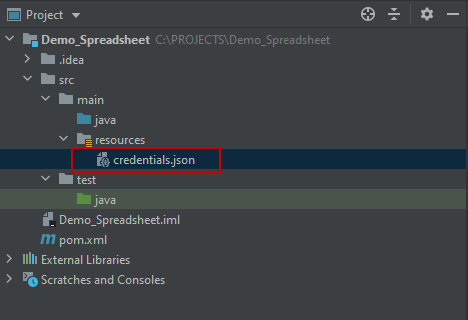
Lúc này file credentials.json sẽ được tải về.
-
Lưu trữ file credentials.json vào thư mục resources của dự án. Ở đây mình sẽ tạo 1 project để demo
![]()
Lúc này chúng ta đã có các thông tin chứng thực cần thiết để sử dụng được các quyền với các trang tính trong phạm vi quyền hạn của account chúng ta
2. Import các thư viện của Google API vào dự án
2.1: Đối với Maven project
Đầu tiên thêm các dependencies của Selenium, TestNG và WebDriverManager (WebDriverManager giúp tự động nhận diện version của webbrowser và tải driver tương ứng) vào pom.xml.
<!-- TestNG -->
<dependency>
    <groupId>org.testng</groupId>
    <artifactId>testng</artifactId>
    <version>6.8.8</version>
</dependency>
<!-- Selenium Java -->
<dependency>
    <groupId>org.seleniumhq.selenium</groupId>
    <artifactId>selenium-java</artifactId>
    <version>3.141.59</version>
</dependency>

<dependency>
    <groupId>org.seleniumhq.selenium</groupId>
    <artifactId>selenium-support</artifactId>
    <version>3.141.59</version>
</dependency>
<dependency>
    <groupId>io.github.bonigarcia</groupId>
    <artifactId>webdrivermanager</artifactId>
    <version>3.6.0</version>
</dependency>
- Tiếp theo là các dependencies liên quan của Google API:
<!-- https://mvnrepository.com/artifact/com.google.api-client/google-api-client -->
<dependency>
    <groupId>com.google.api-client</groupId>
    <artifactId>google-api-client</artifactId>
    <version>1.22.0</version>
</dependency>
<!-- https://mvnrepository.com/artifact/com.google.oauth-client/google-oauth-client-jetty -->
<dependency>
    <groupId>com.google.oauth-client</groupId>
    <artifactId>google-oauth-client-jetty</artifactId><version>1.22.0</version>
</dependency>
<!-- https://mvnrepository.com/artifact/com.google.apis/google-api-services-sheets -->
<dependency>
    <groupId>com.google.apis</groupId>
    <artifactId>google-api-services-sheets</artifactId>
    <version>v4-rev456-1.22.0</version>
</dependency>
2.2: Đối với Gradle: Thêm các dependencies vào file ** build.gradle**
apply plugin: 'java'
apply plugin: 'application'

mainClassName = 'SheetsQuickstart'
sourceCompatibility = 1.8
targetCompatibility = 1.8
version = '1.0'

repositories {
    mavenCentral()
}

dependencies {
    compile 'com.google.api-client:google-api-client:1.30.4'
    compile 'com.google.oauth-client:google-oauth-client-jetty:1.30.4'
    compile 'com.google.apis:google-api-services-sheets:v4-rev581-1.25.0'
}
II. Thao tác với Google Sheets
Ở đây mình sẽ tạo một class "SpreadSheetIntegration.java" để đảm nhiệm việc thao tác với Google SpreadSheet API
- Đầu tiên là khai báo các biến cần thiết và tạo constructor: Vì ở đây mình chỉ sử dụng 2 cột để lưu trữ userID và password nên mình sẽ khai báo range = A:B
    public String ROOT_FORLDER = System.getProperty("user.dir");
    public final String APPLICATION_NAME = "Test Spreadsheet";
    public final JsonFactory JSON_FACTORY = JacksonFactory.getDefaultInstance();
    public final String TOKENS_DIRECTORY_PATH = "tokens";
    public final String CREDENTIAL_FILE_PATH = "/credentials.json";

    public final List<String> SCOPES = Collections.singletonList(SheetsScopes.SPREADSHEETS);
    public NetHttpTransport HTTP_TRANSPORT = null; //Khai báo HTTP Transport
    public Sheets service; //Khai báo Sheet service
    public String valueInputOption = "USER_ENTERED"; //Khai báo option của input
    public ValueRange response; //Khai báo response
    public String spreadSheetID; //Lưu trữ spread sheet ID của sheet được tạo ra
    public String range = "A:B"; //Khai báo range muốn xử lý trong google sheet

    //Tạo constructure để khởi tạo service và HTTP_TRANSPORT
    public SpreadSheetIntegration() throws IOException, GeneralSecurityException {
        HTTP_TRANSPORT = GoogleNetHttpTransport.newTrustedTransport();
        service = new Sheets.Builder(HTTP_TRANSPORT, JSON_FACTORY, getCredential(HTTP_TRANSPORT))
                .setApplicationName(APPLICATION_NAME)
                .build();
    }
- Tạo hàm getCredentials để lấy quyền xác thực với tài khoản
/**
     * Function to create an authorized credential object
     * @param HTTP_TRANSPORT The network HTTP Transport.
     * @return An authorized Credential object
     * @throws IOException If the credentials.json file can not be found
     */
    public Credential getCredential(final NetHttpTransport HTTP_TRANSPORT) throws IOException {
        //Load client secrets
        InputStream in = SpreadSheetIntegration.class.getResourceAsStream(CREDENTIAL_FILE_PATH);
        if (in == null) {
            throw new FileNotFoundException("Resource not found: " + CREDENTIAL_FILE_PATH);
        }
        GoogleClientSecrets clientSecrets = GoogleClientSecrets.load(JSON_FACTORY, new InputStreamReader(in));

        //Build flow and trigger user authorization request
        GoogleAuthorizationCodeFlow flow = new GoogleAuthorizationCodeFlow.Builder(HTTP_TRANSPORT, JSON_FACTORY, clientSecrets, SCOPES)
                .setDataStoreFactory(new FileDataStoreFactory(new java.io.File(TOKENS_DIRECTORY_PATH)))
                .setAccessType("offline")
                .build();
        LocalServerReceiver receiver = new LocalServerReceiver.Builder().setPort(8888).build();
        return new AuthorizationCodeInstalledApp(flow, receiver).authorize("user");
    }
- Tiếp theo là hàm tạo một sheet mới
Bạn có thể set tiêu đề cho sheet mới với lệnh setTitle(title);
    public void createANewSheet() throws IOException {
        Spreadsheet spreadsheet = new Spreadsheet()
                .setProperties(new SpreadsheetProperties()
                        .setTitle("Sheet Test"));
        spreadsheet = service.spreadsheets().create(spreadsheet)
                .setFields("spreadsheetId")
                .execute();
        spreadSheetID = spreadsheet.getSpreadsheetId(); //Gán giá trị spreadSheetID cho sheet mới tạo
        //In ra link Google Sheet vừa tạo
        System.out.println("http://docs.google.com/spreadsheets/d/" + spreadSheetID);
    }
- Hàm ghi thêm giá trị vào sheet vừa tạo
    public void appendDataToSpreadSheet(Object username, Object password) {
        List<List<Object>> values = Arrays.asList(
                Arrays.asList(username, password)
        );
        ValueRange body = new ValueRange().setValues(values);
        try {
            AppendValuesResponse result = service.spreadsheets().values().append(spreadSheetID, range, body).setValueInputOption(valueInputOption).execute();
        } catch (IOException e) {
            e.printStackTrace();
        }
    }
- Hàm đọc giá trị từ sheet vừa tạo
    public List<String> readDataFromSpreadSheet() throws IOException {
       List<String> dataSet = new ArrayList<String>();
       response = service.spreadsheets().values().get(spreadSheetID, range).execute();
       List<List<Object>> values = response.getValues();

       if (values == null || values.isEmpty()) {
           System.out.println("No data found");
       } else {
           for (List row : values) {
               dataSet.add(row.get(0) + " " + row.get(1));
           }
       }
       return dataSet;
   }
Tạm thời trong bài demo này mình chỉ cần sử dụng đến những hàm này. Class mình sẽ để link ở đây
III. Apply Google Sheet cho Automation
Tiếp theo, hãy cùng tạo một class test với TestNG để thực hiện automation.
1. Tạo class test
Tạo một class test sử dụng Selenium và TestNG để thực hiện việc automation. Ở đây mình sẽ tạo class SpreadSheetTest.java trong test/java
Cùng tham khảo class test phía dưới nhé:
public class SpreadSheetTest {
    private WebDriver driver;
    private SpreadSheetIntegration spreadsheet;
    private String email, userID, password;

    @BeforeClass
    public void beforeClass() throws IOException, GeneralSecurityException {
        WebDriverManager.chromedriver().setup(); //tự động nhận diện và tải về Chrome driver
        driver = new ChromeDriver();

        driver.manage().timeouts().implicitlyWait(30, TimeUnit.SECONDS); //Set Global implicit wait time
        driver.manage().window().maximize();

        //Khởi tạo lớp SpreadsheetIntegration
        spreadsheet = new SpreadSheetIntegration();

        //Đầu tiên tạo 1 google sheet mới để ghi và đọc thông tin
        spreadsheet.createANewSheet();
    }

    @Test (invocationCount = 5)
    public void step1_RegisterANewAccount() throws IOException {
        //Truy cập site demo
        driver.get("http://demo.guru99.com/v4/");

        //Click vào link để đăng ký account
        driver.findElement(By.xpath("//a[text()='here']")).click();

        //Điền email để đăng ký account
        email = "tam" + randomNumber() + "@mail.com";
        driver.findElement(By.name("emailid")).sendKeys(email);

        //Nhấn submit để đăng ký account
        driver.findElement(By.name("btnLogin")).click();

        //Lấy userID đã được generate
        userID = driver.findElement(By.xpath("//td[text()='User ID :']/following-sibling::td")).getText();

        //Lấy password đã được generate
        password = driver.findElement(By.xpath("//td[text()='Password :']/following-sibling::td")).getText();

        //Ghi tiếp giá trị userID và password và sheet vừa tạo
        spreadsheet.appendDataToSpreadSheet(userID, password);
    }

    @Test
    public void step2_loginWithDataSet() throws IOException {
        List<String> dataSet = spreadsheet.readDataFromSpreadSheet();
        for(int i=0; i<dataSet.size(); i++){
            driver.get("http://demo.guru99.com/v4/");
            String[] userInfo = dataSet.get(i).split(" ");
            String userId = userInfo[0];
            String password = userInfo[1];
            driver.findElement(By.name("uid")).sendKeys(userId);
            driver.findElement(By.name("password")).sendKeys(password);
            driver.findElement(By.name("btnLogin")).click();
            String welcomeMsg = driver.findElement(By.xpath("//tr[@class='heading3']/td")).getText();
            Assert.assertTrue(welcomeMsg.contains(userId));
        }
    }

    @AfterTest
    public void afterTest(){
        driver.quit();
    }

    /**
     * Hàm tạo số random
     * @return số random
     */
    public int randomNumber(){
        Random random = new Random();
        int randomNumber = random.nextInt(999);
        return randomNumber;
    }
}
Giải thích về class trên một chút: Ở đây mình dùng class dạng step by step nên sẽ bỏ trực tiếp các hàm cần thiết vào trong class này luôn
- randomNumber dùng để tạo giá trị random và gán cho email để tránh trường hợp đăng ký email bị trùng
- WebDriverManager: tự động nhận diện browser driver tương ứng và setup driver.
- spreadsheet.createANewSheet(): Gọi đến class SpreadSheetIntegration và gọi phương tức tạo một SpreadSheet mới.
- invocationCount: Đây là TestNG attribute. parameter này sẽ cho phép chúng ta lặp lại các hàm trong @Test bao nhiêu lần tùy theo value của attribute invocationCount. Ở hàm step1_RegisterANewAccount mình lặp 5 lần để tạo ra 5 account khác nhau và ghi nó vào chung một Sheet.
- step2_loginWithDataSet: Trong hàm này mình sẽ gọi đến phương thức readDataFromSpreadSheet() của class SpreadSheetIntegration để đọc thông tin của các accounts trong Google Sheet đã tạo ở step 1. Sau đó dùng vòng lặp để đăng nhập với lần lượt các account đọc được từ Google Sheet. Sau đó xác minh đăng nhập thành công
Tiếp theo thì chạy thử thôi nào.
Kết quả sau khi chạy thử:
Trong console sẽ generate ra một link Google Sheet mới, trong này sẽ chứa những userId và password mà chúng ta đã ghi vào trước đó. giờ chỉ việc chia sẻ bằng cách phân quyền và gửi link cho người khác về bộ data của mình thôi:
Kết quả của mình: https://docs.google.com/spreadsheets/d/1UKNJHqxwIsVdEy8Lk6R_-eKQLB9Bz-cm_LNpD1f_dwg/edit?usp=sharing
Lưu ý:
Vì ở đây mình sử dụng quyền đọc ghi dữ liệu (SCOPES = Collections.singletonList(SheetsScopes.SPREADSHEETS)) nên ta phải xác minh và cấp quyền cho file credentials.json bằng account. (Những lần sau thì tokens sẽ được lưu lại và chúng ta không cần phải thực hiện bước này nữa)
Nếu chỉ sử dụng quyền Read Only (SCOPES = Collections.singletonList(SheetsScopes.SPREADSHEETS_READONLY)) thì sẽ không cần phải cấp quyền từ account, không qua bước này.
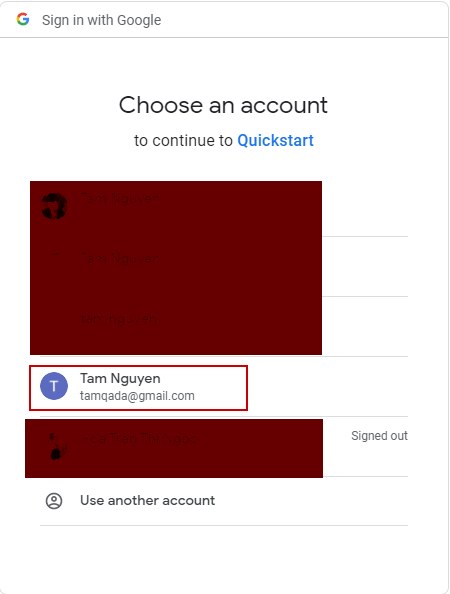
-
Khi run test ở lần đầu tiên, một cửa sổ mới sẽ được mở ra. Chọn tài khoản đã sử dụng để Enable Spreadsheet API để cấp quyền cho file Credentials.json:
![]()
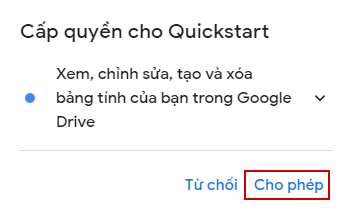
-
Cấp quyền cho file Credentials có quyền đọc ghi với account được chọn
![]()
-
Xác nhận lại lựa chọn cấp quyền:
![]()
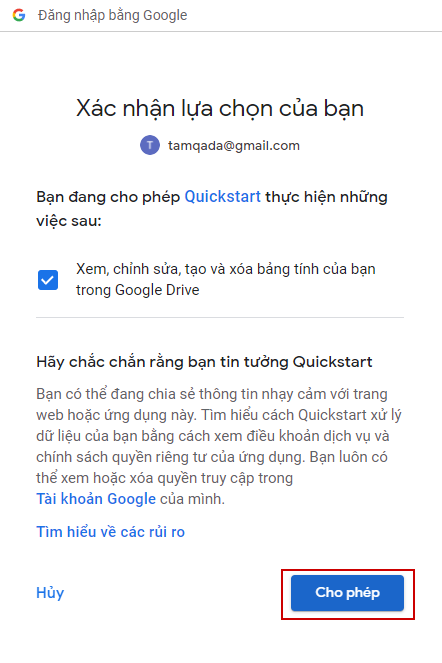
Sau khi đã cấp quyền thành công, script sẽ chạy bình thường. Tokens sẽ được tự động lưu dưới thư mục dự án trong folder "tokens" và chúng ta sẽ không cần phải xác thực quyền ở những lần chạy tiếp theo.
Ở phần trên mình đã in ra spreadSheetID, nên sau khi chạy xong chỉ việc vào console lấy link ra và chúng ta đã có thể gửi cho người khác bộ data test mà chúng ta sử dụng. Cũng khá là tiện phải không nào.
Như vậy là chúng ta đã có thể thao tác với Google SpreadSheet API trong Selenium Java. Việc áp dụng vào design pattern cũng tương tự nhé.
Hy vọng bài viết này giúp ích cho mọi người.
Classes:
Tài liệu tham khảo:
https://developers.google.com/sheets/api/quickstart/java
https://viblo.asia/p/thao-tac-co-ban-voi-google-sheet-api-bang-java-va-spring-boot-maGK7JOB5j2


