In this article, we will see how to create a dynamic bar chart in laravel 9. Bar charts are used to represent data in graphics view. For the creation of a dynamic bar chart example, you need to create a route, controller, blade file, and database.
So, let's see dynamic bar chart in laravel 9, bar chart in laravel 9, laravel 9 bar chart js, dynamic charts in laravel 9, create dynamic bar chart in laravel 9, bar chart in php.
Step 1 : Install Laravel 9 For Dynamic Bar Chart
Step 2 : Create Migration Table
Step 3 : Add Route
Step 4 : Create Controller And Model
Step 5 : Add Code In Controller
Step 6 : Create Blade File For Dynamic Bar Chart
In this step, we will create the laravel 9 project using the below command.
composer create-project --prefer-dist laravel/laravel barchartAfter project setup, we need dynamic data for the bar chart example. So, we have to create migration for the "product" table using the below command.
php artisan make:migration create_products_table --create=productsAfter run this command you will find the PHP file on location "database/migrations/". And in this file add the below code.
<?php

use Illuminate\Database\Migrations\Migration;
use Illuminate\Database\Schema\Blueprint;
use Illuminate\Support\Facades\Schema;

class CreateProductTable extends Migration
{
    /**
     * Run the migrations.
     *
     * @return void
     */
    public function up()
    {
        Schema::create('product', function (Blueprint $table) {
            $table->id();
            $table->string('name')->nullable();
            $table->integer('price')->nullable();
            $table->integer('year')->nullable();
            $table->string('product_type')->nullable();
            $table->timestamps();
        });
    }

    /**
     * Reverse the migrations.
     *
     * @return void
     */
    public function down()
    {
        Schema::dropIfExists('product');
    }
}
After these changes we need to run this migration by the following command in our terminal:
php artisan migrateNow, add a route in the routes/web.php file.
<?php

use Illuminate\Support\Facades\Route;
use App\Http\Controllers\BarchartController;
/*
|--------------------------------------------------------------------------
| Web Routes
|--------------------------------------------------------------------------
|
| Here is where you can register web routes for your application. These
| routes are loaded by the RouteServiceProvider within a group which
| contains the "web" middleware group. Now create something great!
|
*/

Route::get('/', function () {
    return view('welcome');
});


Route::get('bar-chart', [BarchartController::class,'barchart']);After adding the route, we need to create a new controller and model for the bar chart example. So, type the below command for creating a controller.
php artisan make:controller BarchartControllerphp artisan make:model ProductAdd below code in your app\Http\Controllers\EchartController.php file.
<?php

namespace App\Http\Controllers;

use Illuminate\Http\Request;
use App\Product;

class BarchartController extends Controller
{
    public function barchart(Request $request)
    {
        $Laptop = Product::where('product_type','Laptop')->get();
        $Phone = Product::where('product_type','Phone')->get();
        $Desktop = Product::where('product_type','Desktop')->get();
        $laptop_count = count($Laptop);
        $phone_count = count($Phone);
        $desktop_count = count($Desktop);
        return view('barchart',compact('laptop_count','phone_count','desktop_count'));
    }
}
Add below code in your Product Model in app\Models\Product.php file.
<?php

namespace App;

use Illuminate\Database\Eloquent\Model;

class Product extends Model
{
    protected $guarded = [];
}
In this step, we are creating a barchart.blade.php file for view.
<!DOCTYPE html>
<html>
<head>
	<meta charset="utf-8">
	<meta http-equiv="X-UA-Compatible" content="IE=edge">
	<title>How To Create Dynamic Bar Chart In Laravel 9 - Websolutionstuff</title>
	<link rel="stylesheet" href="https://maxcdn.bootstrapcdn.com/bootstrap/3.3.7/css/bootstrap.min.css">
	<link href="{{asset('assets/css/components.min.css')}}" rel="stylesheet" type="text/css">
	<script src="https://cdnjs.cloudflare.com/ajax/libs/jquery/3.6.0/jquery.min.js" crossorigin="anonymous" referrerpolicy="no-referrer"></script>
    <script src="https://cdnjs.cloudflare.com/ajax/libs/echarts/5.3.1/echarts.min.js" crossorigin="anonymous" referrerpolicy="no-referrer"></script>
</head>
<body>
<div class="col-md-12">
	<h1 class="text-center">How To Create Dynamic Bar Chart In Laravel 9 - Websolutionstuff</h1>
    <div class="col-md-8 col-md-offset-2">
    	<div class="col-xl-6">
    		<div class="card">
    			<div class="card-body">
    				<div class="chart-container">
    					<div class="chart has-fixed-height" id="bars_basic"></div>
    				</div>
    			</div>
    		</div>
    	</div>
    </div>
</div>
</body>
</html>

<script type="text/javascript">
var bars_basic_element = document.getElementById('bars_basic');
if (bars_basic_element) {
    var bars_basic = echarts.init(bars_basic_element);
    bars_basic.setOption({
        color: ['#3398DB'],
        tooltip: {
            trigger: 'axis',
            axisPointer: {
                type: 'shadow'
            }
        },
        grid: {
            left: '3%',
            right: '4%',
            bottom: '3%',
            containLabel: true
        },
        xAxis: [
            {
                type: 'category',
                data: ['Laptop', 'Phone','Desktop'],
                axisTick: {
                    alignWithLabel: true
                }
            }
        ],
        yAxis: [
            {
                type: 'value'
            }
        ],
        series: [
            {
                name: 'Total Products',
                type: 'bar',
                barWidth: '20%',
                data: [
                    {{$laptop_count}},
                    {{$phone_count}},
                    {{$desktop_count}}
                ]
            }
        ]
    });
}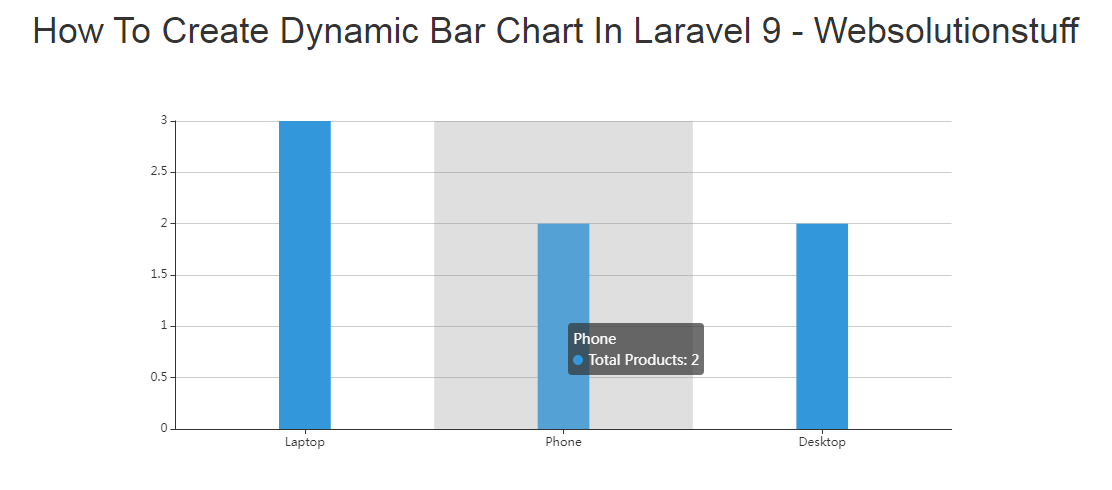
</script>Output :
You might also like :
- Read Also: Laravel 9 AJAX CRUD Example
- Read Also: How To Get Hourly Data In MySQL
- Read Also: Laravel 9 CRUD Operation Example
- Read Also: Laravel 9 Import Export CSV/EXCEL File Example