Giới thiệu
Redux là công cụ quản lý state phổ biến trong reactjs nói riêng và trong hệ sinh thái js nói chung (angularjs, vuejs, ...). Tuy nhiên, luôn có 1 vài vấn đề khi sử dụng redux đó là:
- Configuring a Redux store is too complicated.
- I have to add a lot of packages to get Redux to do anything useful.
- Redux requires too much boilerplate code.
( các bạn tự dịch nha ^^)
Và đó chính là nền tảng để ra đời RTK, từ đây ta có thể tận dụng những lợi ích của redux cũng như giúp viết code redux nhanh gọn, dễ hiểu, hoàn chỉnh theo một quy chuẩn thống nhất.
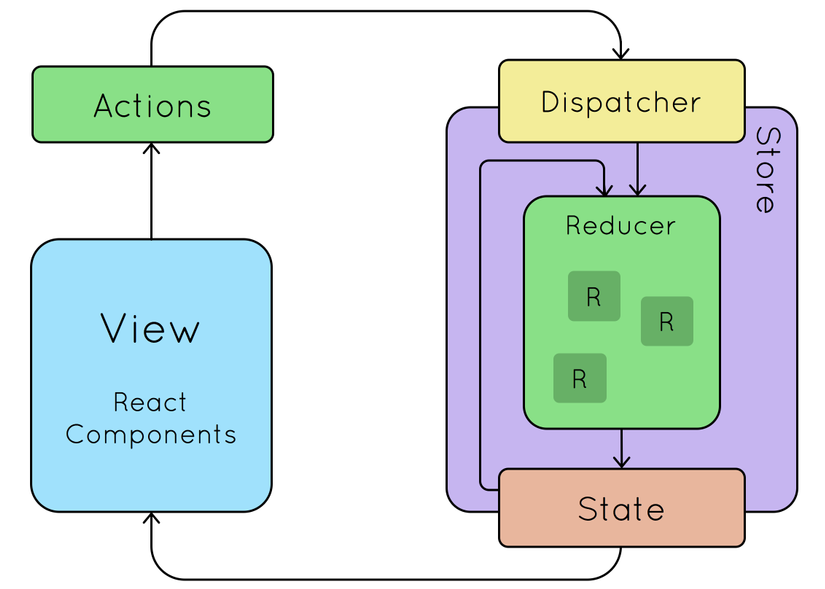
Bài viết này dành cho những bạn đã sử dụng hay đã biết về redux, còn với những bạn chưa từng sử dụng redux, mình nghĩ rằng các bạn nên tiếp cận với redux cơ bản trước, nắm bắt được cách thức hoạt động cũng như các khái niệm chính như actions, reducer, store...
Mình xin đính chính lại đó là RTK không làm thay đổi cách thức hoạt động của redux. Việc cài đặt cũng vỗ cùng dễ dàng :
Sau khi tạo 1 project bằng lệnh:
npx create-react-app your_app_name  // tạo project
npm i --save  redux react-redux  // cài redux
Ta sẽ sử dụng lệnh sau :
# NPM
npm install @reduxjs/toolkit

# Yarn
yarn add @reduxjs/toolkit
Cơ bản là done rồi đó, cài đặt thì chỉ đơn giản vậy thôi  .
.
RTK bao gồm những gì?
- Có sẵn Redux DevTools
- Có sẵn redux-thunk để thực hiện async actions
- Tự động sử dụng thư viện Immerjs
Một số API hay dùng
1. configureStore()
// Khi chưa có Redux Toolkit thì trong store.js sẽ như thế này

import { createStore, applyMiddleware, compose } from 'redux';
import thunkMiddleware from 'redux-thunk';
import rootReducer from './reducers';
// Enable to use redux dev tool in development mode
const composeEnhancers = 'development' === process.env.NODE_ENV
? (window.__REDUX_DEVTOOLS_EXTENSION_COMPOSE__ || compose)
: compose;
// Use redux-thunk as a redux middleware
const enhancer = composeEnhancers(applyMiddleware(thunkMiddleware));
const store = createStore(rootReducer, {}, enhancer);
export default store;
// Khi đã có redux toolkit 🤣
// thì store.js sẽ :

import { configureStore } from '@reduxjs/toolkit'
import rootReducer from './reducers'  // xem mục bên dưới để tạo reducer
const store = configureStore({ reducer: rootReducer })

export default store;
// tạo store thật ngắn gọn
2. createReducer()
// Không có Redux Toolkit

function counterReducer(state = 0, action) {
    switch (action.type) {
        case 'increment':
            return state + action.payload
        case 'decrement':
            return state - action.payload
        default:
            return state
    }
}

export default counterReducer;
// Có Redux Toolkit
// - Mỗi key là một case ứng với 1 action - xem phần createAction()
// - Không cần handle default case
const counterReducer = createReducer(0, {
    increment: (state, action) => state + action.payload,
    decrement: (state, action) => state - action.payload
})

export default counterReducer;
// Một điểm hay nữa là reducer có thể mutate data trực tiếp.
// Bản chất bên dưới họ sử dụng thư viện Immerjs
    const todoReducer = createReducer([], {
        addTodo: (state, action) => {
            // 1. Có thể mutate data trực tiếp 🎉
            state.push(action.payload)
        },
        removeTodo: (state, action) => {
            // 2. Hoặc phải trả về state mới
            // CHỨ KO ĐƯỢC cả 1 và 2 nha 😎
            const newState = [...state];
            newState.splice(action.payload, 1);
            return newState;
        }
})

export default todoReducer;
3. createAction()
// Không có redux toolkit
const INCREMENT = 'increment'

function increment(amount) {
    return {
    type: INCREMENT,
    payload: amount
    }
}

// gọi 1 action trong 1 component nào đó
import { increment } from 'path-to-action-file';
import { useDispatch } from 'react-redux';  // cái này trong react hooks nha

const dispatch = useDispatch();
const action = increment(6)
dispatch(action);
//action sẽ dispatch đi với thông tin là { type: 'increment', payload: 6 }
// Có redux toolkit
const increment = createAction('increment')
const action = increment(3)
// returns { type: 'increment', payload: 3 }
console.log(increment.toString())
// 'increment'
4. createSlice()
Phần này sẽ bao gôm cả 3 phần trên, và mình thường sử dụng createSlice() , vì nó gọn và còn bao gồm cả createReducer() và createAction() nữa, ok cùng xem nó sử dụng như thế nào nhé
// trong file tạo reducer ở đâu đó tùy cấu trúc thư mục của bạn
    import { createSlice } from '@reduxjs/toolkit';

    const listCandidate = createSlice({
        name: 'candidates',  // domain name of action type
        initialState: [],
        reducers: {
            addCandidate: (state, action) => {
                state.push(action.payload);
            },
            editCandidate: (state, action) => {
                // code
            }
        }
    });

    export const candidateSelector = state => state.candidateList; // có thể export các selector ở đây để tiện sử dụng lại

    const { reducer, actions } = listCandidate;
    export const { addCandidate, editCandidate } = actions;

    export default reducer;
    // trong src/app/store.js

    import { configureStore } from '@reduxjs/toolkit';
    import candidateReducer from 'đường dẫn tới file tạo reducer';

    const rootReducer = {
        candidateList: candidateReducer
        // có thể thêm các reducer khác vào đây và nhớ ngăn cách bằng dấu phẩy
    }

    const store = configureStore({
        reducer: rootReducer
    });

    export default store;
Ok bây giờ ta sẽ đưa thằng store vào Provider để có thể sử dụng ở mọi nơi
 // trong file src/index.js

    import React from 'react';
    import ReactDOM from 'react-dom';

    import './index.css';
    import App from './App';
    import reportWebVitals from './reportWebVitals';

    import { Provider } from 'react-redux';
    import store from 'app/store';

    ReactDOM.render(
      <React.StrictMode>
        <Provider store={store}> //đưa store vào đây
          <App />
        </Provider>
      </React.StrictMode>,
      document.getElementById('root')
    );

    reportWebVitals();
Done, vậy là các bạn đã setup xong cơ bản 1 store sử dụng RTK, bây giờ mọi thay đổi của state thông qua các action sẽ được cập nhật trên store, bạn có thể sử dụng các hook như useDispatch() và useSelector() để thao tác với store (lưu ý nữa là để dùng được hooks thì các bạn phải cài reactjs phiên bản >= 16.8 nha)
Ngoài ra các bạn có thể tìm đọc các api khác:
- createSelector() : https://redux-toolkit.js.org/api/createSelector
- createAsyncThunk(): https://redux-toolkit.js.org/api/createAsyncThunk
- createEntityAdapter(): https://redux-toolkit.js.org/api/createEntityAdapter
Và RTK không chỉ giới hạn ở những tính năng trên, nó còn có nhiều cái hay ho nữa mà mình xin phép được chia sẻ nó trong các bài viết sau. Cám ơn mn đã quan tâm.