Link bài viết gốc - Bài 12 - Terraform A/B Testing Deployment
Giới thiệu
Chào các bạn tới với series về Terraform, ở bài trước chúng ta đã tìm hiểu về Blue/Green Deployment. Ở bài này chúng ta sẽ tìm hiểu về một phương pháp deploy tiếp theo là A/B Testing Deployment với CloudFront và S3.
A/B Testing Deployment
Đây là phương pháp triển khai mà cho phép ứng dụng của ta sẽ có nhiều version cùng một lúc, và người dùng sẽ được redirect tới một version cụ thể dựa vào một flag gì đó mà ta chỉ định. Có thể là dựa vào một biến nào đó mà ta cấu hình ở cookies của browser hoặc là tùy vào location của người dùng ta sẽ redirect họ tới version mà ta chỉ định.
A/B Testing Deployment with CloudFront and Lambda@Edge
Trong bài này chúng ta sẽ dùng CloudFront và Lambda@Edge để thực hiện A/B Testing Deployment cho một trang Single Page Application.
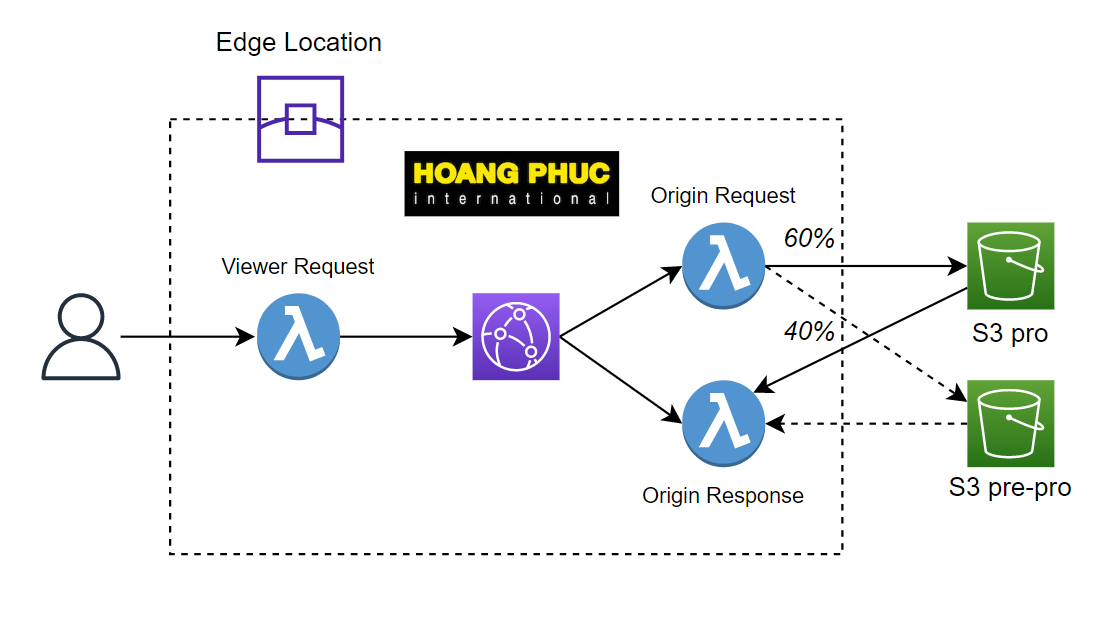
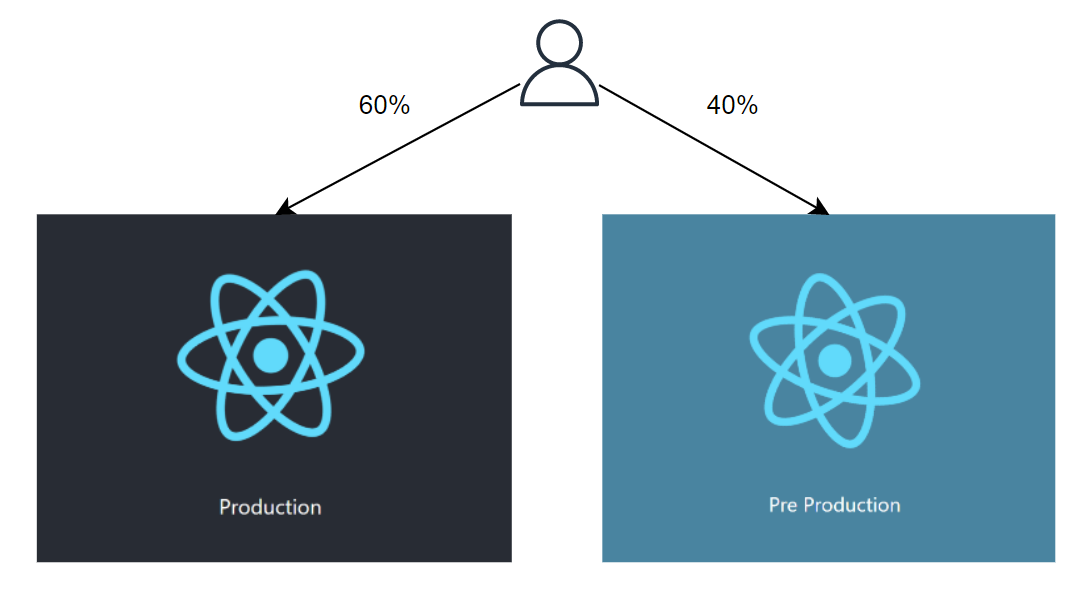
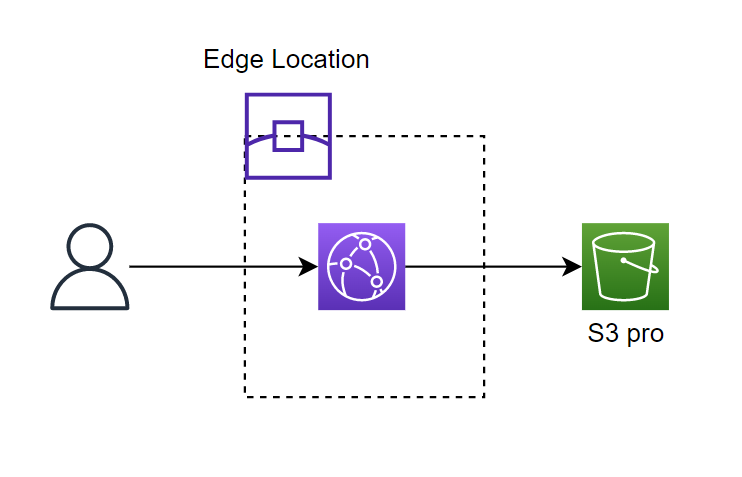
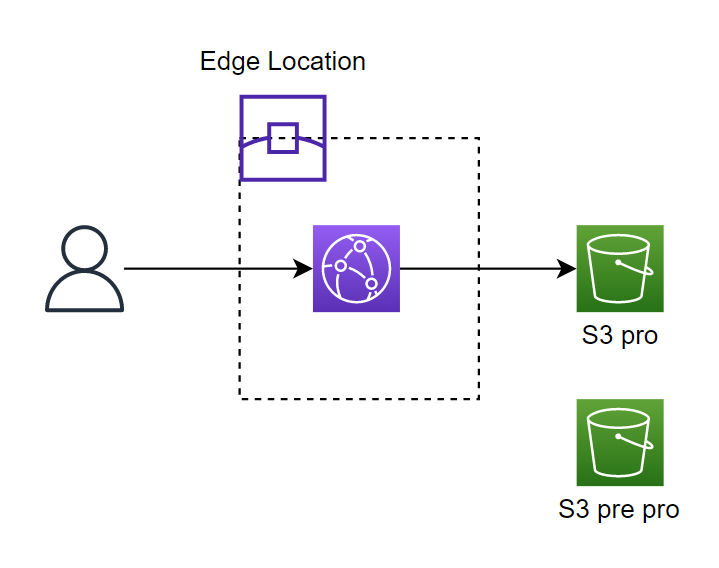
Trang SPA của ta sẽ được hosting trên S3 bucket và được cache bằng DNS CloudFront, bây giờ ta sẽ hosting thêm một version mới của trang SPA lên trên một S3 bucket khác, ta gọi S3 cũ là pro và S3 mới là pre pro, và cấu hình 60% request sẽ tới S3 pro và 40% request sẽ tới S3 pre pro.
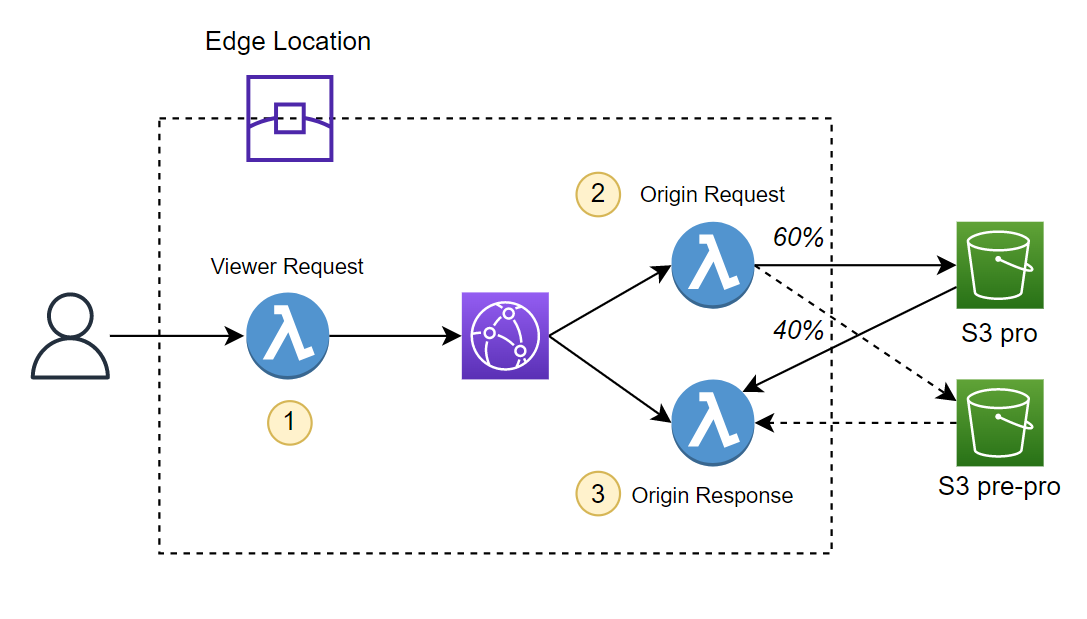
Để thực hiện được việc redirect % request của client này ta sẽ dùng Lambda@Edge. Và ta cần cấu hình CloudFront để nó trigger Lambda@Edge, như hình minh họa sau.
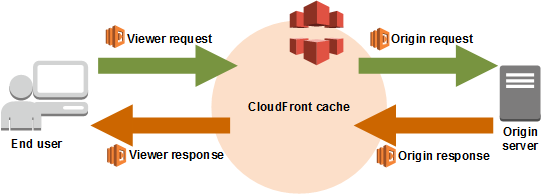
Có 4 event mà CloudFront sẽ trigger Lambda@Edge là:
- CloudFront Viewer Request: Lambda@Edge sẽ được gọi khi CloudFront nhận request từ client.
- CloudFront Origin Request: Lambda@Edge sẽ được gọi khi CloudFront gửi request tới origin phía sau.
- CloudFront Origin Response: Lambda@Edge sẽ được gọi CloudFront nhận request từ origin.
- CloudFront Viewer Response: Lambda@Edge sẽ được gọi trước khi CloudFront trả về response cho client.
Và trong Lambda@Edge ta sẽ sửa lại request của client để nó redirect tới S3 chứa trang SPA mà ta chỉ định.
Implement
Base structure
Oke giờ ta sẽ bắt tay vào làm nào, hệ thống của ta sẽ làm như sau.
Mình sẽ giải thích kĩ từng phần, đầu tiên ta sẽ tạo CloudFront và S3 bucket pro trước, tạo 3 file là main.tf, s3.tf, cloudfront-tf.
provider "aws" {
  region = "us-west-2"
}

output "dns" {
  value = aws_cloudfront_distribution.s3_distribution.domain_name
}
S3 code.
resource "aws_s3_bucket" "s3_pro" {
  bucket        = "terraform-serries-s3-pro"
  force_destroy = true
}

resource "aws_s3_bucket_acl" "s3_pro" {
  bucket = aws_s3_bucket.s3_pro.id
  acl    = "private"
}

resource "aws_s3_bucket_website_configuration" "s3_pro" {
  bucket = aws_s3_bucket.s3_pro.bucket

  index_document {
    suffix = "index.html"
  }

  error_document {
    key = "error.html"
  }
}

data "aws_iam_policy_document" "s3_pro" {
  statement {
    actions   = ["s3:GetObject"]
    resources = ["${aws_s3_bucket.s3_pro.arn}/*"]

    principals {
      type = "AWS"
      identifiers = [
        aws_cloudfront_origin_access_identity.origin_access_identity.iam_arn
      ]
    }
  }
}

resource "aws_s3_bucket_policy" "s3_pro" {
  bucket = aws_s3_bucket.s3_pro.id
  policy = data.aws_iam_policy_document.s3_pro.json
}
CloudFront code.
locals {
  s3_origin_id         = "access-identity-s3-pro"
  s3_origin_staging_id = "access-identity-s3-pre-pro"
}

resource "aws_cloudfront_origin_access_identity" "origin_access_identity" {
  comment = local.s3_origin_id
}

resource "aws_cloudfront_distribution" "s3_distribution" {

  origin {
    domain_name = aws_s3_bucket.s3_pro.bucket_regional_domain_name
    origin_id   = local.s3_origin_id

    s3_origin_config {
      origin_access_identity = aws_cloudfront_origin_access_identity.origin_access_identity.cloudfront_access_identity_path
    }
  }

  enabled             = true
  is_ipv6_enabled     = true
  default_root_object = "index.html"

  default_cache_behavior {
    allowed_methods  = ["DELETE", "GET", "HEAD", "OPTIONS", "PATCH", "POST", "PUT"]
    cached_methods   = ["GET", "HEAD"]
    target_origin_id = local.s3_origin_id

    forwarded_values {
      query_string            = true
      query_string_cache_keys = ["index"]

      cookies {
        forward = "all" // none or all
      }
    }

    viewer_protocol_policy = "allow-all"
    min_ttl                = 0
    default_ttl            = 3600
    max_ttl                = 86400
  }

  restrictions {
    geo_restriction {
      restriction_type = "none"
    }
  }

  viewer_certificate {
    cloudfront_default_certificate = true
  }
}
Sau đó ta chạy câu lệnh apply để tạo resource.
$ terraform apply -auto-approve
...
Plan: 6 to add, 0 to change, 0 to destroy
...
Apply complete! Resources: 6 added, 0 changed, 0 destroyed.

Outputs:

dns = "d2qm7woq264bw9.cloudfront.net"
Sau khi terraform chạy xong, nó sẽ output cho ta domain của CloudFront, nếu trong quá trình chạy có lỗi do tên của S3 bucket trùng thì các bạn đổi tên S3 bucket lại nhé. Hệ thống của ta sau khi chạy Terraform.
Tiếp theo ta sẽ upload code lên trên S3 bucket pro, các bạn tải code của source SPA ở repo sau https://github.com/hoalongnatsu/terraform-series.git, sau đó mở thư mục bai-11 lên, ta sẽ thấy hai source là s3-pro và s3-pre-pro, ta làm việc với source s3-pro trước.
Nhảy vào thư mục s3-pro và chạy những câu lệnh sau.
npm install
npm run build
Sau khi ta chạy câu lệnh build xong thì sẽ thấy nó output ra một thư mục là build, ta sẽ upload thư mục này lên trên S3 pro.
aws s3 cp build s3://terraform-serries-s3-pro/ --recursive
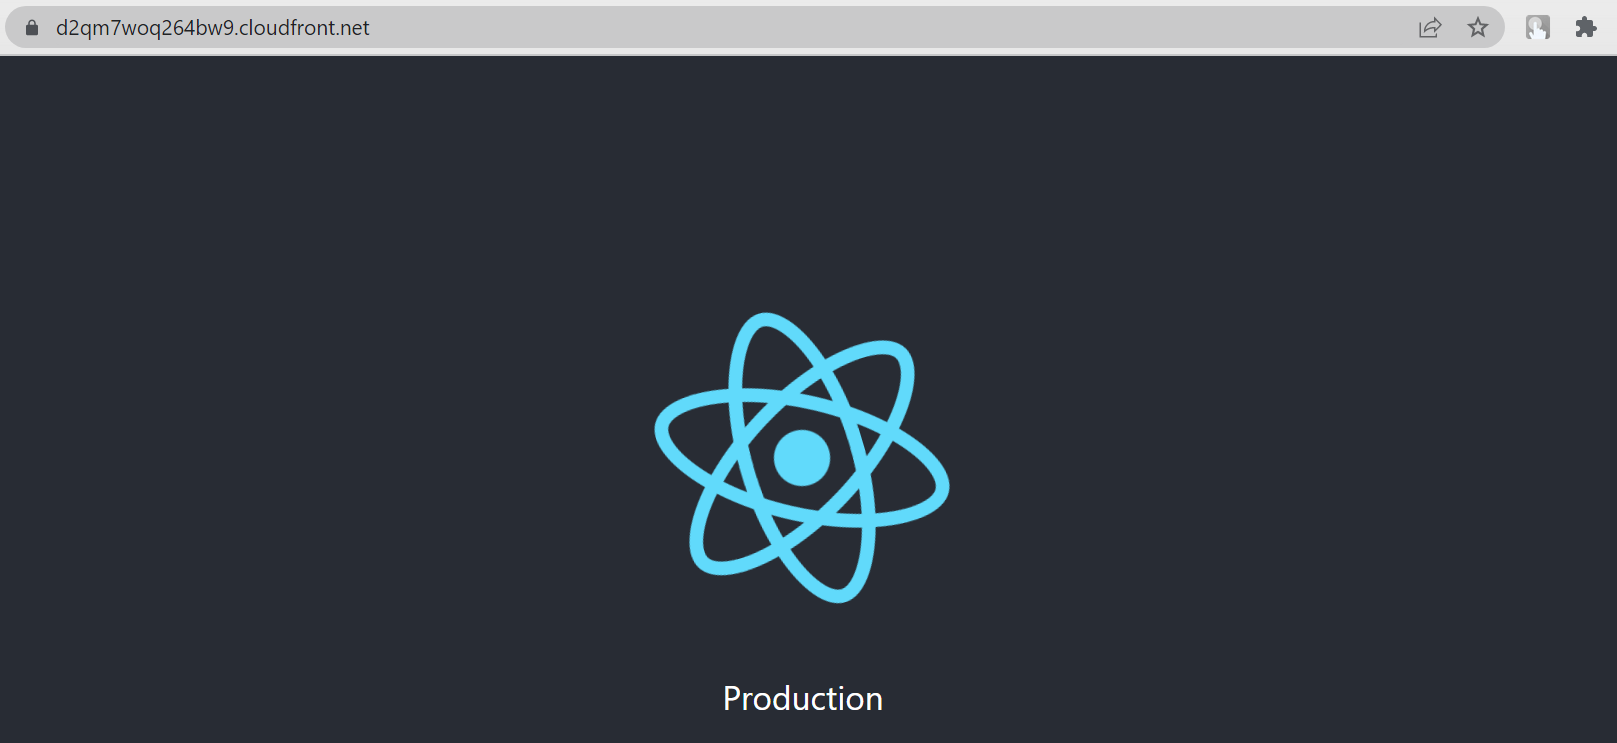
Giờ thi ta truy cập vào domain của cloudfront https://d2qm7woq264bw9.cloudfront.net/, bạn sẽ thấy được trang SPA của ta.
Pre pro enviroment
Tiếp theo ta sẽ tạo S3 bucket pre pro, tạo một file tên là s3_pre_pro.tf.
resource "aws_s3_bucket" "s3_pre_pro" {
  bucket        = "terraform-serries-s3-pre-pro"
  force_destroy = true
}

resource "aws_s3_bucket_acl" "s3_pre_pro" {
  bucket = aws_s3_bucket.s3_pre_pro.id
  acl    = "private"
}

resource "aws_s3_bucket_website_configuration" "s3_pre_pro" {
  bucket = aws_s3_bucket.s3_pre_pro.bucket

  index_document {
    suffix = "index.html"
  }

  error_document {
    key = "error.html"
  }
}

data "aws_iam_policy_document" "s3_pre_pro" {
  statement {
    actions   = ["s3:GetObject"]
    resources = ["${aws_s3_bucket.s3_pre_pro.arn}/*"]

    principals {
      type = "AWS"
      identifiers = [
        aws_cloudfront_origin_access_identity.origin_access_identity.iam_arn
      ]
    }
  }
}

resource "aws_s3_bucket_policy" "s3_pre_pro" {
  bucket = aws_s3_bucket.s3_pre_pro.id
  policy = data.aws_iam_policy_document.s3_pre_pro.json
}
Và cập nhật lại file main.tf thêm vào output sau.
...
output "s3" {
  value = {
    pro     = aws_s3_bucket.s3_pro.bucket_domain_name
    pre_pro = aws_s3_bucket.s3_pre_pro.bucket_domain_name
  }
}
Chạy câu lệnh apply để tạo resource mới.
$ terraform apply -auto-approve
...
Plan: 4 to add, 0 to change, 0 to destroy.
...
Apply complete! Resources: 4 added, 0 changed, 0 destroyed.

Outputs:

dns = "d2qm7woq264bw9.cloudfront.net"
s3 = {
  "pre_pro" = "terraform-serries-s3-pre-pro.s3.amazonaws.com"
  "pro" = "terraform-serries-s3-pro.s3.amazonaws.com"
}
Sau đó ta mở thư mục s3-pre-pro lên, làm tương tự khi nãy để upload code lên s3.
npm install & npm run build
aws s3 cp build s3://terraform-serries-s3-pre-pro/ --recursive
Hệ thống của ta lúc này.
Config Lambda@Edge and CloudFront Function.
Giờ ta sẽ làm phần quan trọng nhất là cấu hình Lambda@Edge để redirect client tới S3 bucket mà ta muốn, ta sẽ làm việc đó bằng cách nhúng một cookies vào trong browser của client, cookie mà ta sẽ nhúng có giá trị là X-Redirect-Flag=Pro hoặc X-Redirect-Flag=Pre-Pro.
Sau đó nếu client gửi request lên trang của ta thì ta sẽ kiểm ta là nếu trong headers của client có cookie với giá trị là X-Redirect-Flag=Pro thì ta sẽ chuyển nó qua S3 pro hoặc ngược lại.
Logic mà ta sẽ thực hiện ở function 1.
- Kiểm tra trong headers có cookies mà ta cần hay chưa, nếu có thì ta sẽ cho request đi tiếp bình thường.
- Nếu trong headers không có cookies mà ta cần, thì ta sẽ random để nhúng vào headers của 60% request là cookie
X-Redirect-Flag=Pro, 40% request là cookieX-Redirect-Flag=Pre-Pro.
Logic mà ta sẽ thực hiện ở function 2.
- Kiểm tra nếu request của client có chứa cookie
X-Redirect-Flag=Prothì redirect tới S3 bucket pro. - Kiểm tra nếu request của client có chứa cookie
X-Redirect-Flag=Pre-Prothì redirect tới S3 bucket pre pro.
Logic mà ta sẽ thực hiện ở function 3.
- Sau khi ta trả về response cho client, ta sẽ kiểm tra tiếp nếu trong headers có cookie
X-Redirect-Flag=ProhoặcX-Redirect-Flag=Pre-Prothì ta sẽ set cookie đó cho browser của client đó luôn, để lần sau client gửi request lên sẽ có cookie đó.
Ở thư mục terraform ta một thêm một thư mục nữa là function, sau đó ta tạo thêm 3 file tên là viewer-request.js, origin-request.js, origin-response.js
├── cloudfront.tf
├── function
│   ├── origin_request.js
│   ├── origin_response.js
│   └── viewer_request.js
├── main.tf
├── s3.tf
├── s3_pre_pro.tf
└── terraform.tfstate
Code của file viewer-request.js.
exports.handler = (event, context, callback) => {
  const request = event.Records[0].cf.request;
  const headers = request.headers;

  // Look for cookie
  if (headers.cookie) {
    for (let i = 0; i < headers.cookie.length; i++) {
      if (headers.cookie[i].value.indexOf("X-Redirect-Flag") >= 0) {
        console.log("Source cookie found. Forwarding request as-is");
        // Forward request as-is
        callback(null, request);
        return;
      }
    }
  }

  // Add Source cookie
  const cookie = Math.random() < 0.6 ? "X-Redirect-Flag=Pro" : "X-Redirect-Flag=Pre-Pro";
  headers.cookie = headers.cookie || [];
  headers.cookie.push({ key: "Cookie", value: cookie });

  // Forwarding request
  callback(null, request);
};
Code của file origin-request.js.
exports.handler = async (event, context, callback) => {
  const request = event.Records[0].cf.request;
  const headers = request.headers;

  if (headers.cookie) {
    for (let i = 0; i < headers.cookie.length; i++) {
      if (headers.cookie[i].value.indexOf("X-Redirect-Flag=Pro") >= 0) {
        request.origin = {
          s3: {
            authMethod: "origin-access-identity",
            domainName: "terraform-serries-s3-pro.s3.amazonaws.com",
            region: "us-west-2",
            path: "",
          },
        };

        headers["host"] = [
          {
            key: "host",
            value: "terraform-serries-s3-pro.s3.amazonaws.com",
          },
        ];
        break;
      }

      if (headers.cookie[i].value.indexOf("X-Redirect-Flag=Pre-Pro") >= 0) {
        request.origin = {
          s3: {
            authMethod: "origin-access-identity",
            domainName: "terraform-serries-s3-pre-pro.s3.amazonaws.com",
            region: "us-west-2",
            path: "",
          },
        };

        headers["host"] = [
          {
            key: "host",
            value: "terraform-serries-s3-pre-pro.s3.amazonaws.com",
          },
        ];
        break;
      }
    }
  }

  callback(null, request);
};
Code của file origin-response.js.
exports.handler = (event, context, callback) => {
  const request = event.Records[0].cf.request;
  const requestHeaders = request.headers;
  const response = event.Records[0].cf.response;

  // Look for cookie
  if (requestHeaders.cookie) {
    for (let i = 0; i < requestHeaders.cookie.length; i++) {
      if (requestHeaders.cookie[i].value.indexOf("X-Redirect-Flag=Pro") >= 0) {
        response.headers["set-cookie"] = [{ key: "Set-Cookie", value: `X-Redirect-Flag=Pro; Path=/` }];
        callback(null, response);
        return;
      }

      if (requestHeaders.cookie[i].value.indexOf("X-Redirect-Flag=Pre-Pro") >= 0) {
        response.headers["set-cookie"] = [{ key: "Set-Cookie", value: `X-Redirect-Flag=Pre-Pro; Path=/` }];
        callback(null, response);
        return;
      }
    }
  }

  // If request contains no Source cookie, do nothing and forward the response as-is
  callback(null, response);
};
Giờ ta sẽ dùng Terraform để tạo Lambda function và cấu hình Lambda@Edge cho CloudFront, tạo một hai file tên là iam_role.tf và lambda.tf.
resource "aws_iam_role" "lambda_edge" {
  name = "AWSLambdaEdgeRole"
  path = "/service-role/"
  assume_role_policy = jsonencode({
    "Version" : "2012-10-17",
    "Statement" : [
      {
        "Effect" : "Allow",
        "Principal" : {
          "Service" : [
            "edgelambda.amazonaws.com",
            "lambda.amazonaws.com",
          ]
        },
        "Action" : "sts:AssumeRole",
      }
    ]
  })

  inline_policy {
    name = "AWSLambdaEdgeInlinePolicy"

    policy = jsonencode({
      Version = "2012-10-17"
      Statement = [
        {
          Effect : "Allow",
          Action : [
            "logs:CreateLogGroup",
            "logs:CreateLogStream",
            "logs:PutLogEvents"
          ],
          Resource : [
            "arn:aws:logs:*:*:*"
          ]
        }
      ]
    })
  }
}
Ta sẽ tạo IAM role cho Lambda để nó có quyền ghi logs vào CloudWatch. Sau đó vì Lambda funcion yêu cầu file zip để upload code, ta sẽ tạo 3 file zip cho 3 function của ta ở trên.
data "archive_file" "zip_file_for_lambda_viewer_request" {
  type        = "zip"
  source_file = "function/viewer-request.js"
  output_path = "function/viewer-request.zip"
}

data "archive_file" "zip_file_for_lambda_origin_request" {
  type        = "zip"
  source_file = "function/origin-request.js"
  output_path = "function/origin-request.zip"
}

data "archive_file" "zip_file_for_lambda_origin_response" {
  type        = "zip"
  source_file = "function/origin-response.js"
  output_path = "function/origin-response.zip"
}
Chạy lại câu lệnh init vì ta thêm một provider mới là archive_file.
terraform init
Sau đó ta chạy câu lệnh apply.
$ terraform apply -auto-approve
...
Apply complete! Resources: 1 added, 0 changed, 0 destroyed.

Outputs:

dns = "d2qm7woq264bw9.cloudfront.net"
s3 = {
  "pre_pro" = "terraform-serries-s3-pre-pro.s3.amazonaws.com"
  "pro" = "terraform-serries-s3-pro.s3.amazonaws.com"
}
Lúc này ta sẽ thấy có 3 file zip cho 3 function.
├── cloudfront.tf
├── function
│   ├── origin-request.js
│   ├── origin-request.zip
│   ├── origin-response.js
│   ├── origin-response.zip
│   ├── viewer-request.js
│   └── viewer-request.zip
├── iam_role.tf
├── lambda.tf
├── main.tf
├── s3.tf
├── s3_pre_pro.tf
└── terraform.tfstate
Tiếp theo ta tạo Lambda function, cập nhật lại file lambda.tf.
...
provider "aws" {
  region  = "us-east-1"
  alias   = "us-east-1"
}

resource "aws_lambda_function" "viewer_request_function" {
  function_name = "viewer-request-ab-testing"
  role          = aws_iam_role.lambda_edge.arn
  publish       = true

  handler          = "viewer-request.handler"
  runtime          = "nodejs14.x"
  filename         = "function/viewer-request.zip"
  source_code_hash = filebase64sha256("function/viewer-request.zip")

  provider = aws.us-east-1
}

resource "aws_lambda_function" "origin_request_function" {
  function_name = "origin-request-ab-testing"
  role          = aws_iam_role.lambda_edge.arn
  publish       = true

  handler          = "origin-request.handler"
  runtime          = "nodejs14.x"
  filename         = "function/origin-request.zip"
  source_code_hash = filebase64sha256("function/origin-request.zip")

  provider = aws.us-east-1
}

resource "aws_lambda_function" "origin_response_function" {
  function_name = "origin-response-ab-testing"
  role          = aws_iam_role.lambda_edge.arn
  publish       = true

  handler          = "origin-response.handler"
  runtime          = "nodejs14.x"
  filename         = "function/origin-response.zip"
  source_code_hash = filebase64sha256("function/origin-response.zip")

  provider = aws.us-east-1
}
Hiện tại AWS chỉ hỗ trợ các Lambda nào tạo ở region us-east-1 mới có thể deploy thành Lambda@Edge, nên ta phải tạo Lambda ở region us-east-1. Ở trong Terraform nếu ta muốn tạo resource ở nhiều region khác nhau, ta phải thêm vào resource đó trường provider, với provider được cấu hình với trường alias đi kèm, ví dụ ở trên ta khai báo aws provider cho region us-east-1.
provider "aws" {
  region  = "us-east-1"
  alias   = "us-east-1"
}
Tiếp theo, ta sẽ thêm S3 bucket pre pro vào trong CloudFront và deploy Lambda@Edge lên trên CloudFront, cập nhật lại file cloudfront.tf.
resource "aws_cloudfront_distribution" "s3_distribution" {

  origin {
    domain_name = aws_s3_bucket.s3_pro.bucket_regional_domain_name
    origin_id   = local.s3_origin_id

    s3_origin_config {
      origin_access_identity = aws_cloudfront_origin_access_identity.origin_access_identity.cloudfront_access_identity_path
    }
  }

  origin {
    domain_name = aws_s3_bucket.s3_pre_pro.bucket_regional_domain_name
    origin_id   = local.s3_origin_staging_id

    s3_origin_config {
      origin_access_identity = aws_cloudfront_origin_access_identity.origin_access_identity.cloudfront_access_identity_path
    }
  }

  enabled             = true
  is_ipv6_enabled     = true
  default_root_object = "index.html"

  default_cache_behavior {
    allowed_methods  = ["DELETE", "GET", "HEAD", "OPTIONS", "PATCH", "POST", "PUT"]
    cached_methods   = ["GET", "HEAD"]
    target_origin_id = local.s3_origin_id

    forwarded_values {
      query_string            = true
      query_string_cache_keys = ["index"]

      cookies {
        forward = "all" // none or all
      }
    }

    lambda_function_association {
      event_type   = "viewer-request"
      lambda_arn   = aws_lambda_function.viewer_request_function.qualified_arn
      include_body = false
    }

    lambda_function_association {
      event_type   = "origin-request"
      lambda_arn   = aws_lambda_function.origin_request_function.qualified_arn
      include_body = false
    }

    lambda_function_association {
      event_type   = "origin-response"
      lambda_arn   = aws_lambda_function.origin_response_function.qualified_arn
      include_body = false
    }

    viewer_protocol_policy = "allow-all"
    min_ttl                = 0
    default_ttl            = 3600
    max_ttl                = 86400
  }

  restrictions {
    geo_restriction {
      restriction_type = "none"
    }
  }

  viewer_certificate {
    cloudfront_default_certificate = true
  }
}
Ta thêm hai doạn code.
origin {
    domain_name = aws_s3_bucket.s3_pre_pro.bucket_regional_domain_name
    origin_id   = local.s3_origin_staging_id

    s3_origin_config {
      origin_access_identity = aws_cloudfront_origin_access_identity.origin_access_identity.cloudfront_access_identity_path
    }
 }
Chỗ này ta thêm origin là S3 bucket pre pro cho cloudfront. Và đoạn.
default_cache_behavior {
    ...

    lambda_function_association {
      event_type   = "viewer-request"
      lambda_arn   = aws_lambda_function.viewer_request_function.qualified_arn
      include_body = false
    }

    lambda_function_association {
      event_type   = "origin-request"
      lambda_arn   = aws_lambda_function.origin_request_function.qualified_arn
      include_body = false
    }

    lambda_function_association {
      event_type   = "origin-response"
      lambda_arn   = aws_lambda_function.origin_response_function.qualified_arn
      include_body = false
    }

    ...
  }
Chỗ này ta deploy Lambda thành Lambda@Edge cho CloudFront, ta chạy câu lệnh apply để tạo Lambda.
$ terraform apply -auto-approve
...
Apply complete! Resources: 3 added, 1 changed, 0 destroyed.

Outputs:

dns = "d2qm7woq264bw9.cloudfront.net"
s3 = {
  "pre_pro" = "terraform-serries-s3-pre-pro.s3.amazonaws.com"
  "pro" = "terraform-serries-s3-pro.s3.amazonaws.com"
}
Sau khi terraform chạy xong thì ta truy cập vào domain của CloudFront và kiểm tra nào.
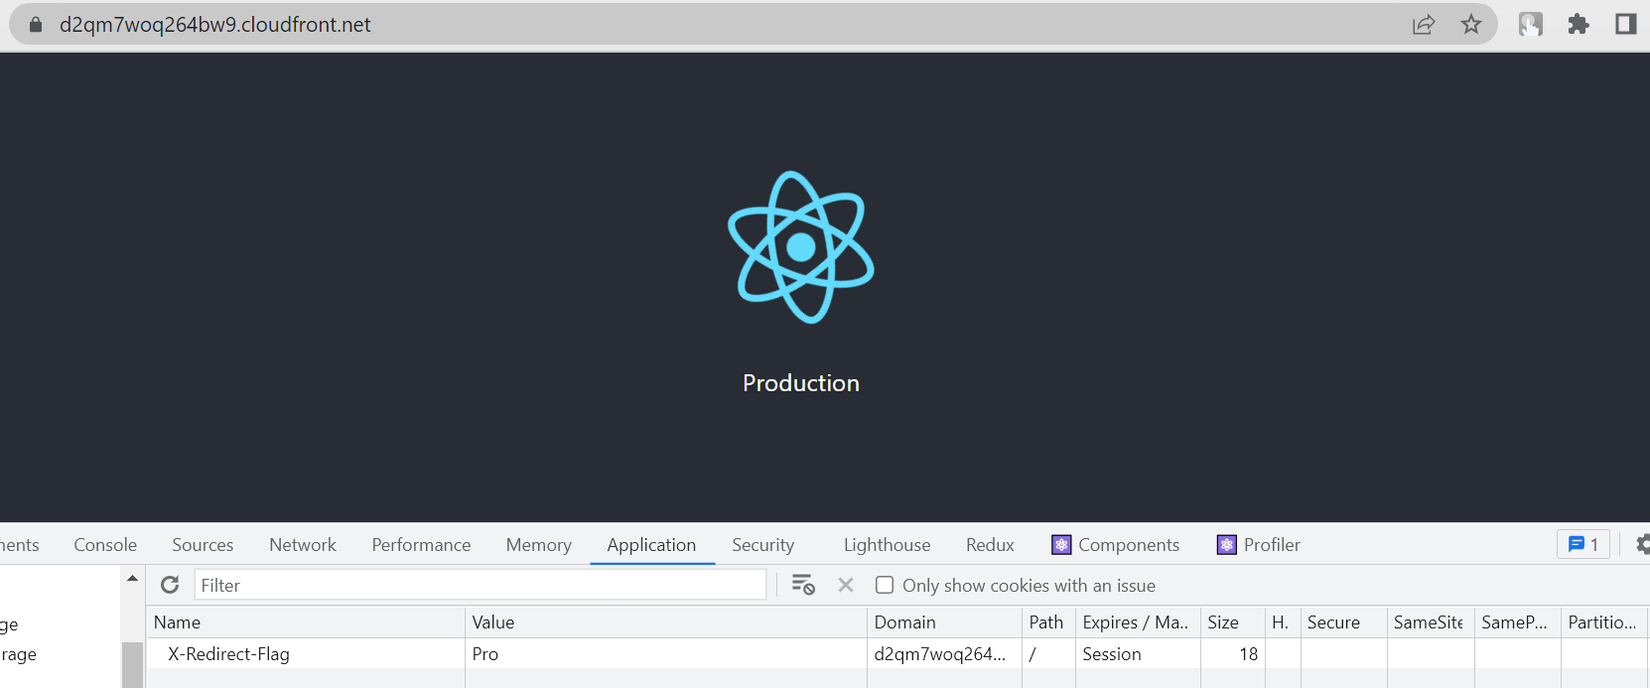
Lúc trang ta tải xong, bạn mở qua tab Application kiểm tra cookie sẽ thấy cookie mà ta set cho browser của client. Để test ta có thể nhảy qua trang pre pro được hay không, bạn sửa lại value của cookie lại thành Pre-Pro.
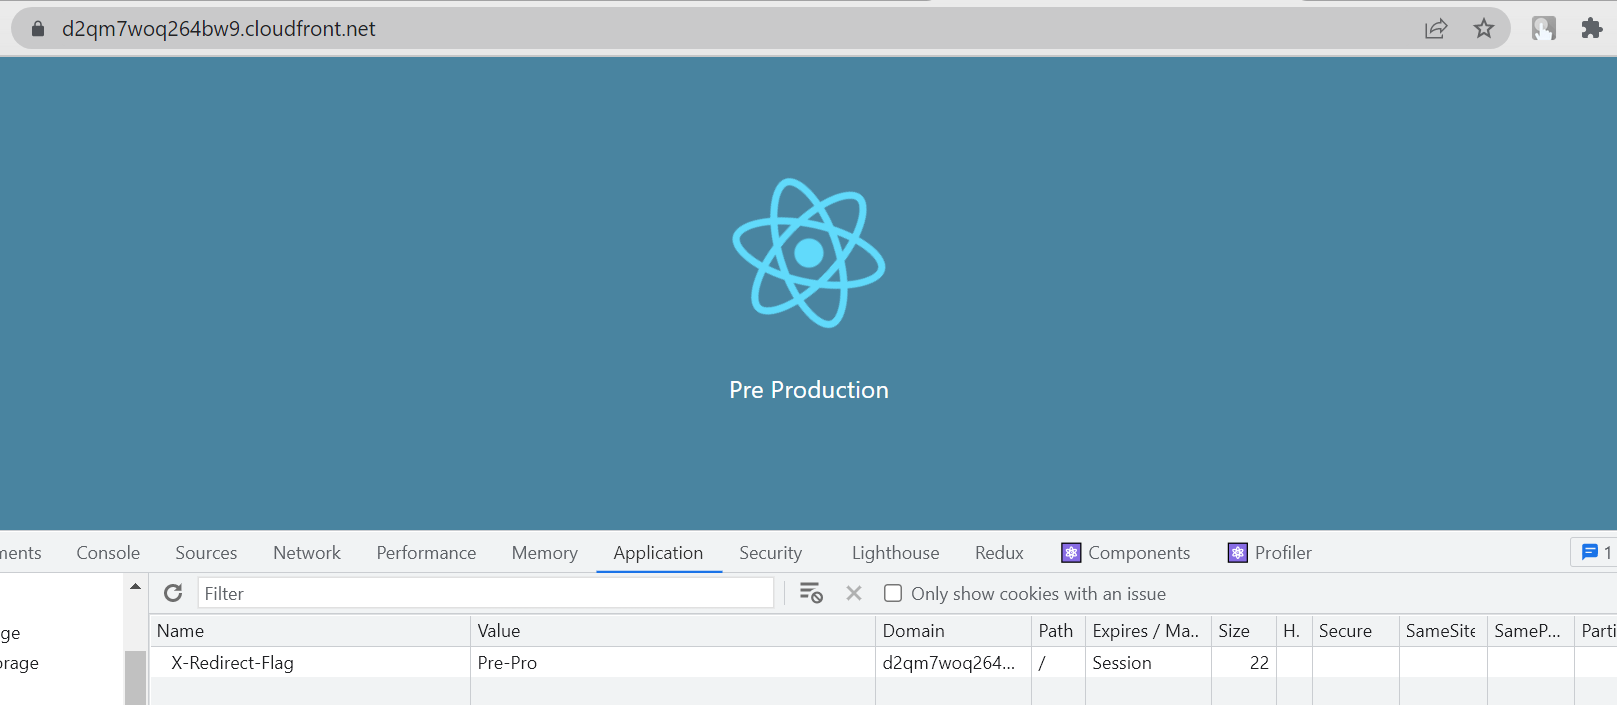
Oke, ta đã triển khai A/B Testing Deployment thành công 😁.
Kết luận
Vậy là ta đã tìm hiểu xong cách triển khai A/B Testing Deployment bằng Terraform, trong bài này thì ta cũng có code một chút, mà đối với role DevOps của chúng ta thì cũng không cần phải hiểu quá rõ về code làm gì, ta chỉ cần biết những cú pháp cơ bản và đọc hiểu code đơn giản là được. Nếu có thắc mắc hoặc cần giải thích rõ thêm chỗ nào thì các bạn có thể hỏi dưới phần comment. Bài tiếp theo ta sẽ tìm hiểu về chủ đề khá thú vị là sử dụng Terraform với Ansible.
Mục tìm kiếm đồng đội

Team công nghệ Hoàng Phúc của bọn mình được thành lập với nhiệm vụ là xây dựng một hệ thống công nghệ nội bộ cho công ty, Hoàng Phúc là một công ty bán lẻ trong lĩnh vực thời trang và có hơn 30 năm tuổi đời, với chuỗi cửa hàng rất nhiều trên toàn quốc, nên việc vận hành của Hoàng Phúc là rất lớn và việc xây dựng được một hệ thống công nghệ để đáp ứng việc vận hành nội bộ cho công ty là một công việc rất thử thách, đây là một quá trình chuyển đổi số và team bọn mình đã làm được những bước ban đầu.
Thứ mà team mình thấy cấn duy nhất là cái website, đây là trang web mà trước khi team mình được thành lập đã có một đội outsource khác làm, và những gì họ để lại cho bọn mình là một trang web với đống bùi nhùi, với số điểm từ google là 1 trên 100. Vậy bọn mình sẽ làm gì với trang web này đây, nản chí sao? Điều đó không có trong từ điển của hai sếp mình, và với sự dẫn dắt của hai sếp team mình sẽ biến đống website bùi nhùi đó thành kim cương, như cách bọn mình đã cải thiện hệ thống nội bộ. Bọn mình đang cải thiện trang web hằng ngày và hằng ngày, từ 1 điểm bọn mình đã cải thiện nó lên 70 điểm, và mục tiêu là trên 90 điểm.
Hiện tại team bọn mình đang cần các đồng đội tham gia để cải thiện lại trang web với số lượng người dùng truy cập khá lớn, đây là một thử thách rất thú vị, có bao giờ các bạn được tham gia thiết kế một hệ thống lớn từ đầu chưa, mình khá chắc là số lượng đó rất ít. Bọn mình đã có khách hàng, những gì còn lại là cần những đồng đội để cùng nhau phát triển một hệ thống để phục vụ rất nhiều người dùng. Mục tiêu của công ty Hoàng Phúc là trở thành nhà bán lẻ về thời trang lớn nhất Việt Nam, hãy tham gia với bọn mình nhé. Một thành viên trong team mình không yêu cần phải giỏi, chỉ cần hòa đồng, hợp tác và sẵn sàng hợp tác với nhau. Có thể bạn không là giỏi nhất nhưng nếu gia nhập với bọn mình thì bạn sẽ tạo ra được những thứ giá trị nhất.
Đồng đội Backend Engineer (Magento - PHP).
Đồng đội Senior Backend Engineer.
Đồng đội Senior Frontend Engineer.