1. Tạo tài khoản trên FCM console
Trước khi bắt đầu thì mọi người tạo tài khoản trên FCM console nhé, thao tác rất đơn giản. Thao tác xong thì tạo project, vào Project settings -> Service accounts, click Generate new private key, trình duyệt sẽ tự động download 1 file json service account. Mọi người lưu vào directory của mình để cấu hình nhé
Trên docs của firebase có guide hướng dẫn cụ thể, mọi người có thể tham khảo thêm: https://firebase.google.com/docs/cloud-messaging/auth-server
2. Gradle dependencies
Mọi người thêm firebase admin SDK vào
dependencies {
    implementation 'org.springframework.boot:spring-boot-starter-web'
    compileOnly 'org.projectlombok:lombok'
    annotationProcessor 'org.projectlombok:lombok'
    implementation group: 'com.google.firebase', name: 'firebase-admin', version: '8.1.0'
}
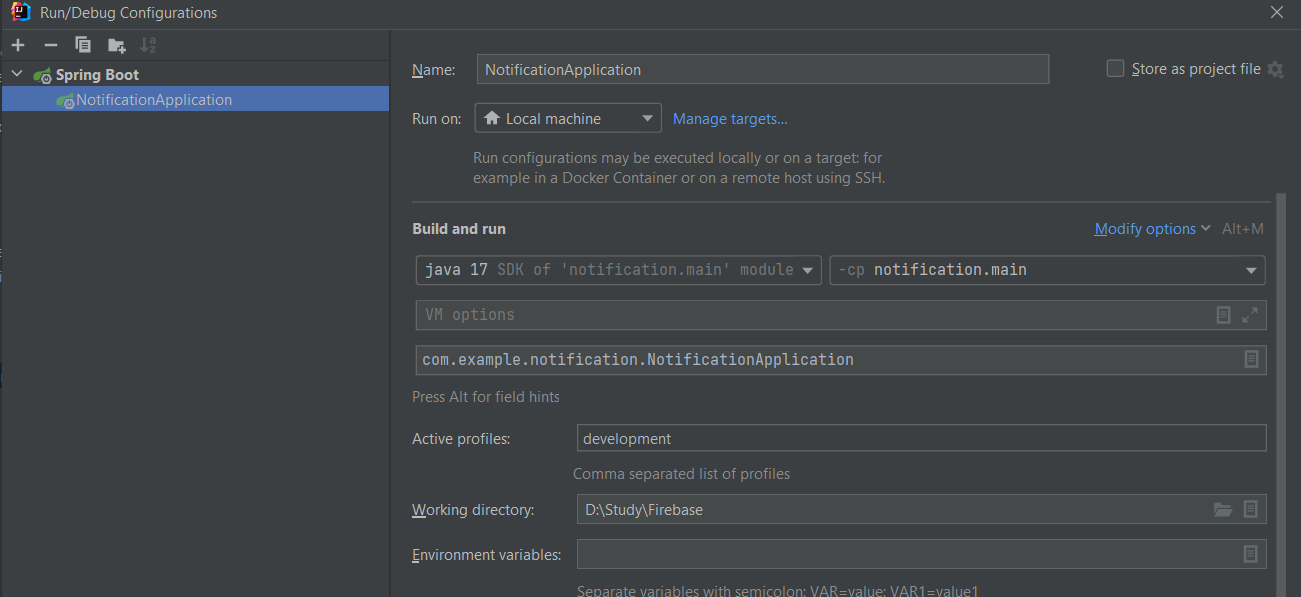
3. Set GOOGLE_APPLICATION_CREDENTIALS
Trong IDE của mọi người có thể set working directory của file firebase-service-account.json đã lưu.
config trong application.yml
firebase:
  googleCredentials: firebase-service-account.json
Thêm config bằng code
Tạo class FirebaseProperties
@Data
@Configuration
@ConfigurationProperties(prefix = "firebase")
public class FirebaseProperties {
    private String googleCredentials;
}
Tạo bean cho Firebasemessaging
@Configuration
@RequiredArgsConstructor
public class FirebaseConfig {
    private final FirebaseProperties firebaseProperties;

    @Bean
    FirebaseMessaging firebaseMessaging() throws IOException {
        GoogleCredentials googleCredentials=GoogleCredentials
                .fromStream(new FileInputStream(firebaseProperties.getGoogleCredentials()));
        FirebaseOptions firebaseOptions = FirebaseOptions
                .builder()
                .setCredentials(googleCredentials)
                .build();
        FirebaseApp app = FirebaseApp.initializeApp(firebaseOptions, "my-app");
        return FirebaseMessaging.getInstance(app);
    }
}
4. Push nofification
Trong package com.google.firebase.messaging có class Notification gồm các thuộc tính title, body, image.
Mình sẽ tạo 1 class tùy chỉnh nội dung Notice như sau:
@Data
@AllArgsConstructor
@NoArgsConstructor
public class Notice implements Serializable {
    /**
     * Subject notification on firebase
     */
    private String subject;
    /**
     * Content notification on firebase
     */
    private String content;
    /**
     * url ảnh đại diện đơn hàng
     */
    private String image;
    /**
     * Map các data
     */
    private Map<String, String> data;
    /**
     * FCM registration token
     */
    private List<String> registrationTokens;
}
Ở Notice mình để 1 list của registrationTokens là FCM registration token theo đầu thiết bị, tức là 1 user có thể đăng nhập vào nhiều thiết bị, mỗi thiết bị sẽ có FCM token riêng. Token này sẽ do client truyền lên server. Phần sau sẽ có hướng dẫn để gửi lấy token của FCM (bằng JS hoặc React)
Ở demo này mình sẽ làm case gửi MulticastMessage (gửi message cho nhiều thiết bị) Sử dụng interace BatchResponse của firebase-messaging. Đây là response sẽ nhận được khi firebaseMessaging send MulticastMessage. Mọi người sẽ nhận được List<SendResponse> là danh sách những message đã gửi được hoặc thất bại, successCount - số lượng message gửi thành công, failureCount - số lượng message gửi thất bại
Response from an operation that sends FCM messages to multiple recipients. See FirebaseMessaging.sendAll(List) and FirebaseMessaging.sendMulticast(MulticastMessage).

public interface BatchResponse {

  @NonNull
  List<SendResponse> getResponses();

  int getSuccessCount();

  int getFailureCount();
}
Code thôi ...
@Service
@RequiredArgsConstructor
@Slf4j
public class NotificationService {
    private final FirebaseMessaging firebaseMessaging;

    public BatchResponse sendNotification(Notice notice) {
        List<String> registrationTokens=notice.getRegistrationTokens();
        Notification notification = Notification.builder()
                .setTitle(notice.getSubject())
                .setBody(notice.getContent())
                .setImage(notice.getImage())
                .build();

        MulticastMessage message = MulticastMessage.builder()
                .addAllTokens(registrationTokens)
                .setNotification(notification)
                .putAllData(notice.getData())
                .build();

        BatchResponse batchResponse = null;
        try {
            batchResponse = firebaseMessaging.sendMulticast(message);
        } catch (FirebaseMessagingException e) {
            log.info("Firebase error {}", e.getMessage());
        }
        if (batchResponse.getFailureCount() > 0) {
            List<SendResponse> responses = batchResponse.getResponses();
            List<String> failedTokens = new ArrayList<>();
            for (int i = 0; i < responses.size(); i++) {
                if (!responses.get(i).isSuccessful()) {
                    failedTokens.add(registrationTokens.get(i));
                }
            }
            log.info("List of tokens that caused failures: " + failedTokens);
        }
        return batchResponse;
    }
}
Endpoint
@RestController
@RequestMapping("/firebase")
@RequiredArgsConstructor
public class NotificationController {
    private final NotificationService notificationService;

    @PostMapping("/send-notification")
    public BatchResponse sendNotification(@RequestBody Notice notice){
        return notificationService.sendNotification(notice);
    }
}
5. Test postman
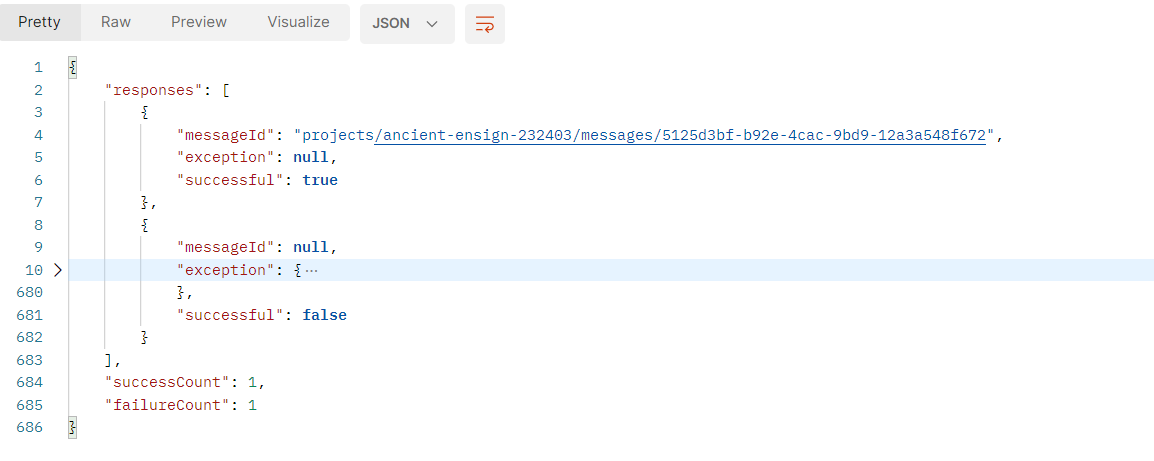
Mình sẽ gửi 1 response body với 1 valid token, 1 invalid token
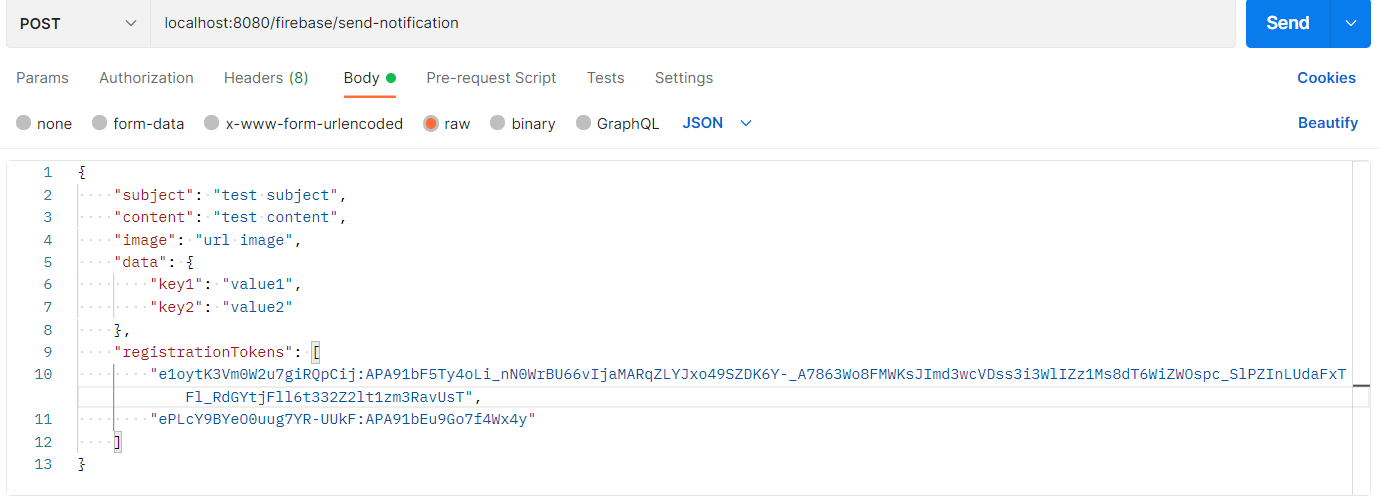
Response nhận được là 1 message thành công, 1 message thất bại, số lượng thành công & thất bại.
Link git tham khảo: https://github.com/phuonganh1992/spring-firebase-push-notification