In this article, we will see how to generate an RSS feed in laravel 9. Here, we will generate an RSS feed in laravel 7, laravel 8, and laravel 9. RSS stands for Really Simple Syndication. RSS is a web feed that allows users and applications to access updates to websites in a standardized, computer-readable format.
Nowadays many websites use an RSS feed to publish frequently updated information on the internet such as blog articles, news headlines, videos, etc. RSS uses the XML file format to generate the RSS feed.
So, let's see how to create an RSS feed in laravel 9, laravel 9 RSS feed generator, and laravel 7/8/9 RSS feed generator.
In this step, we will install laravel 9 using the following command.
composer create-project laravel/laravel laravel9_RSS_FeedIn this step, we will create migration and model using the following command.
php artisan make:migration create_articles_tableMigration:
<?php

use Illuminate\Database\Migrations\Migration;
use Illuminate\Database\Schema\Blueprint;
use Illuminate\Support\Facades\Schema;

return new class extends Migration
{
    /**
     * Run the migrations.
     *
     * @return void
     */
    public function up()
    {
        Schema::create('articles', function (Blueprint $table) {
            $table->id();
            $table->string('title');
            $table->string('slug');
            $table->text('body');
            $table->timestamps();
        });
    }

    /**
     * Reverse the migrations.
     *
     * @return void
     */
    public function down()
    {
        Schema::dropIfExists('articles');
    }
};
Now, migrate the table into the database using the following command.
php artisan migrateAfter that, we will create an Article model using the following command.
php artisan make:model ArticleIn the Article model, we will add a column's name.
app/Models/Articles.php
<?php

namespace App\Models;

use Illuminate\Database\Eloquent\Factories\HasFactory;
use Illuminate\Database\Eloquent\Model;

class Article extends Model
{
    use HasFactory;

    protected $fillable = [
        'title', 'slug', 'body'
    ];
}
Now, we will create dummy records using the laravel factory. we will create an Article factory class using the following command and generate dummy records using tinker.
php artisan make:factory ArticleFactorydatabase/factories/ArticleFactory.php
<?php

namespace Database\Factories;

use Illuminate\Database\Eloquent\Factories\Factory;
use App\Models\Article;
use Illuminate\Support\Str;

/**
 * @extends \Illuminate\Database\Eloquent\Factories\Factory<\App\Models\Article>
 */
class ArticleFactory extends Factory
{
    /**
     * The name of the factory's corresponding model.
     *
     * @var string
     */
    protected $model = Article::class;
    /**
     * Define the model's default state.
     *
     * @return array

     */
    public function definition()
    {
        return [
            'title' => $this->faker->text(),
            'slug' => Str::slug($this->faker->text()),
            'body' => $this->faker->paragraph()
        ];
    }
}
After that, we will run the tinker command and create fake records.
php artisan tinker

App\Models\Article::factory()->count(50)->create();In this step, we will add routes in the web.php file.
routes/web.php
<?php

use Illuminate\Support\Facades\Route;

use App\Http\Controllers\RSSFeedController;

/*
|--------------------------------------------------------------------------
| Web Routes
|--------------------------------------------------------------------------
|
| Here is where you can register web routes for your application. These
| routes are loaded by the RouteServiceProvider within a group which
| contains the "web" middleware group. Now create something great!
|
*/

Route::get('rssfeed', [RSSFeedController::class, 'index']);Now, create a controller and add the index() function to the RSSFeedController File. So, add the below code to that file.
app/Http/Controllers/RSSFeedController.php
<?php

namespace App\Http\Controllers;

use Illuminate\Http\Request;
use App\Models\Article;

class RSSFeedController extends Controller
{
    /**
     * Write code on Method
     *
     * @return response()
     */
    public function index()
    {
        $articles = Article::latest()->get();

        return response()->view('rss', [
            'articles' => $articles
        ])->header('Content-Type', 'text/xml');
    }
}
In this step, we will create a rss.blade.php file and generate the RSS feed.
resources/views/rss.blade.php
<?= '<?xml version="1.0" encoding="UTF-8"?>' ?>
<rss version="2.0">
    <channel>
        <title> Websolutionstuff | Web Developing Website </title>
        <link> http://websolutionstuff.com/ </link>
        <description> The websolutionstuff website is provides different types of examples and tutorials like Laravel, PHP, JavaScript, jQuery, HTML, CSS, Bootstrap, SQL and so on. </description>
        <language>en-us</language>
        @foreach($articles as $article)
            <item>
                <title>{{$article->title}}</title>
                <link>{{$article->slug}}</link>
                <description>{{$article->body}}</description>
                <author>Websolutionstuff</author>
                <pubDate>{{$article->created_at->toRssString()}}</pubDate>
            </item>
        @endforeach
    </channel>
</rss>Now, run the RSS Feed generator using the following command.
php artisan serveOpen the below URL in your browser.
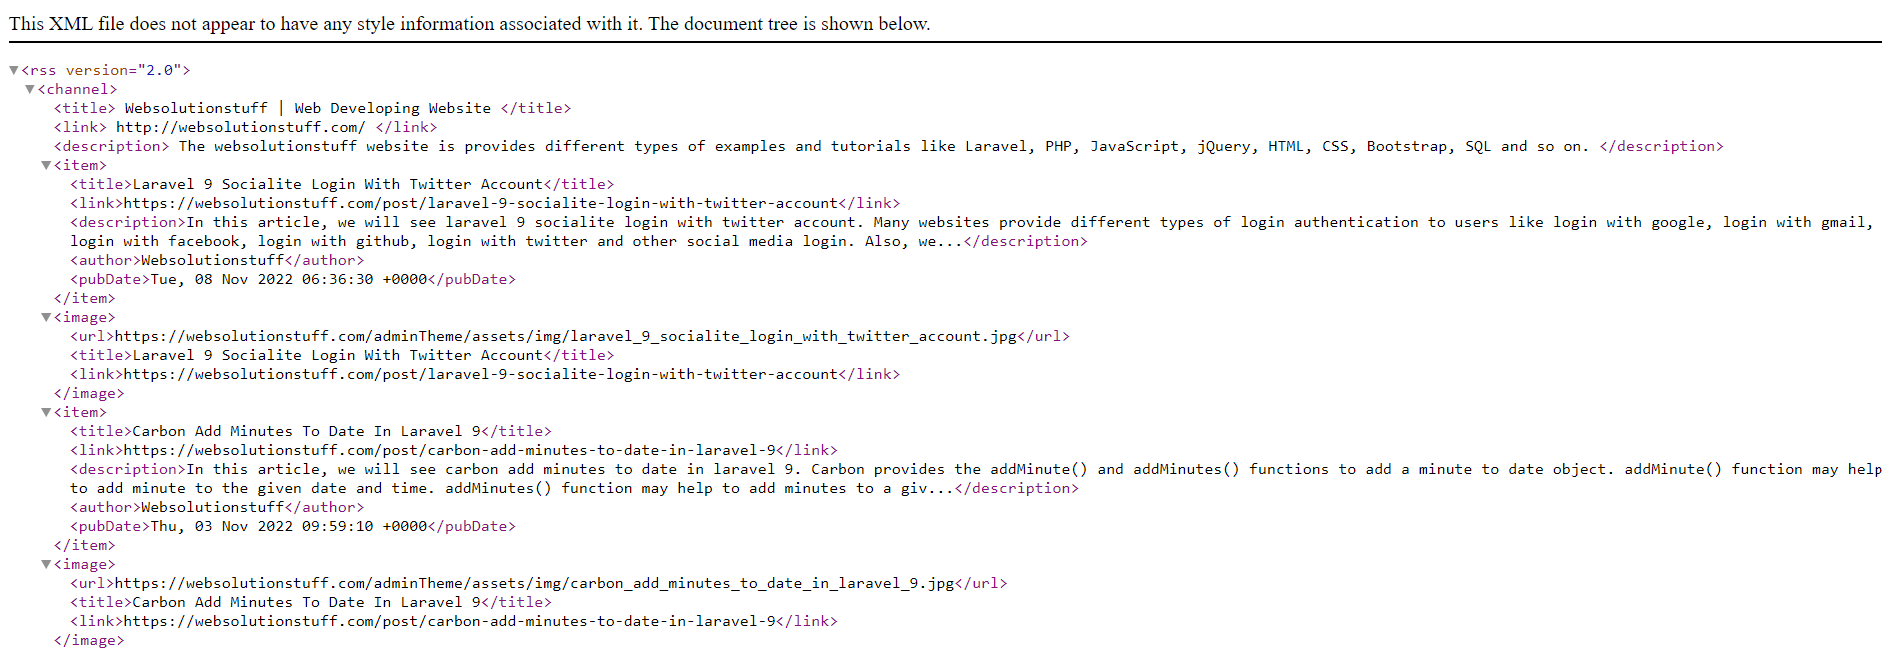
Output:
You might also like:
- Read Also: Laravel 8 Database Seeder Example
- Read Also: Crop Image Before Upload Using Croppie Plugin
- Read Also: Laravel 8 Export Buttons In Datatables Example
- Read Also: How To Create Dynamic XML Sitemap In Laravel 9


