Introduction
Chào các bạn, trong bài viết này, chúng ta sẽ cùng tìm hiểu cách xây dựng một ứng dụng Flutter, với Provider pattern, bài viết này khá dài, nhưng sẽ chi tiết các file, bao gồm đầy đủ các bước từ xây dựng UI, tạo request api để hiển thị reponse.
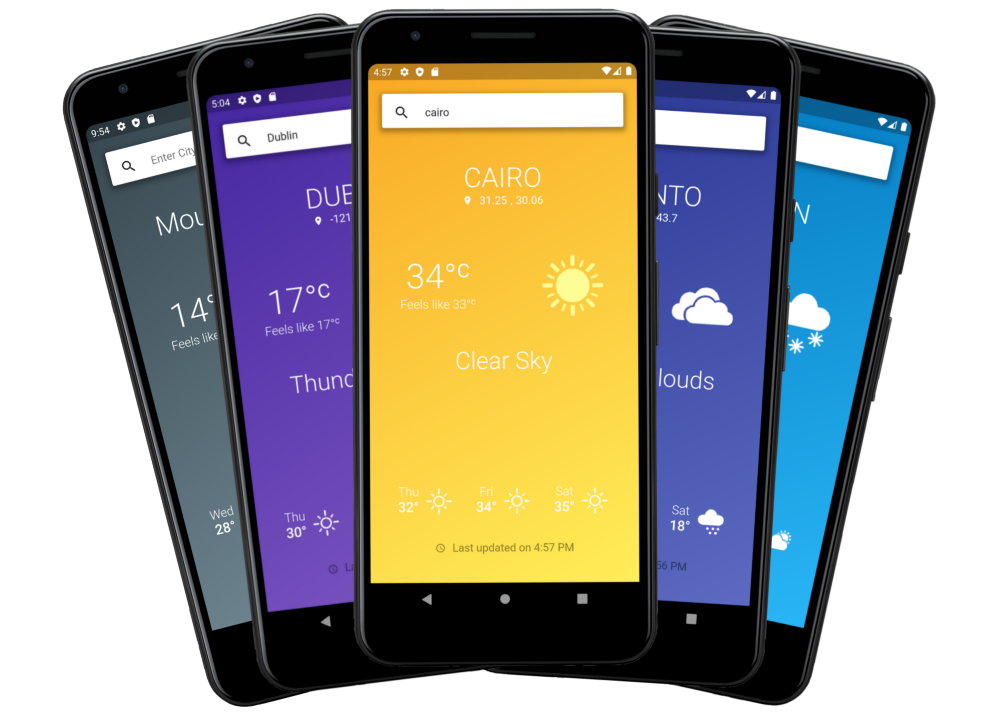
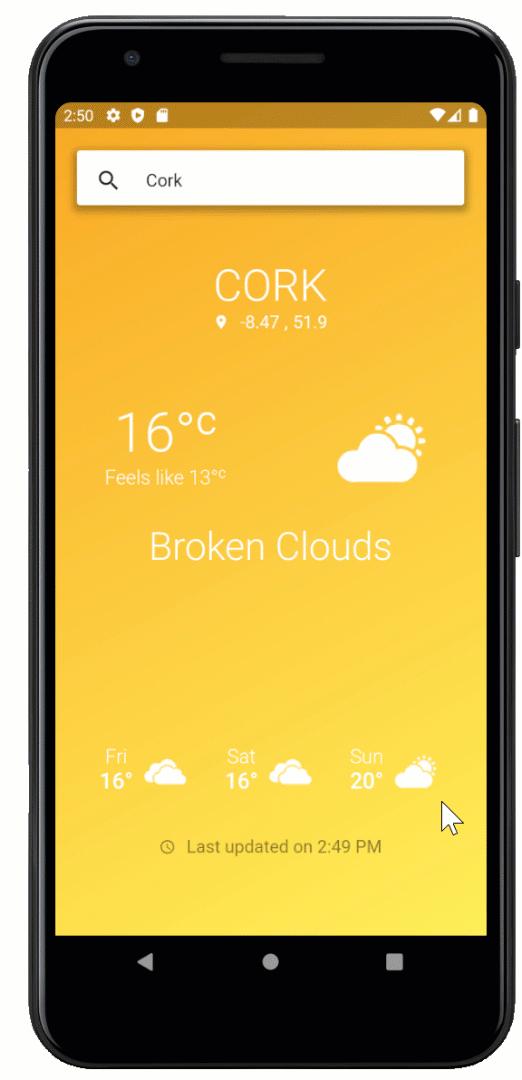
Ứng dụng mà chúng ta sẽ xây dựng bao gồm một màn hình duy nhất, mà trên đó người dùng có thể nhập vào tên của một thành phố. Hiển thị thời tiết cho ngày hiện tại và dự đoán cho 3 ngày. Giao diện ứng dụng cũng thích ứng với điều kiện thời tiết ban đêm hoặc ban ngày.
Assumptions
Giả định rằng bạn ít nhất đã quen thuộc với Flutter, Provider and Flutter widgets như Scaffold , Row, Column, SizedBox và Container. Nếu không thì bạn cũng có thể tìm hiểu trước khi đọc bài viết này.
Getting Started
Chúng ta sẽ sử dụng IDE Visual Code Studio và sẽ nhắm đến xây dựng cho Android devices
▹ Create a new Flutter app trong VS Code hoặc sử dụng Flutter CLI:
flutter create weather_app
▹ Tiếp theo, chúng ta cần thêm provider, http và intl dependencies cho project. Để thực hiện điều này, cập nhật file pubspec.yaml để giống với image bên dưới.
 ▹ Cài đặt packages sử dụng Flutter CLI pub get command:
flutter pub get
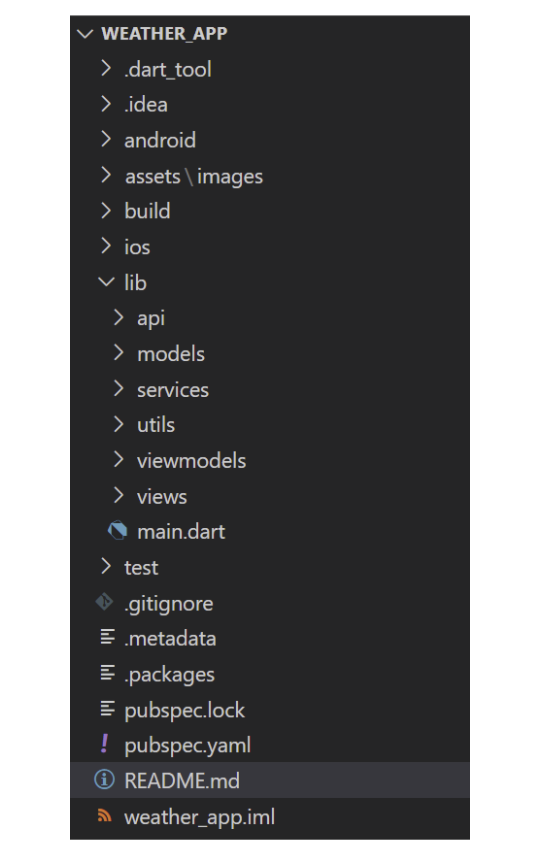
▹ Navigate tới directory lib của project và tạo directory structure hiển thị như bên dưới.
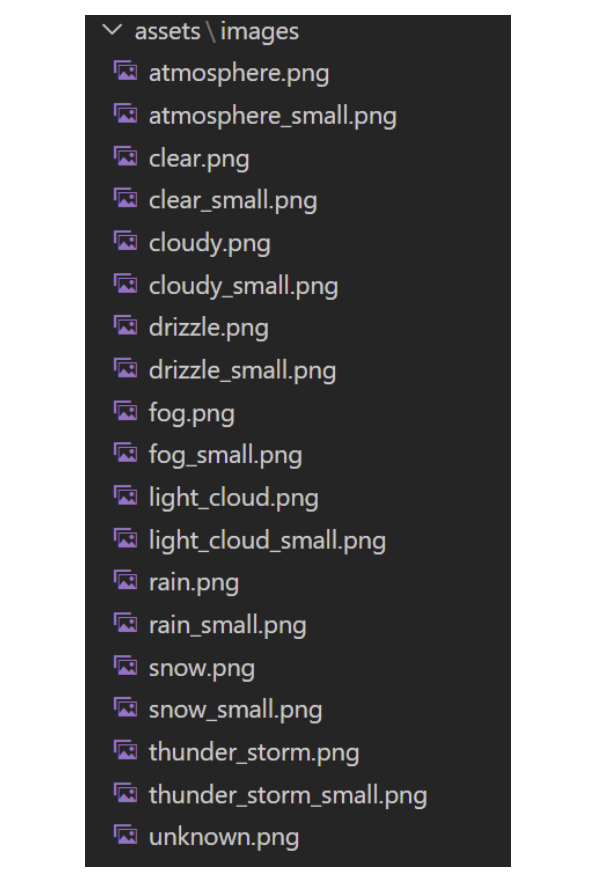
▹ Tiếp theo, tạo một asset section trong pubspec.yaml file và thêm đường dẫn tới folder images.

▹ Copy weather condition images(hình ảnh điều kiện thời tiết) của bạn vào thư mục images của bạn.
Architecture
Đối với một phân tích chi tiết architecture (kiến trúc) của Weather App , chúng ta hãy tham khảo sơ đồ sau đây:
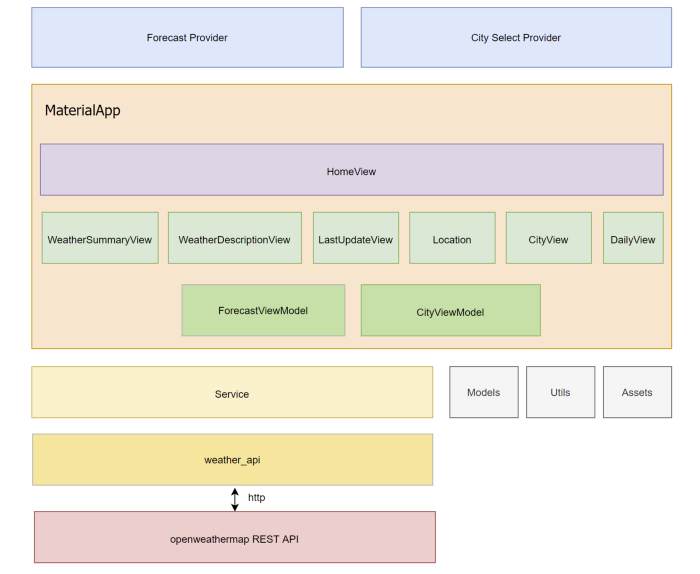
Trong hình này, phía trên, hộp màu xanh là Provider layer của chúng ta. Các Providers là hàng đầu tiên, vì vậy chúng ta có thể cung cấp dữ liệu cho tất cả các widgets phía dưới.
Ứng dụng của chúng ta sẽ có một màn hình Home duy nhất, HomeView, được chia nhỏ thành nhiều custom views, một View là một widget được tạo thành từ các widget khác. Để quản lý những view này, cung cấp cho chúng data và call function, chúng ta có ViewModels
Một View sẽ được rebuilt từ ViewModel khi state đã được thay đổi và một view sẽ chỉ tương tác với ViewModel của nó. ViewModels có thể tương tác với một service, view thì không nên. Ngoài ra không có quản lý state trong views, thay vào đó state sẽ được giữ trong ViewModel của nó.
Service layer chứa một single class ẩn chi tiết thực hiện REST API. Layer này trả về plain old dart objects của model forecast.
Những phần sau sẽ chi tiết việc thực hiện ứng dụng thời tiết dựa trên kiến trúc trên.
openweathermap.org REST API
Ứng dụng này sử dụng các API REST của openweathermap.org để lấy weather forecast(dự báo thời tiết). Để bắt đầu với openweathermap.org bạn sẽ cần phải tạo một tài khoản miễn phí và có được một APP_ID. APP_ID này phải được passed(thông qua) với mỗi API request.
Các One Call API trả về hiện tại và dự báo dữ liệu thời tiết (không bắt buộc theo giờ, phút và hàng ngày) cho tọa độ cung cấp. Để có được tọa độ của thành phố nhập vào bởi người sử dụng, chúng ta sẽ sử dụng Current Weather API. Trả về thời tiết hiện tại và tọa độ của thành phố.
Để xác minh APP_ID của bạn, bạn có thể nhấn REST API thông qua trình duyệt của bạn. Thay APP_ID của bạn trong URL dưới đây và bạn sẽ thấy JSON, đại diện cho các tọa độ thời tiết và thành phố hiện tại.
https://samples.openweathermap.org/data/2.5/weather?q=London&appid=439d4b804bc8187953eb36d2a8c26a02
{
    "coord": {
        "lon": -0.13,
        "lat": 51.51
    },
    "weather": [
        {
            "id": 300,
            "main": "Drizzle",
            "description": "light intensity drizzle",
            "icon": "09d"
        }
    ],
    "base": "stations",
    "main": {
        "temp": 280.32,
        "pressure": 1012,
        "humidity": 81,
        "temp_min": 279.15,
        "temp_max": 281.15
    },
    "visibility": 10000,
    "wind": {
        "speed": 4.1,
        "deg": 80
    },
    "clouds": {
        "all": 90
    },
    "dt": 1485789600,
    "sys": {
        "type": 1,
        "id": 5091,
        "message": 0.0103,
        "country": "GB",
        "sunrise": 1485762037,
        "sunset": 1485794875
    },
    "id": 2643743,
    "name": "London",
    "cod": 200
}
Để kiểm tra One Call APIenpoint nhập URL dưới đây, thay APP_ID của bạn.
{
    "lat": 51.9,
    "lon": -8.47,
    "timezone": "Europe/Dublin",
    "timezone_offset": 3600,
    "current": {
        "dt": 1598893031,
        "sunrise": 1598852699,
        "sunset": 1598901819,
        "temp": 288.67,
        "feels_like": 285.44,
        "pressure": 1017,
        "humidity": 82,
        "dew_point": 285.61,
        "uvi": 4.68,
        "clouds": 75,
        "visibility": 10000,
        "wind_speed": 5.7,
        "wind_deg": 180,
        "weather": [
            {
                "id": 803,
                "main": "Clouds",
                "description": "broken clouds",
                "icon": "04d"
            }
        ]
    },
    "daily": [
        {
            "dt": 1598875200,
            "sunrise": 1598852699,
            "sunset": 1598901819,
            "temp": {
                "day": 288.67,
                "min": 286.54,
                "max": 288.67,
                "night": 287.19,
                "eve": 288.32,
                "morn": 288.67
            },
            "feels_like": {
                "day": 285.39,
                "night": 284.85,
                "eve": 285.91,
                "morn": 285.39
            },
            "pressure": 1017,
            "humidity": 82,
            "dew_point": 285.61,
            "wind_speed": 5.78,
            "wind_deg": 187,
            "weather": [
                {
                    "id": 500,
                    "main": "Rain",
                    "description": "light rain",
                    "icon": "10d"
                }
            ],
            "clouds": 75,
            "pop": 0.32,
            "rain": 0.29,
            "uvi": 4.68
        },
        {
            "dt": 1598961600,
            "sunrise": 1598939196,
            "sunset": 1598988084,
            "temp": {
                "day": 290.35,
                "min": 285.69,
                "max": 290.59,
                "night": 285.96,
                "eve": 288.09,
                "morn": 287.19
            },
            "feels_like": {
                "day": 287.38,
                "night": 283.88,
                "eve": 285.46,
                "morn": 284.76
            },
            "pressure": 1018,
            "humidity": 83,
            "dew_point": 287.56,
            "wind_speed": 6.19,
            "wind_deg": 168,
            "weather": [
                {
                    "id": 500,
                    "main": "Rain",
                    "description": "light rain",
                    "icon": "10d"
                }
            ],
            "clouds": 88,
            "pop": 0.46,
            "rain": 0.73,
            "uvi": 4.8
        }
    ]
}
Models
Chúng ta cần phải consume (tiêu thụ) dữ liệu JSON được trả về bởi hai endpoints(điểm đầu cuối) trên.
weather.dart
Tạo một file gọi là weather.dart trong \lib\models và dán vào đoạn code dưới đây
import 'package:weather_app/utils/strings.dart';

enum WeatherCondition {
  thunderstorm,
  drizzle,
  rain,
  snow,
  atmosphere, // dust, ash, fog, sand etc.
  mist,
  fog,
  lightCloud,
  heavyCloud,
  clear,
  unknown
}

class Weather {
  final WeatherCondition condition;
  final String description;
  final double temp;
  final double feelLikeTemp;
  final int cloudiness;
  final DateTime date;

  Weather(
      {this.condition,
      this.description,
      this.temp,
      this.feelLikeTemp,
      this.cloudiness,
      this.date});

  static Weather fromDailyJson(dynamic daily) {
    var cloudiness = daily['clouds'];
    var weather = daily['weather'][0];

    return Weather(
        condition: mapStringToWeatherCondition(weather['main'], cloudiness),
        description: Strings.toTitleCase(weather['description']),
        cloudiness: cloudiness,
        temp: daily['temp']['day'].toDouble(),
        date: DateTime.fromMillisecondsSinceEpoch(daily['dt'] * 1000,
            isUtc: true),
        feelLikeTemp: daily['feels_like']['day'].toDouble());
  }

  static WeatherCondition mapStringToWeatherCondition(
      String input, int cloudiness) {
    WeatherCondition condition;
    switch (input) {
      case 'Thunderstorm':
        condition = WeatherCondition.thunderstorm;
        break;
      case 'Drizzle':
        condition = WeatherCondition.drizzle;
        break;
      case 'Rain':
        condition = WeatherCondition.rain;
        break;
      case 'Snow':
        condition = WeatherCondition.snow;
        break;
      case 'Clear':
        condition = WeatherCondition.clear;
        break;
      case 'Clouds':
        condition = (cloudiness >= 85)
            ? WeatherCondition.heavyCloud
            : WeatherCondition.lightCloud;
        break;
      case 'Mist':
        condition = WeatherCondition.mist;
        break;
      case 'fog':
        condition = WeatherCondition.fog;
        break;
      case 'Smoke':
      case 'Haze':
      case 'Dust':
      case 'Sand':
      case 'Ash':
      case 'Squall':
      case 'Tornado':
        condition = WeatherCondition.atmosphere;
        break;
      default:
        condition = WeatherCondition.unknown;
    }

    return condition;
  }
}
▹ Các WeatherConditions enum định nghĩa các weather condition(điều kiện thời tiết) có thể được trả về bởi REST API. weather condition được trả về trong dữ liệu JSON được ánh xạ tới một giá trị enum tương ứng.
▹ Method fromDailyJson là một method thuận tiện cho việc tạo ra một instance Weather mới từ response body.
▹ Class không extend hay mix ChangeNotifier. ViewModels của chúng ta sẽ chịu trách nhiệm gọi notifyListeners.
forecast.dart
Tiếp theo, tạo một class gọi là forecast.dart trong \lib\models.
import 'package:weather_app/models/weather.dart';

class Forecast {
  final DateTime lastUpdated;
  final double longitude;
  final double latitude;
  final List<Weather> daily;
  final Weather current;
  final bool isDayTime;
  String city;

  Forecast(
      {this.lastUpdated,
      this.longitude,
      this.latitude,
      this.daily: const [],
      this.current,
      this.city,
      this.isDayTime});

  static Forecast fromJson(dynamic json) {
    var weather = json['current']['weather'][0];
    var date = DateTime.fromMillisecondsSinceEpoch(json['current']['dt'] * 1000,
        isUtc: true);

    var sunrise = DateTime.fromMillisecondsSinceEpoch(
        json['current']['sunrise'] * 1000,
        isUtc: true);

    var sunset = DateTime.fromMillisecondsSinceEpoch(
        json['current']['sunset'] * 1000,
        isUtc: true);

    bool isDay = date.isAfter(sunrise) && date.isBefore(sunset);

    // get the forecast for the next 3 days, excluding the current day
    bool hasDaily = json['daily'] != null;
    var tempDaily = [];
    if (hasDaily) {
      List items = json['daily'];
      tempDaily = items
          .map((item) => Weather.fromDailyJson(item))
          .toList()
          .skip(1)
          .take(3)
          .toList();
    }

    var currentForcast = Weather(
        cloudiness: int.parse(json['current']['clouds'].toString()),
        temp: json['current']['temp'].toDouble(),
        condition: Weather.mapStringToWeatherCondition(
            weather['main'], int.parse(json['current']['clouds'].toString())),
        description: weather['description'],
        feelLikeTemp: json['current']['feels_like'],
        date: date);

    return Forecast(
        lastUpdated: DateTime.now(),
        current: currentForcast,
        latitude: json['lat'].toDouble(),
        longitude: json['lon'].toDouble(),
        daily: tempDaily,
        isDayTime: isDay);
  }
}
▹ Class mày sẽ là model của weather hiện tại và forecast (dự báo) 3 ngày .
▹ Trong quá trình decoding dữ liệu JSON, chúng ta sẽ so sánh thời gian hiện tại với thời gian mặt trời mọc và lặn để xác định xem nó là ngày hay đêm tại địa điểm.
location.dart
Class model cuối cùng của chúng ta là location.dart
Ở đây chúng ta đang mô hình hóa một vị trí thành phố và method fromJson sẽ giúp tạo ra một instance Location từ JSON response data.
class Location {
  final double longitude;
  final double latitude;

  Location({
    this.longitude,
    this.latitude,
  });

  static Location fromJson(dynamic json) {
    return Location(
        longitude: json['coord']['lon'].toDouble(),
        latitude: json['coord']['lat'].toDouble());
  }
}
Weather API
Chúng ta cần phát triển một class để tạo requests HTTP tới openweathermap.org API endpoints và trả về instances của các class model của chúng ta ở trên
import 'dart:convert';
import 'package:http/http.dart' as http;
import 'package:weather_app/api/weather_api.dart';
import 'package:weather_app/models/forecast.dart';
import 'dart:developer';

import 'package:weather_app/models/location.dart';

class OpenWeatherMapWeatherApi extends WeatherApi {
  static const endPointUrl = 'https://api.openweathermap.org/data/2.5';
  static const apiKey = "<insert api_id here>";
  http.Client httpClient;

  OpenWeatherMapWeatherApi() {
    this.httpClient = new http.Client();
  }

  Future<Location> getLocation(String city) async {
    final requestUrl = '$endPointUrl/weather?q=$city&APPID=$apiKey';
    final response = await this.httpClient.get(Uri.encodeFull(requestUrl));

    if (response.statusCode != 200) {
      throw Exception(
          'error retrieving location for city $city: ${response.statusCode}');
    }

    return Location.fromJson(jsonDecode(response.body));
  }

  @override
  Future<Forecast> getWeather(Location location) async {
    final requestUrl =
        '$endPointUrl/onecall?lat=${location.latitude}&lon=${location.longitude}&exclude=hourly,minutely&APPID=$apiKey';
    final response = await this.httpClient.get(Uri.encodeFull(requestUrl));

    if (response.statusCode != 200) {
      throw Exception('error retrieving weather: ${response.statusCode}');
    }

    return Forecast.fromJson(jsonDecode(response.body));
  }
}
Như đã đề cập trước đó, chúng ta cần phải có được các tọa độ cho một thành phố trước và sau đó truyền nó cho những API khác để có được thời tiết hiện tại và dự báo 3 ngày. Một instance HttpClient xử lý network requests và
chúng ta sẽ parse response JSON thành các model tương ứng bằng cách sử dụng jsonDecode function.
Service
Chúng ta có thể consume(tiêu thụ) class weather API trực tiếp trong lớp ViewModel và loại bỏ một architecture layer nhưng tốt nhất là tách implementation chi tiết từ client code.
Class OpenWeatherMapWeatherApi extends một abstract class WeatherApi. Abstract class này sẽ cung cấp một public-facing interface mà service layer code của chúng ta sẽ tương tác với. Điều này sẽ ẩn đi chi tiết implementation weather api cụ thể và để lại
code của chúng ta chỉ biết về các function và các model được trả về bởi các định nghĩa phương pháp abstract class.
import 'package:weather_app/models/location.dart';

abstract class WeatherApi {
  Future<Forecast> getWeather(Location location);
  Future<Location> getLocation(String city);
}
Service layer bao gồm mộtsingle class hoạt động như một wrapper xung quanh instance là một WeatherApi. Nó exposes mộtsingle method chấp nhận một city và returns một instance model Forecast của chúng ta.
import 'package:weather_app/models/forecast.dart';

class ForecastService {
  final WeatherApi weatherApi;
  ForecastService(this.weatherApi);

  Future<Forecast> getWeather(String city) async {
    final location = await weatherApi.getLocation(city);
    return await weatherApi.getWeather(location);
  }
}
Presentation
Nó luôn luôn là thực hành tốt để phá vỡ bố trí màn hình của bạn thành nhiều widget tùy chỉnh. Thứ nhất, nó làm giảm sự phức tạp của màn hình của bạn và giảm đáng kể số lượng các widget lồng nhau trong một file cá nhân.
Một lợi ích khác là tách mối quan tâm — một sự thay đổi cho một widget không ảnh hưởng đến widget khác.
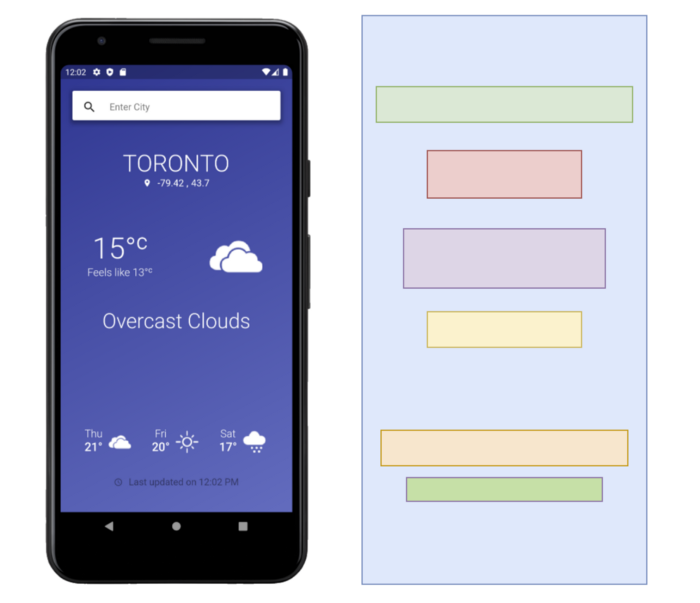
App
Để cho weather data models có sẵn cho tất cả các widget thì chúng ta wrap phần top của widget tree trong một MultiProvider widget, mỗi child ChangeNotifierProvider chịu trách nhiệm cho việc tạo một single instance của một ViewModel class.
App của chúng ta là một StatelessWidget mà sẽ builds MaterialApp và HomeView widget.
import 'package:flutter/material.dart';
import 'package:weather_app/viewModels/city_entry_viewmodel.dart';
import 'viewModels/forecast_view_model.dart';
import 'views/home_view.dart';
import 'package:provider/provider.dart';

void main() {
  runApp(MultiProvider(providers: [
    ChangeNotifierProvider<CityEntryViewModel>(
        create: (_) => CityEntryViewModel()),
    ChangeNotifierProvider<ForecastViewModel>(
        create: (_) => ForecastViewModel()),
  ], child: MyApp()));
}

class MyApp extends StatelessWidget {
  @override
  Widget build(BuildContext context) {
    return MaterialApp(
      title: 'Weather Provider',
      home: HomeView(),
      debugShowCheckedModeBanner: false,
    );
  }
}
HomeView
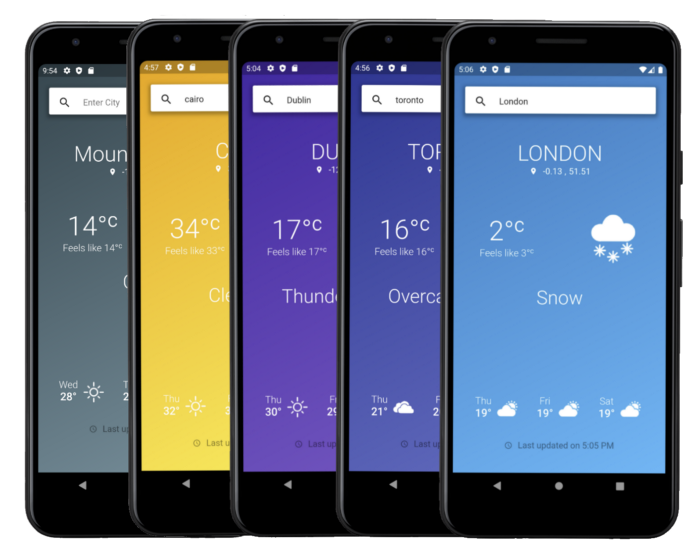
Widget phức tạp nhất của chúng ta, HomeView widget sẽ builds screen UI, hỗ trợ pull-to-refresh, tạo một background gradient và hiển thi một busy indicator.
import 'package:flutter/material.dart';
import 'package:weather_app/models/weather.dart';
import 'package:provider/provider.dart';
import 'package:weather_app/viewModels/city_entry_viewmodel.dart';

import 'package:weather_app/viewModels/forecast_view_model.dart';
import 'package:weather_app/views/weather_description_view.dart';
import 'package:weather_app/views/weather_summary.dart';
import 'package:weather_app/views/gradient_container.dart';

import 'city_entry_view.dart';
import 'daily_summary_view.dart';
import 'last_update_view.dart';
import 'location_view.dart';

class HomeView extends StatefulWidget {
  @override
  _HomeViewState createState() => _HomeViewState();
}

class _HomeViewState extends State<HomeView> {
  @override
  void initState() {
    super.initState();

    onStart();
  }

  Future<void> onStart() async {
    // any init in here ?
  }

  @override
  Widget build(BuildContext context) {
    return Consumer<ForecastViewModel>(
      builder: (context, model, child) => Scaffold(
        body: _buildGradientContainer(
            model.condition, model.isDaytime, buildHomeView(context)),
      ),
    );
  }

  Widget buildHomeView(BuildContext context) {
    return Consumer<ForecastViewModel>(
        builder: (context, weatherViewModel, child) => Container(
            height: MediaQuery.of(context).size.height,
            child: RefreshIndicator(
                color: Colors.transparent,
                backgroundColor: Colors.transparent,
                onRefresh: () => refreshWeather(weatherViewModel, context),
                child: ListView(
                  children: <Widget>[
                    CityEntryView(),
                    weatherViewModel.isRequestPending
                        ? buildBusyIndicator()
                        : weatherViewModel.isRequestError
                            ? Center(
                                child: Text('Ooops...something went wrong',
                                    style: TextStyle(
                                        fontSize: 21, color: Colors.white)))
                            : Column(children: [
                                LocationView(
                                  longitude: weatherViewModel.longitude,
                                  latitude: weatherViewModel.latitide,
                                  city: weatherViewModel.city,
                                ),
                                SizedBox(height: 50),
                                WeatherSummary(
                                    condition: weatherViewModel.condition,
                                    temp: weatherViewModel.temp,
                                    feelsLike: weatherViewModel.feelsLike,
                                    isdayTime: weatherViewModel.isDaytime),
                                SizedBox(height: 20),
                                WeatherDescriptionView(
                                    weatherDescription:
                                        weatherViewModel.description),
                                SizedBox(height: 140),
                                buildDailySummary(weatherViewModel.daily),
                                LastUpdatedView(
                                    lastUpdatedOn:
                                        weatherViewModel.lastUpdated),
                              ]),
                  ],
                ))));
  }

  Widget buildBusyIndicator() {
    return Column(mainAxisAlignment: MainAxisAlignment.center, children: [
      CircularProgressIndicator(
          valueColor: new AlwaysStoppedAnimation<Color>(Colors.white)),
      SizedBox(
        height: 20,
      ),
      Text('Please Wait...',
          style: TextStyle(
            fontSize: 18,
            color: Colors.white,
            fontWeight: FontWeight.w300,
          ))
    ]);
  }

  Widget buildDailySummary(List<Weather> dailyForecast) {
    return Row(
        mainAxisAlignment: MainAxisAlignment.center,
        children: dailyForecast
            .map((item) => new DailySummaryView(
                  weather: item,
                ))
            .toList());
  }

  Future<void> refreshWeather(
      ForecastViewModel weatherVM, BuildContext context) {
    // get the current city
    String city = Provider.of<CityEntryViewModel>(context, listen: false).city;
    return weatherVM.getLatestWeather(city);
  }

  GradientContainer _buildGradientContainer(
      WeatherCondition condition, bool isDayTime, Widget child) {
    GradientContainer container;

    // if night time then just default to a blue/grey
    if (isDayTime != null && !isDayTime)
      container = GradientContainer(color: Colors.blueGrey, child: child);
    else {
      switch (condition) {
        case WeatherCondition.clear:
        case WeatherCondition.lightCloud:
          container = GradientContainer(color: Colors.yellow, child: child);
          break;
        case WeatherCondition.fog:
        case WeatherCondition.atmosphere:
        case WeatherCondition.rain:
        case WeatherCondition.drizzle:
        case WeatherCondition.mist:
        case WeatherCondition.heavyCloud:
          container = GradientContainer(color: Colors.indigo, child: child);
          break;
        case WeatherCondition.snow:
          container = GradientContainer(color: Colors.lightBlue, child: child);
          break;
        case WeatherCondition.thunderstorm:
          container = GradientContainer(color: Colors.deepPurple, child: child);
          break;
        default:
          container = GradientContainer(color: Colors.lightBlue, child: child);
      }
    }

    return container;
  }
}
Một số điểm sau cần lưu ý:
▹ Line 35: Consumes ForecastViewModel để notified khi một Forecast mới được lấy (fetched).
▹ Line 29: Lúc bắt đầu,chúng ta cần kiểm tra nếu forecast đã được load trên screen hay chưa. Nếu chưa, nó sẽ hiển thị một lời nhắc để người dùng nhập vào một thành phố. Nếu không, thì nó được xây dựng giao diện người dùng thời tiết.
▹ Line 47: Widget RefreshIndicator wraps ListView cho phép user pull-to-refresh. ViewModel tạo weather request trong onRequest callback.
▹ Line 54: Kiểm tra nếu một request đang diễn ra thì widget CircularProgressIndicator được hiển thị.
▹ Line 103: Helper method để xây dựng widget tóm tắt forecast 3-day — một Row là child widgets là instances của DailySummaryView.
▹ Line 152: Returns một GradientContainer widget với background colour phù hợp với điều kiện thời tiết của ngày hiện tại. Nếu ban đêm thì chúng ta mặc định để một gradient phù hợp thời gian ban đêm.
ForecastViewModel
The ForecastViewModel requests cập nhật forecast thay cho view đang sử dụng instance của ForecastService class.
import 'dart:core';

import 'package:flutter/cupertino.dart';
import 'package:flutter/foundation.dart';
import 'package:weather_app/api/open_weather_map_weather_api.dart';
import 'package:weather_app/models/forecast.dart';
import 'package:weather_app/models/weather.dart';
import 'package:weather_app/services/forecast_service.dart';
import 'package:weather_app/utils/strings.dart';
import 'package:weather_app/utils/temperature_convert.dart';

class ForecastViewModel with ChangeNotifier {
  bool isRequestPending = false;
  bool isWeatherLoaded = false;
  bool isRequestError = false;

  WeatherCondition _condition;
  String _description;
  double _minTemp;
  double _maxTemp;
  double _temp;
  double _feelsLike;
  int _locationId;
  DateTime _lastUpdated;
  String _city;
  double _latitude;
  double _longitude;
  List<Weather> _daily;
  bool _isDayTime;

  WeatherCondition get condition => _condition;
  String get description => _description;
  double get minTemp => _minTemp;
  double get maxTemp => _maxTemp;
  double get temp => _temp;
  double get feelsLike => _feelsLike;
  int get locationId => _locationId;
  DateTime get lastUpdated => _lastUpdated;
  String get city => _city;
  double get longitude => _longitude;
  double get latitide => _latitude;
  bool get isDaytime => _isDayTime;
  List<Weather> get daily => _daily;

  ForecastService forecastService;

  ForecastViewModel() {
    forecastService =
        ForecastService(OpenWeatherMapWeatherApi());
  }

  Future<Forecast> getLatestWeather(String city) async {
    setRequestPendingState(true);
    this.isRequestError = false;

    Forecast latest;
    try {
      await Future.delayed(Duration(seconds: 1), () => {});

      latest = await forecastService
          .getWeather(city)
          .catchError((onError) => this.isRequestError = true);
    } catch (e) {
      this.isRequestError = true;
    }

    this.isWeatherLoaded = true;
    updateModel(latest, city);
    setRequestPendingState(false);
    notifyListeners();
    return latest;
  }

  void setRequestPendingState(bool isPending) {
    this.isRequestPending = isPending;
    notifyListeners();
  }

  void updateModel(Forecast forecast, String city) {
    if (isRequestError) return;

    _condition = forecast.current.condition;
    _city = Strings.toTitleCase(forecast.city);
    _description = Strings.toTitleCase(forecast.current.description);
    _lastUpdated = forecast.lastUpdated;
    _temp = TemperatureConvert.kelvinToCelsius(forecast.current.temp);
    _feelsLike =
        TemperatureConvert.kelvinToCelsius(forecast.current.feelLikeTemp);
    _longitude = forecast.longitude;
    _latitude = forecast.latitude;
    _daily = forecast.daily;
    _isDayTime = forecast.isDayTime;
  }
}
Một số điểm chung:
▹ Line 12: Mixes ChangeNotifier(with) cho phép nó notify consumer Views với bất kì thay đổi của state
▹ Line 17: Khai báo các fields để theo dõi các requests đang thực hiện và các requests đã hoàn thành. Như đã bàn trước đây, điều này tạo điều kiện cho View hiển thị nhắc nhở và busy indicators.
▹ Line 79: Sao chép Forecast model data tới ViewModel fields tương ứng và thực hiện một số format để chuyển đổi nhiệt độ Kelvin thành Celsius.
WeatherSummaryView
WeatherSummaryView của chúng ta là một StatelessWidget đơn giản, hiển thị nhiệt độ hiện tại (actual & feels-like) và chọn một asset image thích hợp cho điều kiện thời tiết hiện tại.
Asset image được điều chỉnh cho thời gian ban đêm phù hợp với điều kiện thời tiết. Ví dụ, vào một ngày rõ ràng, hình ảnh mặt trời sẽ được hiển thị, trong khi vào một đêm rõ ràng một mặt trăng lưỡi liềm được hiển thị.

import 'package:flutter/material.dart';
import 'package:weather_app/models/weather.dart';

class WeatherSummary extends StatelessWidget {
  final WeatherCondition condition;
  final double temp;
  final double feelsLike;
  final bool isdayTime;

  WeatherSummary(
      {Key key,
      @required this.condition,
      @required this.temp,
      @required this.feelsLike,
      @required this.isdayTime})
      : super(key: key);

  @override
  Widget build(BuildContext context) {
    return Center(
      child: Row(mainAxisAlignment: MainAxisAlignment.spaceAround, children: [
        Column(
          children: [
            Text(
              '${_formatTemperature(this.temp)}°ᶜ',
              style: TextStyle(
                fontSize: 50,
                color: Colors.white,
                fontWeight: FontWeight.w300,
              ),
            ),
            Text(
              'Feels like ${_formatTemperature(this.feelsLike)}°ᶜ',
              style: TextStyle(
                fontSize: 18,
                color: Colors.white,
                fontWeight: FontWeight.w300,
              ),
            ),
          ],
        ),
        _mapWeatherConditionToImage(this.condition, this.isdayTime),
      ]),
    );
  }

  String _formatTemperature(double t) {
    var temp = (t == null ? '' : t.round().toString());
    return temp;
  }

  Widget _mapWeatherConditionToImage(
      WeatherCondition condition, bool isDayTime) {
    Image image;
    switch (condition) {
      case WeatherCondition.thunderstorm:
        image = Image.asset('assets/images/thunder_storm.png');
        break;
      case WeatherCondition.heavyCloud:
        image = Image.asset('assets/images/cloudy.png');
        break;
      case WeatherCondition.lightCloud:
        isDayTime
            ? image = Image.asset('assets/images/light_cloud.png')
            : image = Image.asset('assets/images/light_cloud-night.png');
        break;
      case WeatherCondition.drizzle:
      case WeatherCondition.mist:
        image = Image.asset('assets/images/drizzle.png');
        break;
      case WeatherCondition.clear:
        isDayTime
            ? image = Image.asset('assets/images/clear.png')
            : image = Image.asset('assets/images/clear-night.png');
        break;
      case WeatherCondition.fog:
        image = Image.asset('assets/images/fog.png');
        break;
      case WeatherCondition.snow:
        image = Image.asset('assets/images/snow.png');
        break;
      case WeatherCondition.rain:
        image = Image.asset('assets/images/rain.png');
        break;
      case WeatherCondition.atmosphere:
        image = Image.asset('assets/images/fog.png');
        break;

      default:
        image = Image.asset('assets/images/unknown.png');
    }

    return Padding(padding: const EdgeInsets.only(top: 5), child: image);
  }
}
WeatherDescriptionView
Một StatelessWidget đơn giản khác để hiển thị mô tả weather hiện tại
import 'package:flutter/material.dart';

class WeatherDescriptionView extends StatelessWidget {
  final String weatherDescription;

  WeatherDescriptionView({Key key, @required this.weatherDescription})
      : assert(weatherDescription != null),
        super(key: key);

  @override
  Widget build(BuildContext context) {
    return Center(
      child: Text(weatherDescription,
          textAlign: TextAlign.center,
          style: TextStyle(
            fontSize: 35,
            fontWeight: FontWeight.w300,
            color: Colors.white,
          )),
    );
  }
}
LastUpdatedView
Một StatelessWidget để hiển thị lần cuối mà weather đã được lấy ra.
import 'package:flutter/material.dart';

class LastUpdatedView extends StatelessWidget {
  final DateTime lastUpdatedOn;

  LastUpdatedView({Key key, @required this.lastUpdatedOn})
      : assert(lastUpdatedOn != null),
        super(key: key);

  @override
  Widget build(BuildContext context) {
    return Padding(
        padding: EdgeInsets.only(top: 20.0, left: 00),
        child: Row(mainAxisAlignment: MainAxisAlignment.center, children: [
          Icon(
            Icons.access_time,
            color: Colors.black45,
            size: 15,
          ),
          SizedBox(width: 10),
          Text(
              'Last updated on ${TimeOfDay.fromDateTime(this.lastUpdatedOn).format(context)}',
              style: TextStyle(
                fontSize: 16,
                color: Colors.black45,
              ))
        ]));
  }
}
LocationView
Hiển thị thành phố hiện tại và tọa độ vĩ độ và kinh độ của nó.

import 'package:flutter/material.dart';

class LocationView extends StatelessWidget {
  final double longitude;
  final double latitude;
  final String city;

  LocationView(
      {Key key,
      @required this.longitude,
      @required this.latitude,
      @required this.city})
      : super(key: key);

  @override
  Widget build(BuildContext context) {
    return Center(
      child: Column(children: [
        Text('${this.city.toUpperCase()}',
            style: TextStyle(
              fontSize: 40,
              fontWeight: FontWeight.w300,
              color: Colors.white,
            )),
        Row(
          mainAxisAlignment: MainAxisAlignment.center,
          children: [
            Icon(Icons.location_on, color: Colors.white, size: 15),
            SizedBox(width: 10),
            Text(this.longitude.toString(),
                style: TextStyle(
                  fontSize: 16,
                  color: Colors.white,
                )),
            Text(' , ',
                style: TextStyle(
                  fontSize: 16,
                  color: Colors.white,
                )),
            Text(this.latitude.toString(),
                style: TextStyle(
                  fontSize: 16,
                  color: Colors.white,
                )),
          ],
        )
      ]),
    );
  }
}
DailySummaryView
StatelessWidget này lấy mộtinstance của Weather model trong constructor của nó và builds một widget hiển thị ngày của tuần, nhiệt độ cho ngày đó và một weather image nhỏ tương ứng với điều kiên thời tiết.

Bạn có thể nhớ lại, HomeView widget tạo instances của DailySummaryView widget cho mỗi 3 days trong daily forecast list .
import 'package:flutter/material.dart';
import 'package:intl/intl.dart';
import 'package:weather_app/models/weather.dart';
import 'package:weather_app/utils/temperature_convert.dart';

class DailySummaryView extends StatelessWidget {
  final Weather weather;

  DailySummaryView({Key key, @required this.weather})
      : assert(weather != null),
        super(key: key);

  @override
  Widget build(BuildContext context) {
    final dayOfWeek =
        toBeginningOfSentenceCase(DateFormat('EEE').format(this.weather.date));

    return Padding(
        padding: EdgeInsets.all(15),
        child: Row(
          children: [
            Column(mainAxisAlignment: MainAxisAlignment.spaceAround, children: [
              Text(dayOfWeek ?? '',
                  textAlign: TextAlign.center,
                  style: TextStyle(
                      fontSize: 18,
                      color: Colors.white,
                      fontWeight: FontWeight.w300)),
              Text(
                  "${TemperatureConvert.kelvinToCelsius(this.weather.temp).round().toString()}°",
                  textAlign: TextAlign.center,
                  style: TextStyle(
                      fontSize: 20,
                      color: Colors.white,
                      fontWeight: FontWeight.w500)),
            ]),
            Padding(
                padding: EdgeInsets.only(left: 5),
                child: Container(
                    alignment: Alignment.center,
                    child: _mapWeatherConditionToImage(this.weather.condition)))
          ],
        ));
  }

  Widget _mapWeatherConditionToImage(WeatherCondition condition) {
    Image image;
    switch (condition) {
      case WeatherCondition.thunderstorm:
        image = Image.asset('assets/images/thunder_storm_small.png');
        break;
      case WeatherCondition.heavyCloud:
        image = Image.asset('assets/images/cloudy_small.png');
        break;
      case WeatherCondition.lightCloud:
        image = Image.asset('assets/images/light_cloud_small.png');
        break;
      case WeatherCondition.drizzle:
      case WeatherCondition.mist:
        image = Image.asset('assets/images/drizzle_small.png');
        break;
      case WeatherCondition.clear:
        image = Image.asset('assets/images/clear_small.png');
        break;
      case WeatherCondition.fog:
        image = Image.asset('assets/images/fog_small.png');
        break;
      case WeatherCondition.snow:
        image = Image.asset('assets/images/snow_small.png');
        break;
      case WeatherCondition.rain:
        image = Image.asset('assets/images/rain_small.png');
        break;
      case WeatherCondition.atmosphere:
        image = Image.asset('assets/images/atmosphere_small.png');
        break;

      default:
        image = Image.asset('assets/images/light_cloud_small.png');
    }

    return Padding(padding: const EdgeInsets.only(top: 5), child: image);
  }
}
CityEntryView
CityEntryView là một Statefulwidget cho phép user nhập vào một thành phố và gọi một weather request. Nó chỉ là Statefulwidget trong app và được yêu cầu bởi vì nó đang duy trì một TextEditingController.

User tạo một weather request bằng cách clicking button icon search hoặc submit sau khi gõ.
Một cách tiếp cận thứ ba cũng được hỗ trợ, trong đó người dùng nhập vào một thành phố mà không cần submit và sau đó thực hiện pull-to-refresh.
Đây là lý do field city CityEntryViewModel được giữ đồng bộ với mỗi thay đổi của TextField, sử dụng controller addListener method. ForecastViewModel có thể sử dụng field city CityEntryViewModel trong một request weather pull-to-refresh .
Cũng lưu ý cách widget TextField trang trí được thiết lập để thu gọn. Điều này là bắt buộc kể từ khi Container của chúng ta đang bắt chước sự xuất hiện của một Text box truyền thống.
import 'package:flutter/material.dart';
import 'package:provider/provider.dart';
import 'package:weather_app/viewModels/city_entry_viewmodel.dart';

class CityEntryView extends StatefulWidget {
  @override
  _CityEntryState createState() => _CityEntryState();
}

class _CityEntryState extends State<CityEntryView> {
  TextEditingController cityEditController;

  @override
  void initState() {
    super.initState();

    cityEditController = new TextEditingController();

    // sync the current value in text field to
    // the view model
    cityEditController.addListener(() {
      Provider.of<CityEntryViewModel>(this.context, listen: false)
          .updateCity(cityEditController.text);
    });
  }

  @override
  Widget build(BuildContext context) {
    return Consumer<CityEntryViewModel>(
        builder: (context, model, child) => Container(
            margin: EdgeInsets.only(left: 20, top: 20, right: 20, bottom: 50),
            padding: EdgeInsets.only(left: 5, top: 5, right: 20, bottom: 00),
            height: 50,
            width: 200,
            decoration: BoxDecoration(
              color: Colors.white,
              borderRadius: BorderRadius.only(
                  topLeft: Radius.circular(3),
                  topRight: Radius.circular(3),
                  bottomLeft: Radius.circular(3),
                  bottomRight: Radius.circular(3)),
              boxShadow: [
                BoxShadow(
                  color: Colors.black.withOpacity(0.3),
                  spreadRadius: 3,
                  blurRadius: 5,
                  offset: Offset(0, 3), // changes position of shadow
                ),
              ],
            ),
            child: Row(
              mainAxisSize: MainAxisSize.max,
              mainAxisAlignment: MainAxisAlignment.start,
              children: [
                IconButton(
                  icon: new Icon(Icons.search),
                  onPressed: () {
                    model.updateCity(cityEditController.text);
                    model.refreshWeather(cityEditController.text, context);
                  },
                ),
                SizedBox(width: 10),
                Expanded(
                    child: TextField(
                        controller: cityEditController,
                        decoration:
                            InputDecoration.collapsed(hintText: "Enter City"),
                        onSubmitted: (String city) =>
                            {model.refreshWeather(city, context)})),
              ],
            )));
  }
}
CityEntryViewModel
CityEntryViewModel gọi một request weather bằng cách lấy một instance của ForecastViewModel. Như đã thảo luận ở trên, nó cũng duy trì một filed để giữ cho city đồng bộ trong các request pull-to-refresh.
import 'package:flutter/cupertino.dart';
import 'package:flutter/foundation.dart';
import 'package:provider/provider.dart';
import 'package:weather_app/viewModels/forecast_view_model.dart';

class CityEntryViewModel with ChangeNotifier {
  String _city;

  CityEntryViewModel();

  String get city => _city;

  void refreshWeather(String newCity, BuildContext context) {
    Provider.of<ForecastViewModel>(context, listen: false)
        .getLatestWeather(_city, context);

    notifyListeners();
  }

  void updateCity(String newCity) {
    _city = newCity;
  }
}
GradientContainer
Mục cuối mà chúng ta sẽ thảo luận là GradientContainer StatelessWidget. Class dựa trên một class được phát trển bởi Felix Angelov cho một bài viết xuất sắc để xây dựng một weather app sử dụng Bloc design pattern.
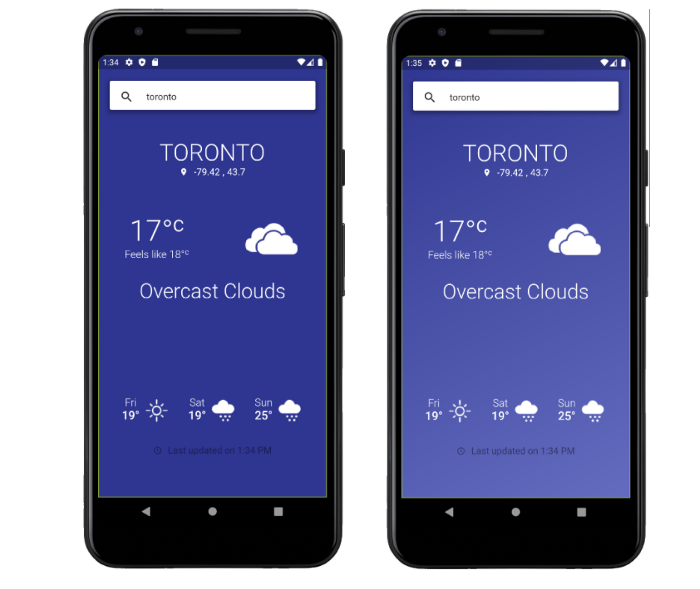
Trong phiên bản này, chúng ta sẽ thực hiện một số thay đổi nhỏ bằng cách giảm số điểm dừng và thay đổi hướng gradient top-left -> bottom right. Bạn có thể xem hiệu ứng gradient tinh tế dưới đây
// based on original GradientContainer class by Felix Angelov
// https://gist.github.com/felangel/96b231de636173a44e4787fb52614130#file-gradient_container-dart

import 'package:flutter/material.dart';

import 'package:meta/meta.dart';

class GradientContainer extends StatelessWidget {
  final Widget child;
  final MaterialColor color;

  const GradientContainer({
    Key key,
    @required this.color,
    @required this.child,
  })  : assert(color != null, child != null),
        super(key: key);

  @override
  Widget build(BuildContext context) {
    return Container(
      decoration: BoxDecoration(
        gradient: LinearGradient(
          begin: Alignment.topLeft,
          end: Alignment.bottomRight,
          stops: [0, 1.0],
          colors: [
            color[800],
            color[400],
          ],
        ),
      ),
      child: child,
    );
  }
}
Summary
Như vậy chúng ta đã xây dựng thành công weather app sử dụng Flutter và Provider package.
Trong quá trình này, chúng ta đã tìm hiểu kiến trúc của một ứng dụng có multi-layer. Thúc đẩy sự tách chi tiết các implement từ client code và tách business logic từ widgets thông qua View/Viewmodels.
Cách tiếp cận này để phát triển ứng dụng, sẽ phục vụ bạn tốt cho các dự án trong tương lai.
Đây cũng là một ví dụ của việc sử dụng Provider vào dự án Flutter, hy vọng các bạn đã có thể hiểu và áp dụng vào dự án của chính mình.
Bài viết khá dài, cảm ơn các bạn đã đọc, xin chào và hẹn gặp lại.


