1. Lời mở đầu
Gần đây chắc hẳn các bạn đã nghe nhiều tới các khái niệm như định danh điện tử, Ekyc,... Nếu như trước đây, khách hàng muốn mở tài khoản ngân hàng, mở thẻ ATM... sẽ phải đến trực tiếp quầy giao dịch để thực hiện các thủ tục đăng kí, xác minh thông tin, thì giờ đây các thao tác này đều có thể thực hiện qua chiếc điện thoại nhờ giải pháp định danh khách hàng điện tử (eKYC). Và bài toán Trích xuất thông tin từ chứng minh thư chính là bài toán nhỏ trong ứng dụng định danh điện từ này. Hôm nay mình xin giới thiệu các bước giúp các bạn thực hiện bài toán này. Tuy cách này chưa thực sự là cách giải quyết tốt nhất nhưng qua bài này các bạn mới học về AI cũng có thể học thêm được kiến thức qua bài toán này. Toàn bộ source code các bạn có thể xem tại link github của mình.
 Nguồn TP Bank
2. Các bước xử lý
Trong bài này, mình đề xuất một hướng xử lý như sau :
- Detect 4 góc chứng minh thư
- Xoay chứng minh thư
- Detect vùng chữ có trong chứng minh thư
- OCR
2.1. Detect 4 góc chứng minh thư
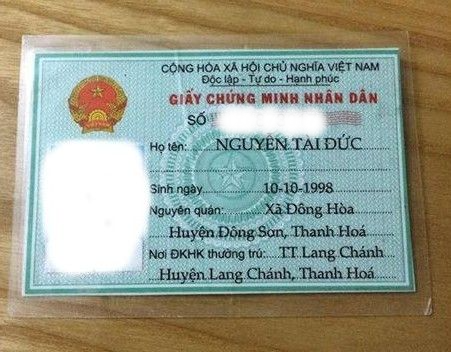
Do ảnh đầu vào là ảnh chụp từ điện thoại, có thể ảnh bị nghiêng, bị xoay ngược do đó chúng ta cần bước xoay thẳng lại để có thể dễ dàng xử lý. Vì lý do như vậy, nếu chúng ta dùng phương pháp bình thường detect nguyên cả chứng minh thư thì chúng ta khó có thể xoay lại được bằng xử lý ảnh hoặc phải dùng các phương pháp phức tạp hơn. Để đơn giản, ở bài này mình đề xuất một phương pháp đó là chúng ta sẽ coi bốn góc của chứng minh thư như là một object chúng ta cần detect sau đó chúng ta sẽ xoay thẳng bằng tọa độ của bốn góc này. Nếu như các bạn đã làm quen với các bài toán detect face, bike, car,... , trong đó bike hay car là object thì ở đây bốn góc : bottom left, bottom right, top left, top right chính là 4 object chúng ta cần tìm. Các bạn có thể thực hiện nhanh chóng bước này bằng cách sử dụng dữ liệu của bản thân kết hợp với mô hình detect đã được cung cấn sẵn bởi Tensorflow API. Các bạn có thể tìm bài viết hướng dẫn Tensorflow API của mình ở bài viết này. Ta sẽ có kết quả như hình sau:
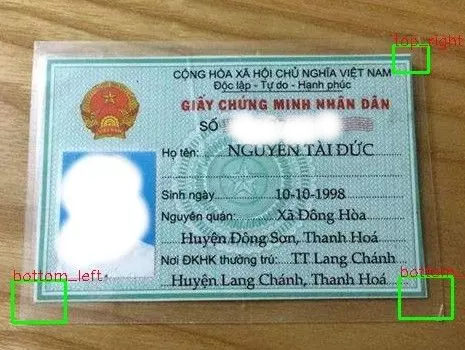 Step 1: Detect 4 corners
2.2. Xoay chứng minh thư
Ở đây ta cần bốn góc để xoay nhưng mô hình chúng ta lại chỉ detect được có 3 góc  . Vậy làm thế nào ta có thể tính được ra tọa độ góc còn lại bây giờ ? Đơn giản thôi, chúng ta chỉ cần áp dụng một kiến thức hình học cấp hai, ta dễ dàng nội suy ra tọa độ của 3 góc ra tọa độ góc còn lại. Các bác thử ngâm cứu vẽ vời ra giấy tính toán thử xem. Còn nếu lười thì dùng luôn code của tôi dưới đây nhé :
Đầu tiên chúng ta cần phải tính ra tọa độ trung tâm của mỗi bouding box hay tọa độ của bốn góc bằng hàm get_center_point(). Hàm này nhận dữ liệu đầu vào là dictionary chứa key là tên góc và value: tọa độ của bounding box tương ứng. Đẩu ra là một dictionary chứa key là tên góc và value: tọa độ trung tâm bounding box tương ứng hay chính là tọa độ các góc.
def get_center_point(coordinate_dict):
    di = dict()

    for key in coordinate_dict.keys():
        xmin, ymin, xmax, ymax = coordinate_dict[key]
        x_center = (xmin + xmax) / 2
        y_center = (ymin + ymax) / 2
        di[key] = (x_center, y_center)

    return di
Sau đó chúng ta đưa dictionary thu được bên trên vào hàm calculate_missed_coord_corner để nội suy ra góc còn thiếu và trả dữ liệu dạng dictionary chứa tên và tọa độ bốn góc tương ứng. Ở đây hàm này chỉ khắc phục trong trường hợp thiếu một góc, những trường hợp thiếu hai góc không khắc phục được. Cách khắc phục nhược điểm thiếu nhiều góc là cải thiện model detect trở nên tốt hơn.
def calculate_missed_coord_corner(coordinate_dict):
    thresh = 0

    index = find_miss_corner(coordinate_dict)

    # calculate missed corner coordinate
    # case 1: missed corner is "top_left"
    if index == 0:
        midpoint = np.add(coordinate_dict['top_right'], coordinate_dict['bottom_left']) / 2
        y = 2 * midpoint[1] - coordinate_dict['bottom_right'][1] - thresh
        x = 2 * midpoint[0] - coordinate_dict['bottom_right'][0] - thresh
        coordinate_dict['top_left'] = (x, y)
    elif index == 1:  # "top_right"
        midpoint = np.add(coordinate_dict['top_left'], coordinate_dict['bottom_right']) / 2
        y = 2 * midpoint[1] - coordinate_dict['bottom_left'][1] - thresh
        x = 2 * midpoint[0] - coordinate_dict['bottom_left'][0] - thresh
        coordinate_dict['top_right'] = (x, y)
    elif index == 2:  # "bottom_left"
        midpoint = np.add(coordinate_dict['top_left'], coordinate_dict['bottom_right']) / 2
        y = 2 * midpoint[1] - coordinate_dict['top_right'][1] - thresh
        x = 2 * midpoint[0] - coordinate_dict['top_right'][0] - thresh
        coordinate_dict['bottom_left'] = (x, y)
    elif index == 3:  # "bottom_right"
        midpoint = np.add(coordinate_dict['bottom_left'], coordinate_dict['top_right']) / 2
        y = 2 * midpoint[1] - coordinate_dict['top_left'][1] - thresh
        x = 2 * midpoint[0] - coordinate_dict['top_left'][0] - thresh
        coordinate_dict['bottom_right'] = (x, y)

    return coordinate_dict
Sau khi có được tọa độ 4 góc của chứng minh thư, ta xoay thẳng ảnh lại dựa vào kích thước thực tế có chiều dài 500, chiều rộng 300. Ở đây, mình dùng PerspectiveTransform của OpenCV:
def perspective_transform(image, source_points):
    dest_points = np.float32([[0, 0], [500, 0], [500, 300], [0, 300]])
    M = cv2.getPerspectiveTransform(source_points, dest_points)
    dst = cv2.warpPerspective(image, M, (500, 300))

    return dst
Và kết quả cuối cùng, mình sẽ thu được về như sau:
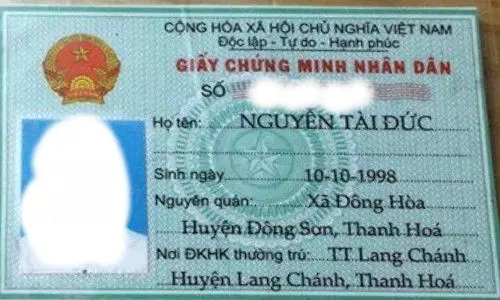 Step 2: Xoay ảnh
2.3. Detect vùng chữ có trong chứng minh thư
Tương tự như ý tưởng detect các góc, ở task này chúng ta sẽ sử dụng các mô hình detect có sẵn trong thư viện Tensorflow API như ở bước 1 đã làm để huấn luyện detect ra các chữ có trong ảnh chứng minh thư đã được crop ở bước trên. Các bạn có thể xem hướng dẫn ở đây. Mình chia các chữ ra thành 5 class tương ứng với 5 trường thông tin cần thu: id, name, birth, home và add. Chúng ta sẽ thu được ảnh kết quả trả về như sau:
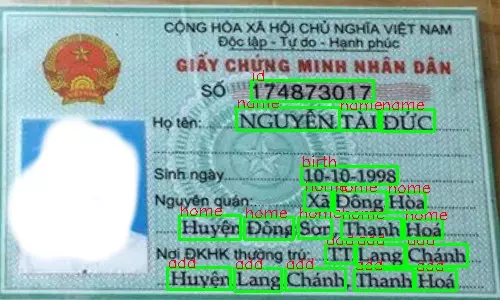 Ảnh 1: Trước khi dùng NMS
Trong ảnh thu được, để tránh hiện tượng cùng một object nhưng có nhiều bouding box đè lên nhau (overlap), chúng ta sử dụng một thuật toán có tên là NMS (Non Maximum Suppression) giúp loại bỏ đi box thừa giữ lại box tốt nhất cho object.
  def non_max_suppression_fast(boxes, labels, overlapThresh):
  # if there are no boxes, return an empty list
  if len(boxes) == 0:
      return []

  # if the bounding boxes integers, convert them to floats --
  # this is important since we'll be doing a bunch of divisions
  if boxes.dtype.kind == "i":
      boxes = boxes.astype("float")
  #
  # initialize the list of picked indexes
  pick = []
  # grab the coordinates of the bounding boxes
  x1 = boxes[:, 1]
  y1 = boxes[:, 0]
  x2 = boxes[:, 3]
  y2 = boxes[:, 2]

  # compute the area of the bounding boxes and sort the bounding
  # boxes by the bottom-right y-coordinate of the bounding box
  area = (x2 - x1 + 1) * (y2 - y1 + 1)
  idxs = np.argsort(y2)

  # keep looping while some indexes still remain in the indexes
  # list
  while len(idxs) > 0:
      # grab the last index in the indexes list and add the
      # index value to the list of picked indexes
      last = len(idxs) - 1
      i = idxs[last]
      pick.append(i)

      # find the largest (x, y) coordinates for the start of
      # the bounding box and the smallest (x, y) coordinates
      # for the end of the bounding box
      xx1 = np.maximum(x1[i], x1[idxs[:last]])
      yy1 = np.maximum(y1[i], y1[idxs[:last]])
      xx2 = np.minimum(x2[i], x2[idxs[:last]])
      yy2 = np.minimum(y2[i], y2[idxs[:last]])

      # compute the width and height of the bounding box
      w = np.maximum(0, xx2 - xx1 + 1)
      h = np.maximum(0, yy2 - yy1 + 1)

      # compute the ratio of overlap
      overlap = (w * h) / area[idxs[:last]]

      # delete all indexes from the index list that have
      idxs = np.delete(idxs, np.concatenate(([last], np.where(overlap > overlapThresh)[0])))

  # return only the bounding boxes that were picked using the
  # integer data type
  final_labels = [labels[idx] for idx in pick]
  final_boxes = boxes[pick].astype("int")
  return final_boxes, final_labels
Các bạn để ý các box ở trường home và add đã ít hơn hẳn so với ảnh trước.
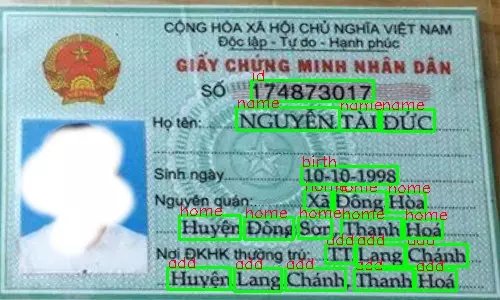 Ảnh 2: Sau khi dùng NMS
2.4. OCR
OCR hay nhận dạng kí tự là kĩ thuật nhận dạng chữ có trong ảnh đầu vào. Với các box chữ chúng ta thu được từ bước trên, ta crop và đưa qua mô hình OCR để đọc. Để giải quyết bài toán nhanh gọn, không mất thời gian các bạn có thể sử dụng thư viện VietOcr của tác gỉa Phạm Quốc, lý thuyết về Transformer OCR các bạn có thể theo dõi tại bài viết của mình nhé. Ở đây do tác giả chưa hỗ trợ dự đoán theo batch_size nên các bạn có thể custom lại file Predictor.py như sau để dự đoán theo theo batch_size nhanh hơn nhé:
from vietocr.tool.translate import build_model, translate, translate_beam_search, batch_translate_beam_search
import cv2
import numpy as np
import math
import time
import torch
from collections import defaultdict


class Predictor(object):
    def __init__(self, config):
        device = config['device']

        model, vocab = build_model(config)
        weights = config['weights']

        model.load_state_dict(torch.load(weights, map_location=torch.device(device)))

        self.config = config
        self.model = model
        self.vocab = vocab

    def predict(self, img):
        img = img / 255.0
        img = self.preprocess_input(img)
        img = np.expand_dims(img, axis=0)
        img = torch.FloatTensor(img)
        img = img.to(self.config['device'])

        if self.config['predictor']['beamsearch']:
            sent = translate_beam_search(img, self.model)
            s = sent
        else:
            s = translate(img, self.model)[0].tolist()

        s = self.vocab.decode(s)

        return s

    def batch_predict(self, images):
        """
        param: images : list of ndarray
        """
        batch_dict, indices = self.batch_process(images)
        list_keys = [i for i in batch_dict if batch_dict[i] != batch_dict.default_factory()]
        result = list([])

        for width in list_keys:
            batch = batch_dict[width]
            batch = np.asarray(batch)
            batch = torch.FloatTensor(batch)
            batch = batch.to(self.config['device'])

            if self.config['predictor']['beamsearch']:
                sent = batch_translate_beam_search(batch, model=self.model)
            else:
                sent = translate(batch, self.model).tolist()

            batch_text = self.vocab.batch_decode(sent)
            result.extend(batch_text)

        # sort text result to original coordinate
        def get_index(element):
            return element[1]

        z = zip(result, indices)
        sorted_result = sorted(z, key=get_index)
        result, _ = zip(*sorted_result)

        return result

     def preprocess_input(self, image):
        """
        Preprocess input image (resize, normalize)

        Parameters:
        image: has shape of (H, W, C)

        Return:
        img: has shape (H, W, C)
        """

        h, w, _ = image.shape
        new_w, image_height = self.resize_v1(w, h, self.config['dataset']['image_height'],
                                             self.config['dataset']['image_min_width'],
                                             self.config['dataset']['image_max_width'])

        img = cv2.resize(image, (new_w, image_height))
        img = img / 255.0
        img = np.transpose(img, (2, 0, 1))

        return img

    def batch_process(self, images):
        batch_img_dict = defaultdict(list)
        image_height = self.config['dataset']['image_height']

        batch_img_li = [self.preprocess_input(img) for img in images]
        batch_imgs, width_list, indices = self.sort_width(batch_img_li, reverse=False)

        min_bucket_width = min(width_list)
        max_width = max(width_list)
        thresh = 30
        max_bucket_width = np.minimum(min_bucket_width + thresh, max_width)

        for i, image in enumerate(batch_imgs):
            c, h, w = image.shape

            # reset min_bucket_width, max_bucket_width
            if w > max_bucket_width:
                min_bucket_width = w
                max_bucket_width = np.minimum(min_bucket_width + thresh, max_width)

            avg_bucket_width = int((max_bucket_width + min_bucket_width) / 2)

            new_img = self.resize_v2(image, avg_bucket_width, height=image_height)
            batch_img_dict[avg_bucket_width].append(new_img)

        return batch_img_dict, indices

    @staticmethod
    def sort_width(batch_img, reverse=False):
        def get_img_width(element):
            img = element[0]
            c, h, w = img.shape
            return w

        batch = list(zip(batch_img, range(len(batch_img))))
        sorted_batch = sorted(batch, key=get_img_width, reverse=reverse)
        sorted_batch_img, indices = list(zip(*sorted_batch))

        return sorted_batch_img, list(map(get_img_width, batch)), indices

    @staticmethod
    def resize_v1(w, h, expected_height, image_min_width, image_max_width):
        new_w = int(expected_height * float(w) / float(h))
        round_to = 10
        new_w = math.ceil(new_w / round_to) * round_to
        new_w = max(new_w, image_min_width)
        new_w = min(new_w, image_max_width)

        return new_w, expected_height

    @staticmethod
    def resize_v2(img, width, height):
        new_img = np.transpose(img, (1, 2, 0))
        new_img = cv2.resize(new_img, (width, height), cv2.INTER_AREA)
        new_img = np.transpose(new_img, (2, 0, 1))

        return new_img
3. Kết quả
Trong bài viết lần này, mình có xây dựng một API bằng thư viện FastApi để các bạn dễ hình dung hơn, các bạn có thể chạy demo bằng cách sau đây:
git clone https://github.com/buiquangmanhhp1999/extract-information-from-identity-card.git
pip install -r requirement.txt
cd complete
python server.py
Và kết quả API trả về như sau:
{
  "id": "174873017",
  "name": "NGUYỄN TÀI ĐỨC",
  "birth": "10-10-1998",
  "home": "TT Lang Chánh Huyện Lang Chánh Thanh Hóa",
  "add": "Xã Đông Hòa Huyện Đông Sơn Thanh Hoá"
}
4. Lời kết
Mọi người có nhu cầu ứng dụng hệ thống trích xuất thông tin chứng minh thư/chứng minh nhân dân cũ mới, giấy phép lái xe, ... có thể liên lạc mình qua email buiquangmanhhp1999@gmail.com với giá thành hấp dẫn ưu đãi nhất thị trường.
Cảm ơn các bạn đã theo dõi bài viết của mình. Bài toán trích xuất từ chứng minh thư đã không còn xa lạ trong cộng đồng học machine learning nhưng mình vẫn hy vọng bài viết của mình sẽ giúp cho nhiều bạn có thêm được nhiều kiến thức mới mẻ. 


