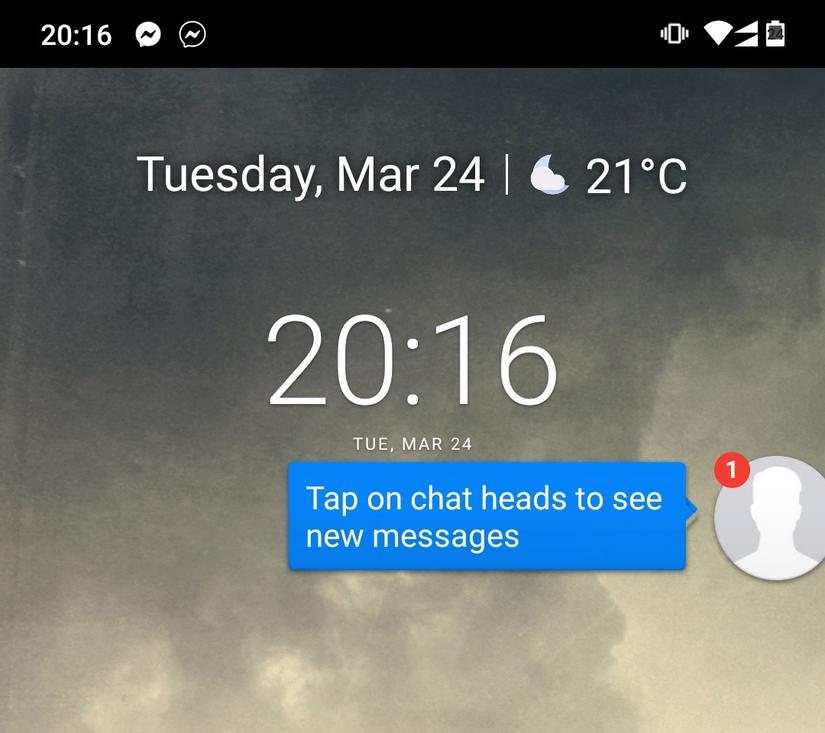
Còn nhớ khoảng năm 2015 2016 gì đó tôi hay nghe thấy những request về làm một cái "quả bóng tròn" giống Facebook Messenger. Vâng, đúng rồi đấy ạ, chắc hẳn những ai dùng Facebook Messenger trên Android hẳn sẽ rất quen thuộc với 1 icon tròn nổi trên màn hình khi nhận được tin nhắn như hình dưới
 Rất nhiều ý kiến đã được đưa ra để làm sao làm được như vậy, trong đó ý kiến phổ biến nhất là tạo ra một floating window nằm đè lên các app khác thông qua việc request SYSTEM_ALERT_WINDOW.
Tuy nhiên đây lại là một ý tưởng không được khuyến khích, theo như document của Android
Very few apps should use this permission; these windows are intended for system-level interaction with the user. thì permission này vốn được dùng ở tầng hệ thống để tương tác với user. Bẵng đi một thời gian, cho đến gần đây, thì cuối cùng Google cũng đã đưa tính năng hay ho này vào Android với tên gọi Bubble. Bắt đầu từ Android 10, developer đã có thể vọc thử tính năng này bằng cách enable Settings ▸ Developer Options ▸ Bubbles. Và trên Android 11 thì nó đã chính thức được sử dụng. Giờ chúng ta hãy cùng thử triển khai xem sao Trước hết, bạn có thể đọc thêm về Bubble ở đây https://developer.android.com/guide/topics/ui/bubbles Đầu tiên bạn cần set targetSdkVersion thành 30 (Android 11) trong build.gradle Tiếp đó, bạn cần xây dựng 1 activity để khi user bấm vào Bubble, nó sẽ expand ra.
<activity
  android:name=".bubbles.BubbleActivity"
  android:theme="@style/AppTheme.NoActionBar"
  android:label="@string/title_activity_bubble"
  android:allowEmbedded="true"
  android:resizeableActivity="true"
/>
Chú ý 2 dòng cuối, như tài liệu đã nói The activity must be resizeable and embedded
Bước tiếp theo, hãy chú ý đến dòng sau
Bubbles are built into the Notification system. They float on top of other app content and follow the user wherever they go. Bubbles can be expanded to reveal app functionality and information, and can be collapsed when not being used. Như vậy, Bubble được xây dựng với hệ thống Notification, nghĩa là để Bubble "nhảy" ra thì cần phải có một notification được bắn ra. Vì vậy ở bước này, ta sẽ build 1 notification, bắt đầu từ tạo channel
private void createNotificationChannel() {
        // Create the NotificationChannel, but only on API 26+ because
        // the NotificationChannel class is new and not in the support library
        CharSequence name = "notification name";
        String description = "notification description";
        // The importance must be IMPORTANCE_HIGH to show Bubbles.
        int importance = NotificationManager.IMPORTANCE_HIGH;
        NotificationChannel channel = new NotificationChannel("1000", name, importance);
        channel.setDescription(description);
        // Register the channel with the system; you can't change the importance
        // or other notification behaviors after this
        NotificationManager notificationManager = getContext().getSystemService(NotificationManager.class);
        notificationManager.createNotificationChannel(channel);

        try {
            updateShortcuts();
        } catch (IOException e) {
            e.printStackTrace();
        }
    }
Tuy nhiên, không phải notification nào cũng có thể show Bubble, mà cần phải là notification loại conversation, bạn có thể đọc thêm ở đây https://developer.android.com/guide/topics/ui/conversations#api-notifications Giờ ta sẽ build shortcut cho notification của chúng ta (lưu ý, đây chỉ là code demo nên id, tên tuổi, icon... chỉ mang tính ước lệ và dùng hard-code, bạn không nên dùng vào code thật)
private void updateShortcuts() throws IOException {
        // Create a dynamic shortcut for each of the contacts.
        // The same shortcut ID will be used when we show a bubble notification.
        HashSet<String> set = new HashSet<>();
        set.add("com.example.android.bubbles.category.TEXT_SHARE_TARGET");
        ShortcutInfo shortcutInfo = new ShortcutInfo.Builder(getContext(), "1000")
                .setLocusId(new LocusId("1000"))
                .setActivity(new ComponentName(getContext(), MainActivity.class))
                .setShortLabel("contact name")
                .setIcon(Icon.createWithAdaptiveBitmap(BitmapFactory.decodeStream(getContext().getResources().getAssets().open("cat.jpg"))))
                .setLongLived(true)
                .setCategories(set)
                .setIntent(
                        new Intent(getContext(), MainActivity.class)
                                .setAction(Intent.ACTION_VIEW)
                                .setData(
                                        Uri.parse(
                                                "https://android.example.com/chat/${contact.id}"
                                        )
                                )
                )
                .setPerson(
                        new Person.Builder()
                                .setName("contact name")
                                .setIcon(Icon.createWithAdaptiveBitmap(BitmapFactory.decodeStream(getContext().getResources().getAssets().open("cat.jpg"))))
                                .build()
                )
                .build();
        List<ShortcutInfo> shortcuts = new ArrayList<>();
        shortcuts.add(shortcutInfo);
        ((ShortcutManager) getContext().getSystemService(Context.SHORTCUT_SERVICE)).addDynamicShortcuts(shortcuts);
    }
Tiếp đến, ta tạo Bubble Intent và metadata để add vào notification
// Create bubble intent
Intent target = new Intent(getContext(), BubbleActivity.class);
        PendingIntent bubbleIntent =
                PendingIntent.getActivity(getContext(), 0, target, PendingIntent.FLAG_UPDATE_CURRENT /* flags */);

        // Create bubble metadata
        Notification.BubbleMetadata bubbleData =
                new Notification.BubbleMetadata.Builder(bubbleIntent,
                        Icon.createWithAdaptiveBitmap(BitmapFactory.decodeStream(getContext().getResources().getAssets().open("cat.jpg"))))
                        .setDesiredHeight(600)
                        .build();
Cuối cùng là tạo notification:
// Create notification
Person chatPartner = new Person.Builder()
        .setName("Chat partner")
        .setImportant(true)
        .build();

Notification.Builder builder =
    new Notification.Builder(mContext, CHANNEL_ID)
        .setContentIntent(contentIntent)
        .setSmallIcon(smallIcon)
        .setBubbleMetadata(bubbleData)
        .addPerson(chatPartner);
Đến đây, bạn có thể bắn thử notifcation
NotificationManager notificationManager = (NotificationManager) getContext().getSystemService(Context.NOTIFICATION_SERVICE);

            // notificationId is a unique int for each notification that you must define
            notificationManager.notify(1000, builder.build());
Tuy nhiên bạn sẽ không thấy Bubble hiện ra? Why? Tôi đã làm đúng theo document rồi mà? Đó là do code trong document chưa thỏa mãn điều kiện
mà cần phải là notification loại conversation Ở phần build notification ở trên, hãy thêm vào vài dòng code để thành như sau
Notification.Builder builder =
                    new Notification.Builder(mContext, CHANNEL_ID)
                            .setContentIntent(contentIntent)
                            .setSmallIcon(smallIcon)
                            .setBubbleMetadata(bubbleData)
                            .addPerson(chatPartner)
                            .setCategory(Notification.CATEGORY_MESSAGE)
                            .setShortcutId("1000")
                            .setLocusId(new LocusId("1000")https://images.viblo.asia/64x-/9cd6ae80-2ec5-4382-99b4-87e8b7ca4b1e.png)
                            .setStyle(new Notification.MessagingStyle(chatPartner)
                                    .setGroupConversation(false));
Vậy là xong rồi đấy, giờ hãy thử tính năng mới so với của Facebook xem như nào. Happy coding!!!


