In this article, we will see a laravel 9 firebase push notification, a firebase notification through you can notify users that new emails or other messages are available to sync. In this example, we will learn how to send web push notifications in laravel 9 using firebase.
Firebase push notification is a free open source and you can easily implement using your google account. firebase messaging or Firebase Cloud Messaging (FCM) is a cross-platform messaging solution that lets you reliably send messages at no cost. FCM push notifications are used for android, ios as well as a web applications.
Here I will give an example of a "firebase web push notification" or firebase web push notification in laravel 9, Firebase provides a real-time database and backend as a service. The service provides application developers an API that allows application data to be synchronized across clients and stored on Firebase’s cloud.
Here we will see how to set firebase push notification in laravel 9 step by step.
Step 1: Create Laravel App for Firebase Push Notification
Step 2: Install Laravel 9
Step 3: Create Laravel 9 Auth
Step 4: Create Migration and Model
Step 5: Create Route
Step 6: Create Controller
Step 7: Update Blade File
Step 8: Create firebase-messaging-sw.js File
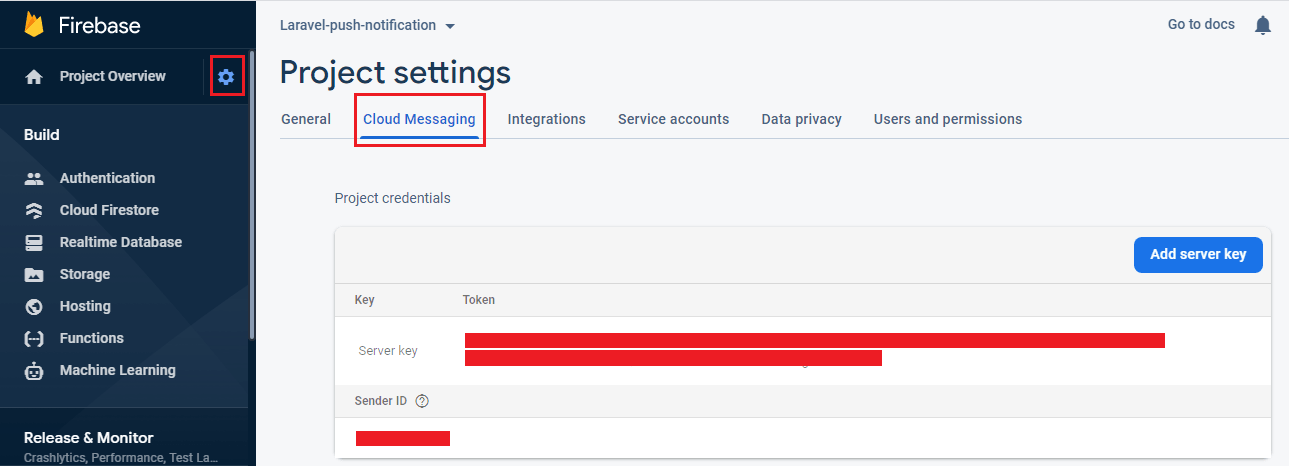
In this step, we will log in to Firebase Console and create a new project for laravel firebase push notification.
Now, install new laravel 9 application using the below command
composer create-project --prefer-dist laravel/laravel Laravel_9_Firebase_ExampleNow, create a login system using auth command in laravel 9, and run the following command in your terminal.
composer require laravel/ui

php artisan ui bootstrap --auth  // For Generate Auth

npm install // TO Install NPM

npm run devIn this step, we will add a new row "device_token" in the user's table as well as the model.
php artisan make:migration add_column_device_token<?php
use Illuminate\Database\Migrations\Migration;
use Illuminate\Database\Schema\Blueprint;
use Illuminate\Support\Facades\Schema;
class AddColumnDeviceTokenToUsersTable extends Migration
{
public function up()
{
Schema::table('users', function (Blueprint $table) {
$table->string('device_token')->nullable();
});
}
public function down()
{
Schema::table('users', function (Blueprint $table) {
//
});
}
}
app/Models/User.php
<?php

namespace App\Models;

use Illuminate\Contracts\Auth\MustVerifyEmail;
use Illuminate\Database\Eloquent\Factories\HasFactory;
use Illuminate\Foundation\Auth\User as Authenticatable;
use Illuminate\Notifications\Notifiable;

class User extends Authenticatable
{
    use HasFactory, Notifiable;


    protected $fillable = [
        'name',
        'email',
        'password',
        'device_token'
    ];


    protected $hidden = [
        'password',
        'remember_token',
    ];

    protected $casts = [
        'email_verified_at' => 'datetime',
    ];
}
Now, run the below command to run the migration.
php artisan migrateNow, we will add routes to store tokens and send push notifications in laravel. So, copy the below code in your routes/web.php file
<?php

use Illuminate\Support\Facades\Route;
use App\Http\Controllers\HomeController;


Route::get('/', function () {
    return view('welcome');
});

Auth::routes();
Route::get('/home', [HomeController::class, 'index'])->name('home');
Route::post('/save-push-notification-token', [HomeController::class, 'savePushNotificationToken'])->name('save-push-notification-token');
Route::post('/send-push-notification', [HomeController::class, 'sendPushNotification'])->name('send.push-notification');Here, I have created HomeController and added savePushNotificationToken() and sendPushNotification() function. In this controller, you need to add the server API key.
<?php

namespace App\Http\Controllers;

use Illuminate\Http\Request;
use App\Models\User;

class HomeController extends Controller
{

    public function __construct()
    {
        $this->middleware('auth');
    }

    public function index()
    {
        return view('home');
    }

    public function savePushNotificationToken(Request $request)
    {
        auth()->user()->update(['device_token'=>$request->token]);
        return response()->json(['token saved successfully.']);
    }

    public function sendPushNotification(Request $request)
    {
        $firebaseToken = User::whereNotNull('device_token')->pluck('device_token')->all();

        $SERVER_API_KEY = 'Enter_Your_Server_Key';

        $data = [
            "registration_ids" => $firebaseToken,
            "notification" => [
                "title" => $request->title,
                "body" => $request->body,
            ]
        ];
        $dataString = json_encode($data);

        $headers = [
            'Authorization: key=' . $SERVER_API_KEY,
            'Content-Type: application/json',
        ];

        $ch = curl_init();

        curl_setopt($ch, CURLOPT_URL, 'https://fcm.googleapis.com/fcm/send');
        curl_setopt($ch, CURLOPT_POST, true);
        curl_setopt($ch, CURLOPT_HTTPHEADER, $headers);
        curl_setopt($ch, CURLOPT_SSL_VERIFYPEER, false);
        curl_setopt($ch, CURLOPT_SSL_VERIFYHOST, 0);
        curl_setopt($ch, CURLOPT_RETURNTRANSFER, true);
        curl_setopt($ch, CURLOPT_POSTFIELDS, $dataString);

        $response = curl_exec($ch);

        dd($response);
    }
} 

Now, we will update the home.blade.php file.
@extends('layouts.app')

@section('content')
<div class="container">
    <div class="row justify-content-center">
        <center><h2>Laravel 9 FCM Push Notification - Websolutionstuff</h2></center>
        <div class="col-md-8">
             <center>
                <button id="btn-nft-enable" onclick="initFirebaseMessagingRegistration()" class="btn btn-danger btn-xs btn-flat">Allow for Notification</button>
            </center><br>
            <div class="card">
                <div class="card-header">{{ __('Dashboard') }}</div>

                <div class="card-body">
                    @if (session('status'))
                        <div class="alert alert-success" role="alert">
                            {{ session('status') }}
                        </div>
                    @endif
                    <form action="{{ route('send.push-notification') }}" method="POST">

                        @csrf

                        <div class="form-group">

                            <label>Title</label>

                            <input type="text" class="form-control" name="title">

                        </div>

                        <div class="form-group">

                            <label>Body</label>

                            <textarea class="form-control" name="body"></textarea>

                          </div>

                        <button type="submit" class="btn btn-primary">Send Notification</button>

                    </form>
                </div>
            </div>
        </div>
    </div>
</div>
<script
    src="https://code.jquery.com/jquery-3.4.1.min.js"
    integrity="sha256-CSXorXvZcTkaix6Yvo6HppcZGetbYMGWSFlBw8HfCJo="
    crossorigin="anonymous"></script>
<script src="https://www.gstatic.com/firebasejs/8.3.0/firebase-app.js"></script>
<script src="https://www.gstatic.com/firebasejs/8.3.0/firebase-messaging.js"></script>
<script>
  var firebaseConfig = {
    apiKey: "XXXX",
    authDomain: "XXXX.firebaseapp.com",
    projectId: "XXXX",
    storageBucket: "XXXX.appspot.com",
    messagingSenderId: "XXXX",
    databaseURL: "https://Your_Project_ID.firebaseio.com",
    appId: "XXXX"
  };

    firebase.initializeApp(firebaseConfig);
    const messaging = firebase.messaging();

    function initFirebaseMessagingRegistration() {
            messaging
            .requestPermission()
            .then(function () {
                return messaging.getToken({ vapidKey: 'Your_Public_Key' })
            })
            .then(function(token) {
                console.log(token);

                $.ajaxSetup({
                    headers: {
                        'X-CSRF-TOKEN': $('meta[name="csrf-token"]').attr('content')
                    }
                });

                $.ajax({
                    url: '{{ route("save-push-notification-token") }}',
                    type: 'POST',
                    data: {
                        token: token
                    },
                    dataType: 'JSON',
                    success: function (response) {
                        alert('Token saved successfully.');
                    },
                    error: function (err) {
                        console.log('User Chat Token Error'+ err);
                    },
                });

            }).catch(function (err) {
                console.log('User Chat Token Error'+ err);
            });
     }

    messaging.onMessage(function(payload) {
        const noteTitle = payload.notification.title;
        const noteOptions = {
            body: payload.notification.body,
            icon: payload.notification.icon,
        };
        new Notification(noteTitle, noteOptions);
    });

</script>
@endsectionNow, we will create firebase-messaging-sw.js in the public folder. So, add the below code in the js file.
importScripts('https://www.gstatic.com/firebasejs/8.3.0/firebase-app.js');
importScripts('https://www.gstatic.com/firebasejs/8.3.0/firebase-messaging.js');

	firebase.initializeApp({
        apiKey: "XXXX",
	    authDomain: "XXXX.firebaseapp.com",
	    databaseURL: "https://Your_Project_Id.firebaseio.com",
	    projectId: "XXXX",
	    storageBucket: "XXXX.appspot.com",
	    messagingSenderId: "XXXX",
	    appId: "XXXX"
    });

	const messaging = firebase.messaging();
	messaging.setBackgroundMessageHandler(function(payload) {
    console.log(
        "[firebase-messaging-sw.js] Received background message ",
        payload,
    );

    const notificationTitle = "Background Message Title";
    const notificationOptions = {
        body: "Background Message body.",
        icon: "/itwonders-web-logo.png",
    };

    return self.registration.showNotification(
        notificationTitle,
        notificationOptions,
    );
});Output:

You might also like:
- Read Also: How To Generate Barcode In Laravel
- Read Also: Laravel 8 Datatables Filter with Dropdown
- Read Also: How to Integrate Razorpay Payment Gateway in Laravel
- Read Also: Stripe Payment Gateway Integration Example In Laravel 8


