
1. Step 1 — Installing the React Developer Tools Extension
React Developer Tools Extension là một extension giúp bạn tránh được nhiều lỗi bằng cách cung cấp cho bạn cái nhìn tổng quan về các state và prop hiện tại của từng Component, Component tree cụ thể, cũng như theo dõi được hiêu năng các quá trình trong component với các khoảng thời điểm khác nhau
React Developer Tools Extension là extension phổ biến trên cả trình duyệt Google Chrome và Firefox, nhưng trong bài hôm nay, ta chỉ nói riêng trên trình duyệt Chrome
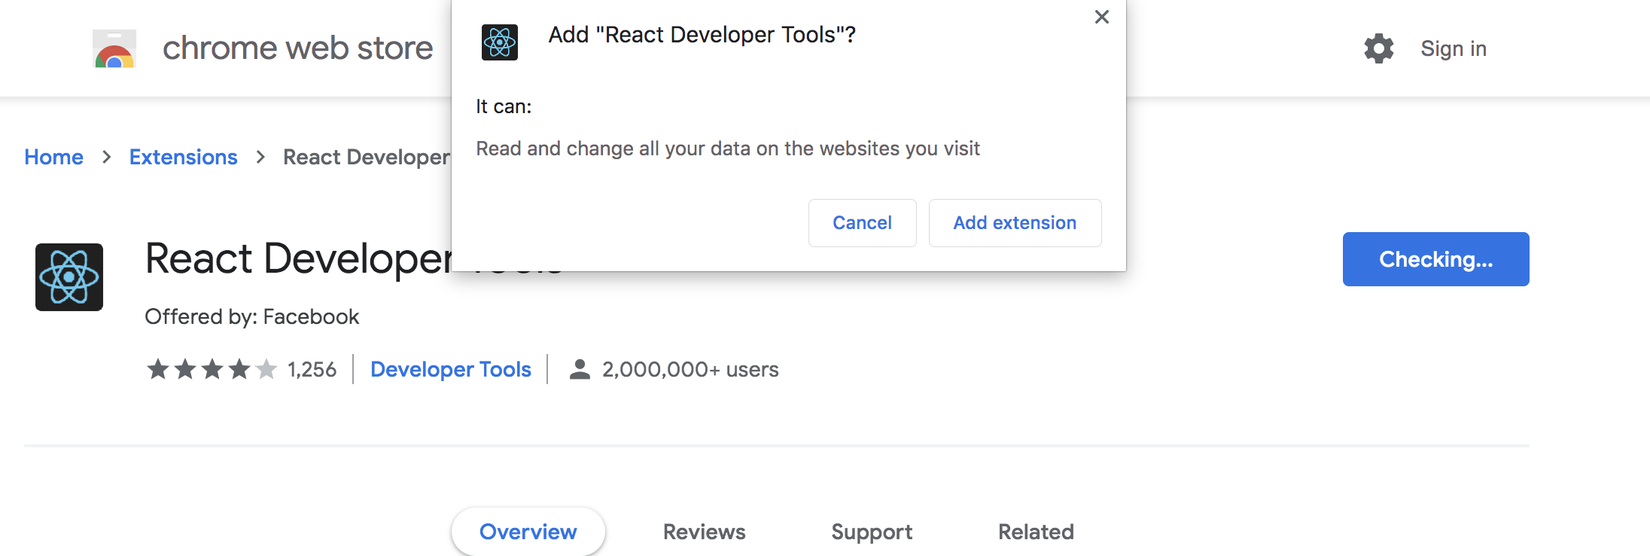
Đầu tiền bạn hãy install extension này tại link
https://chrome.google.com/webstore/detail/react-developer-tools/fmkadmapgofadopljbjfkapdkoienihi
Khi bạn ở trên một trang không có bất kỳ component React nào, biểu tượng của extension sẽ xuất hiện màu xám.
Tuy nhiên, nếu bạn đang ở trên một trang có các component React, biểu tượng sẽ xuất hiện màu xanh lam và xanh lục.
Nếu bạn nhấp vào biểu tượng, nó sẽ cho biết rằng ứng dụng đang chạy phiên bản nào của React.

Ngoài ra, sau khi bạn cài xong extension, sẽ xuất hiện 2 tab mới ở console (F12), đó là: ⚛️ Components and ⚛️ Profiler
Hai tab này cũng là đại diện 2 chức năng chính mà React Developer Tools Extension mang lại
⚛️ Components để theo dõi state và props, ⚛️ Profiler để theo dõi và record lại performance của function và nó sẽ được nói rõ hơn ở step 2 và step 3 của bài
Vậy thì còn chần chừ gì nữa, Let's go (go)
2. Step 2 — Identifying Real-Time Component Props and Context
Ở step 2 này, chúng ta sẽ xây dựng một app demo để hiểu rõ hơn về tab Component trong React Developer Tools
App này sẽ có mục đích kiểm tra số từ, số ký tự và tần suất ký tự của văn bản trong ô textarea.
Khi kết thúc step 2 này, bạn sẽ có thể sử dụng React Developer Tools để hiểu rõ một app đang hoạt động và quan sát state và props hiện tại mà không cần bất kì câu lệnh console.log hay đặt phải debugger trong code nữa.
Đầu tiên, ta sẽ taọ một textarea để có thể input text cần kiểm tra
Tạo App,js
nano src/components/App/App.js
# debug-tutorial/src/components/App/App.js

import React from 'react';
import './App.css';

function App() {
  return(
    <div className="wrapper">
     <label htmlFor="text">
       Add Your Text Here:
       <br>
       <textarea
         id="text"
         name="text"
         rows="10"
         cols="100"
       >
       </textarea>
      </label>
    </div>
  )
}

export default App;
Lưu lại và tiếp đó là tạo file App.css:
nano src/components/App/App.css
Thay đổi css để textarea trở nên bắt mắt hơn
# debug-tutorial/src/components/App.App.css
.wrapper {
    padding: 20px;
}

.wrapper button {
    background: none;
    border: black solid 1px;
    cursor: pointer;
    margin-right: 10px;
}

.wrapper div {
    margin: 20px 0;
}
Xong bước đầu bộ khung rồi đó, đây là hình ảnh đầu tiên của App
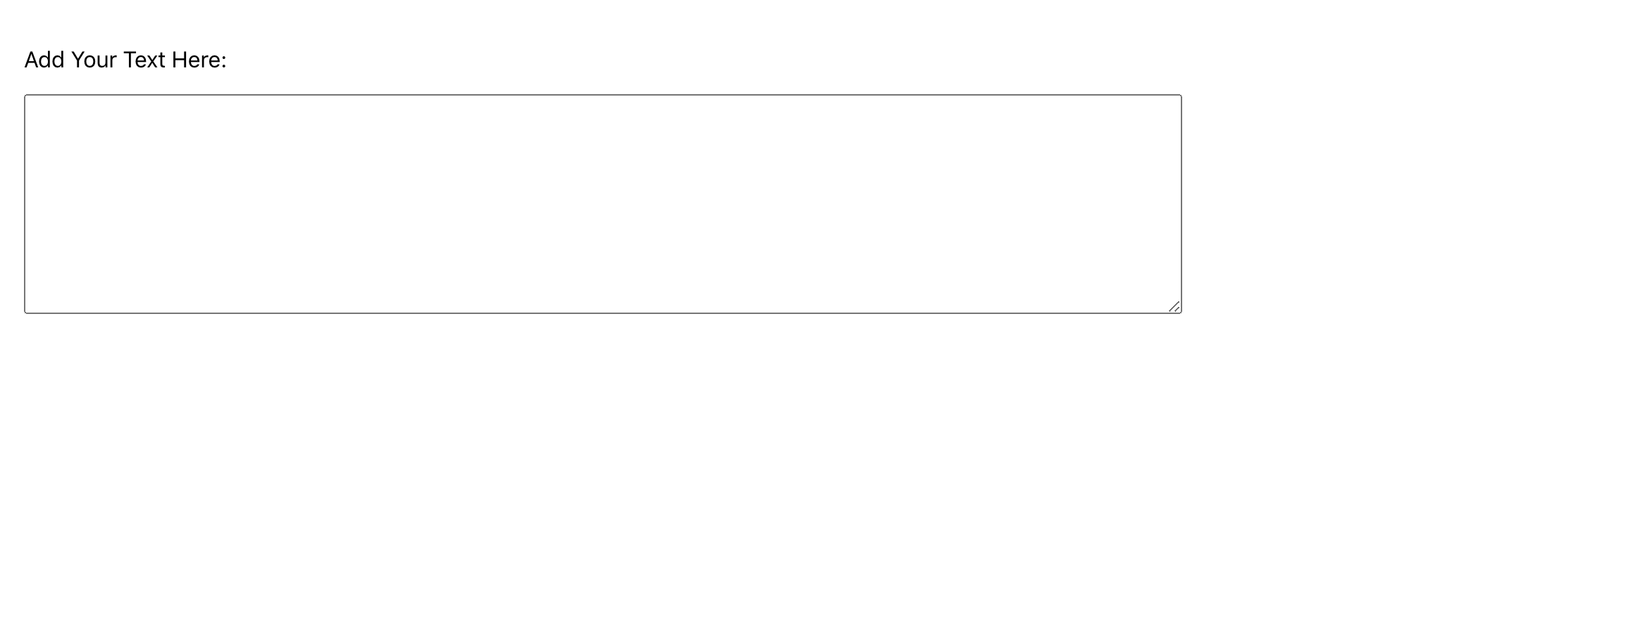
Tiếp theo, ta tạo context để giữ giá trị từ phần tử <textarea> .
Ta sẽ sử dụng useState Hook để gán gía trị text vào input, tìm hiểu thêm
#debug-tutorial/src/components/App/App.js

import React, { createContext, useState } from 'react';
import './App.css';

export const TextContext = createContext();

function App() {
  const [text, setText] = useState('');

  return(
    <TextContext.Provider value={text}>
      <div className="wrapper">
        <label htmlFor="text">
          Add Your Text Here:
          <br>
          <textarea
            id="text"
            name="text"
            rows="10"
            cols="100"
            onChange={e => setText(e.target.value)}
          >
          </textarea>
        </label>
      </div>
    </TextContext.Provider>
  )
}

export default App;
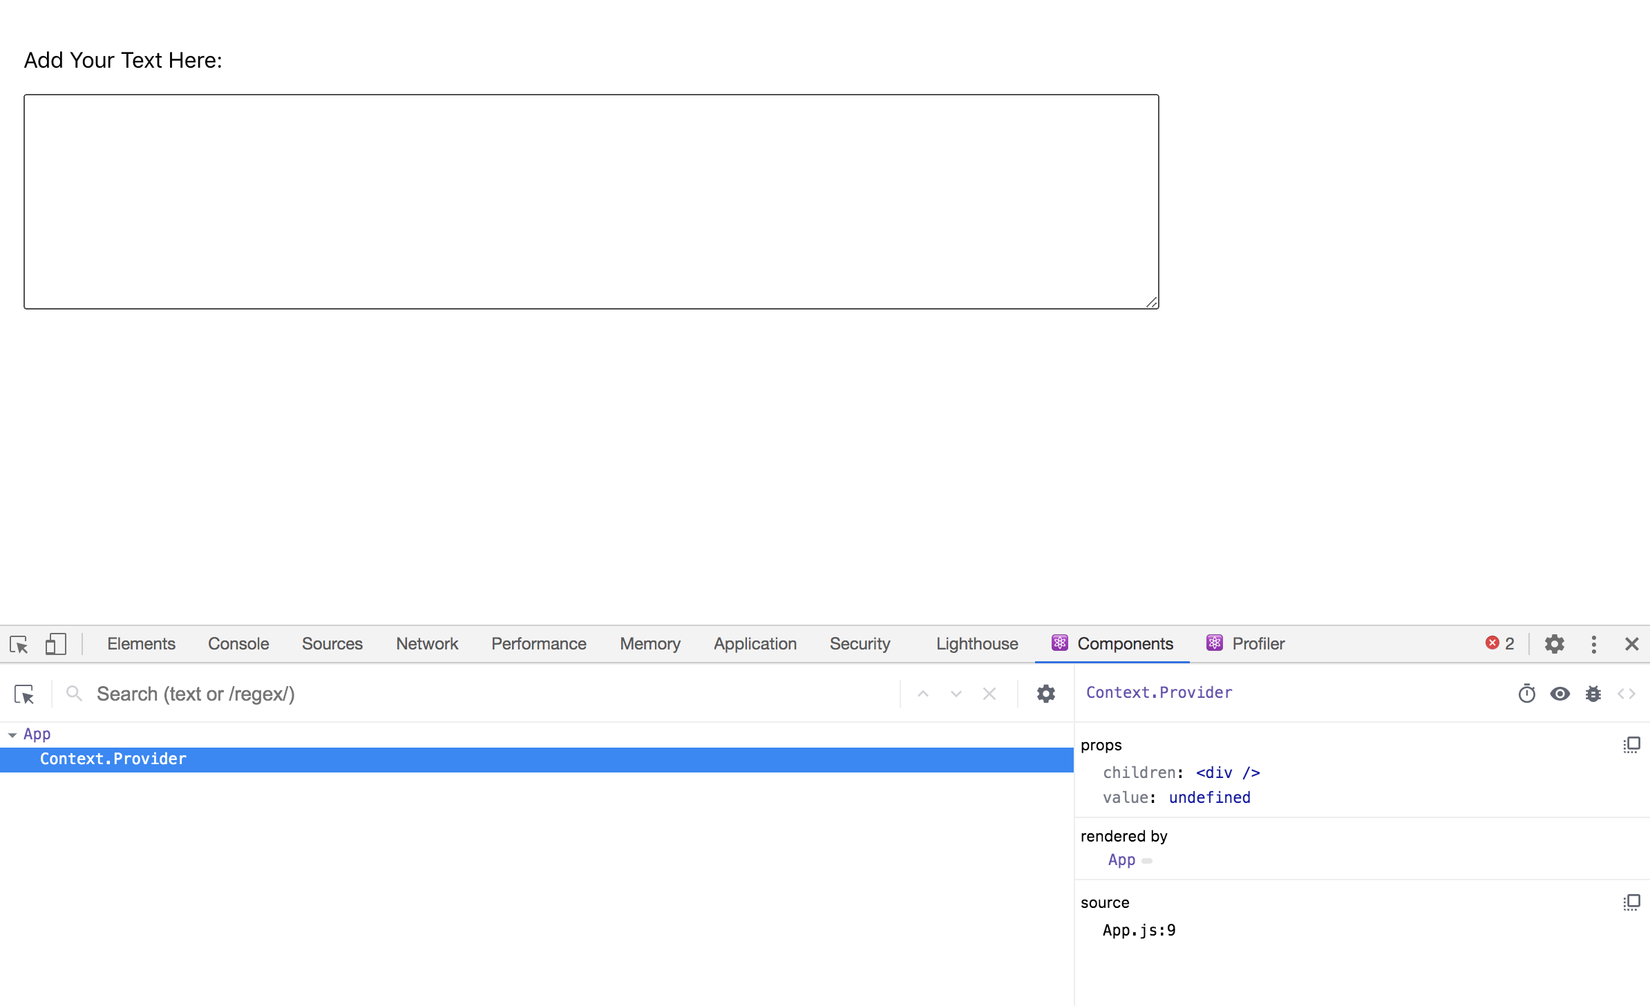
Component theo mặc định có tên là Context, nhưng chúng ta có thể thay đổi tên đó bằng cách thêm thuộc tính displayName vào Context đã tạo.
Bên trong App.js, thêm một dòng nơi bạn đặt displayName thành TextContext:
# debug-tutorial/src/components/App/App.js

import React, { createContext, useState } from 'react';
import './App.css';

export const TextContext = createContext();
TextContext.displayName = 'TextContext';

function App() {
    ...
}

export default App;
Không cần thiết phải thêm displayName, nhưng nó giúp điều hướng các components khi phân tích component tree trong console của trình duyệt.
Bạn cũng sẽ thấy giá trị của useState Hook trong thanh bên. Nhập vào "Updated value" vào textarea và bạn sẽ thấy giá trị được cập nhật trong React Developer Tools trong phần hook trong tab Components
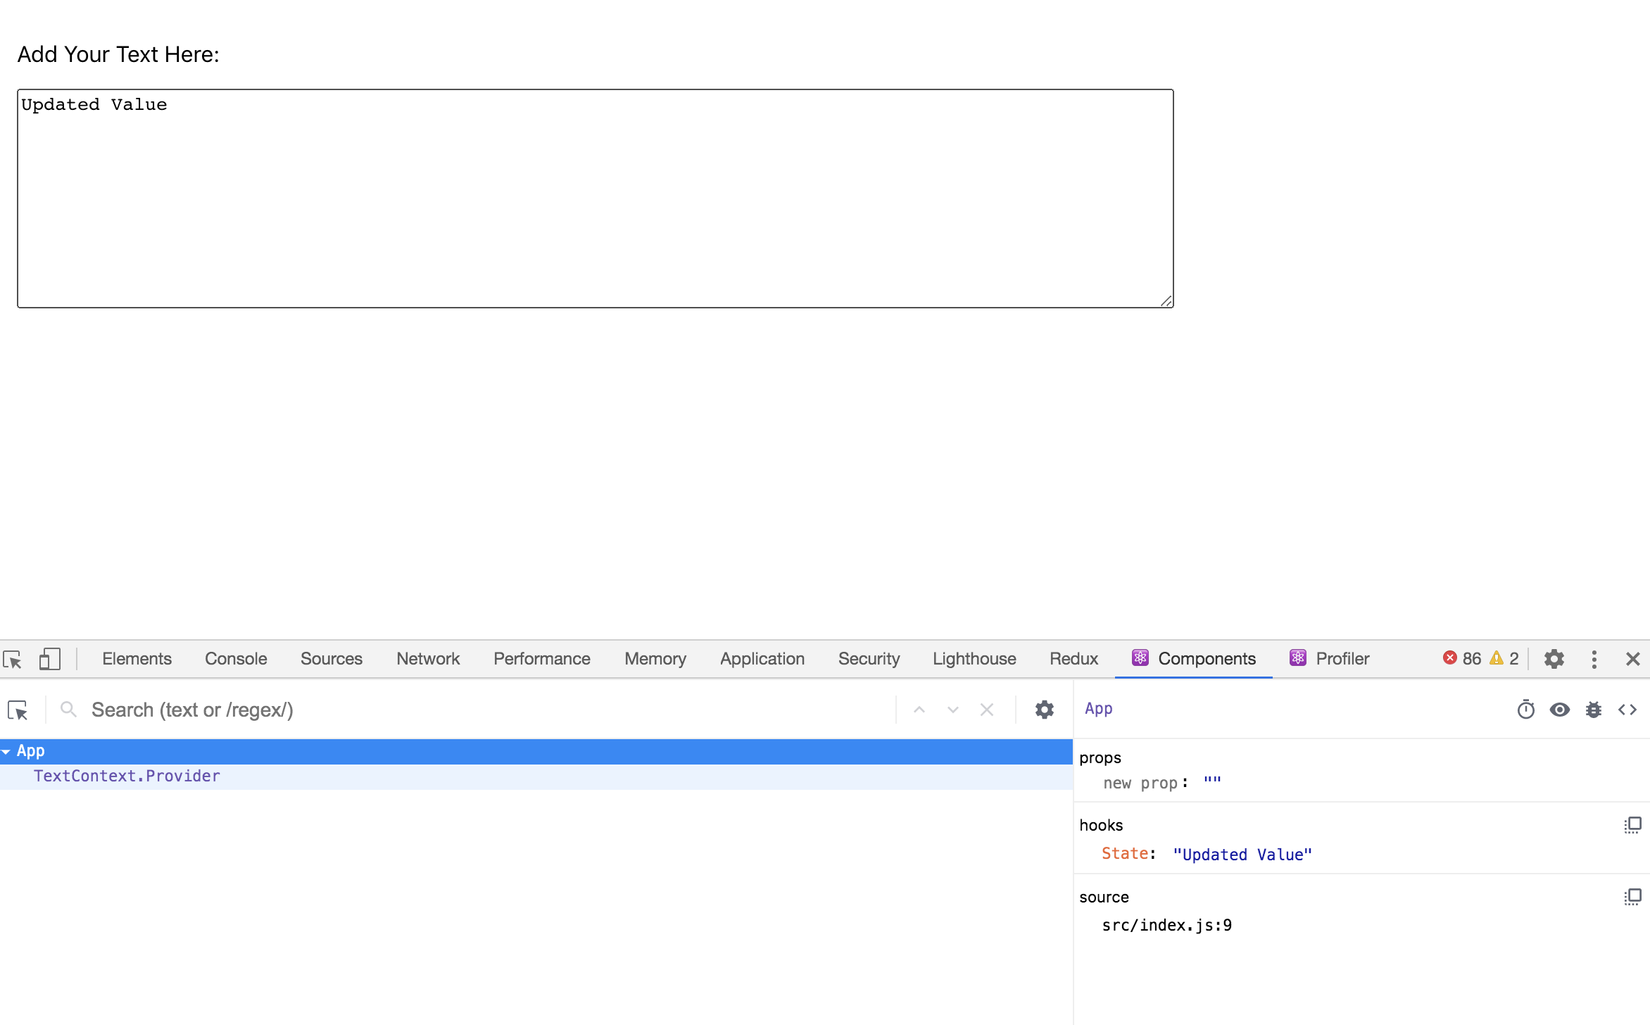
Hook cũng có tên chung là State, nhưng điều này không dễ cập nhật vì context.
Có một useDebugValue hook , nhưng nó chỉ hoạt động trên các Hook tùy chỉnh và không được khuyến nghị cho tất cả các Hook tùy chỉnh.
Trong trường hợp này, state cho components của App là props của TextContext.Provider.
Nhấp vào TextContext.Provider trong React Developer Tools và bạn sẽ thấy rằng giá trị này cũng phản ánh giá trị đầu vào mà bạn đã đặt với state:
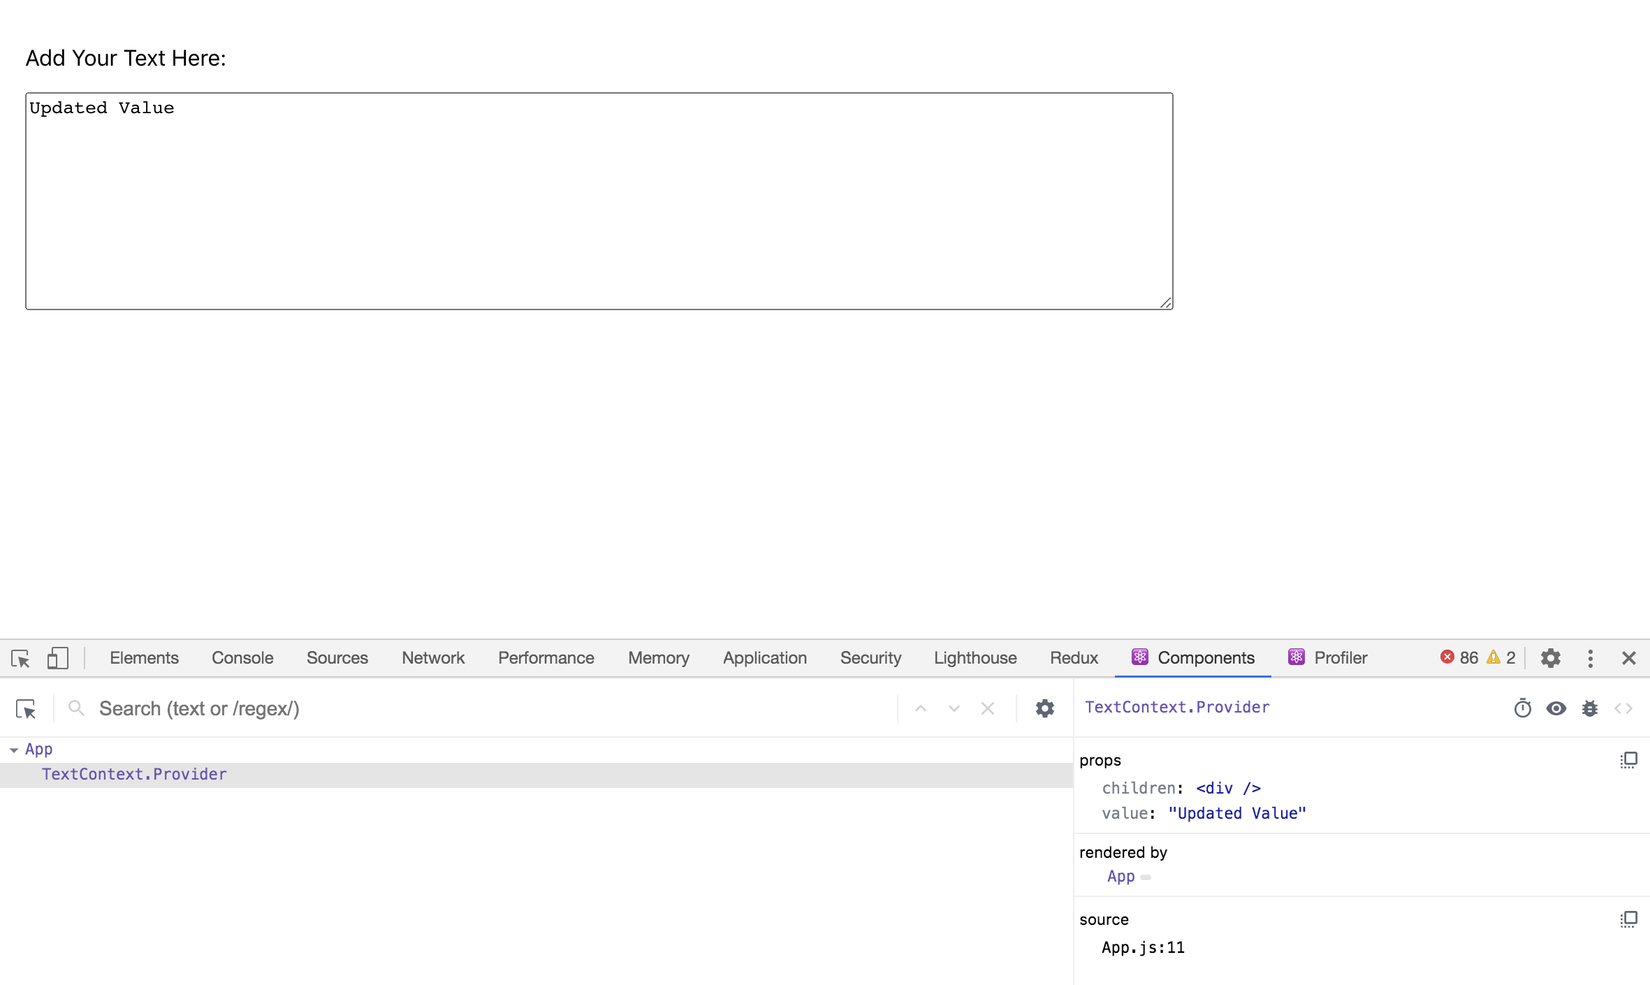
React Developer Tools đang hiển thị cho bạn thông tin context và real time prop, đồng thời giá trị sẽ thay đổi khi bạn bổ sung các Components.
Tiếp theo, chúng ta sẽ thêm Component mới có tên là TextInformation.
Component này sẽ là nơi chứa các component có phân tích dữ liệu cụ thể, chẳng hạn như số từ.
Tạo thư mục component mới
mkdir src/components/TextInformation
Then open TextInformation.js in your text editor.
Tạo mới component:
nano src/components/TextInformation/TextInformation.js
Bên trong component, bạn sẽ có ba thành phần riêng biệt: CharacterCount, WordCount và CharacterMap.
Bạn sẽ tạo ra những thành phần này chỉ ngay sau đây thôi.
Component TextInformation sẽ sử dụng useReducer hook để chuyển đổi các tab chứa các component tương ứng, tất nhiên là bằng hành động onClick rồi.
# debug-tutorial/src/components/TextInformation/TextInformation.js

import React, { useReducer } from 'react';

const reducer = (state, action) => {
  return {
    ...state,
    [action]: !state[action]
  }
}
export default function TextInformation() {
  const [tabs, toggleTabs] = useReducer(reducer, {
    characterCount: true,
    wordCount: true,
    characterMap: true
  });

  return(
    <div>
      <button onClick={() => toggleTabs('characterCount')}>Character Count</button>
      <button onClick={() => toggleTabs('wordCount')}>Word Count</button>
      <button onClick={() => toggleTabs('characterMap')}>Character Map</button>
    </div>
  )
}
Lưu lại file sau đó bổ sung tại file App.js:
nano src/components/App/App.js
Import thêm một component mới TextInformation
# debug-tutorial/src/components/App/App.js

import React, { createContext, useState } from 'react';
import './App.css';
import TextInformation from '../TextInformation/TextInformation';

...

function App() {
  const [text, setText] = useState('');

  return(
    <TextContext.Provider value={text}>
      <div className="wrapper">
        <label htmlFor="text">
          Add Your Text Here:
          <br>
          <textarea
            id="text"
            name="text"
            rows="10"
            cols="100"
            onChange={e => setText(e.target.value)}
          >
          </textarea>
        </label>
        <TextInformation />
      </div>
    </TextContext.Provider>
  )
}

export default App;
Khi bạn làm như vậy, trình duyệt sẽ tải lại và bạn sẽ thấy các components được cập nhật.
Nếu bạn nhấp vào TextInformation trong React Developer Tools, bạn sẽ thấy giá trị được cập nhật trên mỗi lần nhấp vào nút:
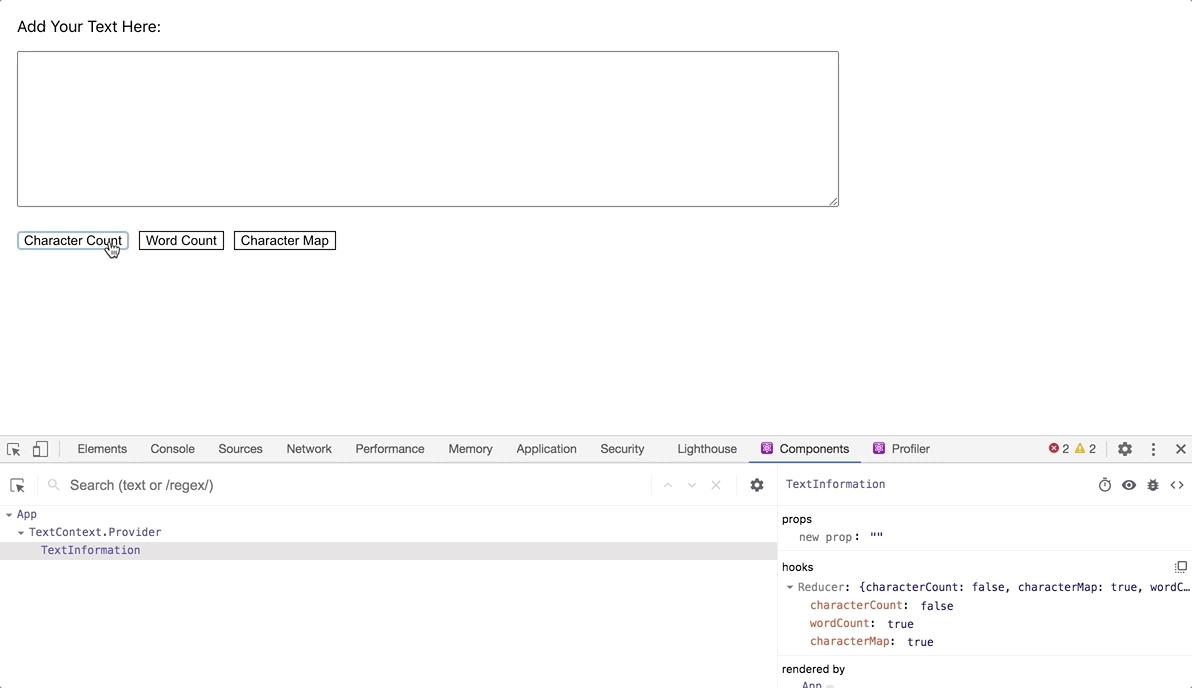
Bây giờ bạn đã có container component, bạn sẽ cần tạo từng thành phần thông tin nhỏ hơn characterCount, wordCount, characterMap.
Mỗi component sẽ có một props gọi là show.
Nếu show nhận giá trị false, component sẽ trả về null.
Các component sẽ sử dụng TextContext, phân tích dữ liệu và hiển thị kết quả.
Để bắt đàu, tạo CharacterCount component.
Tạo mới directory:
mkdir src/components/CharacterCount
Tạo file tương ứng
nano src/components/CharacterCount/CharacterCount.js
Bên trong component sẽ có phần xử lí phần props show
# debug-tutorial/src/components/CharacterCount/CharacterCount.js

import React, { useContext } from 'react';
import PropTypes from 'prop-types';
import { TextContext } from '../App/App';

export default function CharacterCount({ show }) {
  const text = useContext(TextContext);

  if(!show) {
    return null;
  }

  return(
    <div>
      Character Count: {text.length}
    </div>
  )
}

CharacterCount.proTypes = {
  show: PropTypes.bool.isRequired
}
Bên trong hàm CharacterCount, bạn chỉ định giá trị của TextContext cho một biến bằng cách sử dụng useContext Hook.
Sau đó, bạn trả về một <div> hiển thị số lượng ký tự bằng phương thức length.
Cuối cùng, PropTypes bổ sung một hệ thống kiểm tra và duyệt loại giá trị đầu vào, tránh sai sót trong quá trình input.
Quay lại TextInformation.js:
nano src/components/TextInformation/TextInformation.js
Ta import CharacterCount component và show thì được lấy qua giá trị của tabs.characterCount
# debug-tutorial/src/components/TextInformation/TextInformation.js

import React, { useReducer } from 'react';
import CharacterCount from '../CharacterCount/CharacterCount';

const reducer = (state, action) => {
  return {
    ...state,
    [action]: !state[action]
  }
}

export default function TextInformation() {
  const [tabs, toggleTabs] = useReducer(reducer, {
    characterCount: true,
    wordCount: true,
    characterMap: true
  });

  return(
    <div>
      <button onClick={() => toggleTabs('characterCount')}>Character Count</button>
      <button onClick={() => toggleTabs('wordCount')}>Word Count</button>
      <button onClick={() => toggleTabs('characterMap')}>Character Map</button>
      <CharacterCount show={tabs.characterCount} />
    </div>
  )
}
Lưu file và trải nghiệm
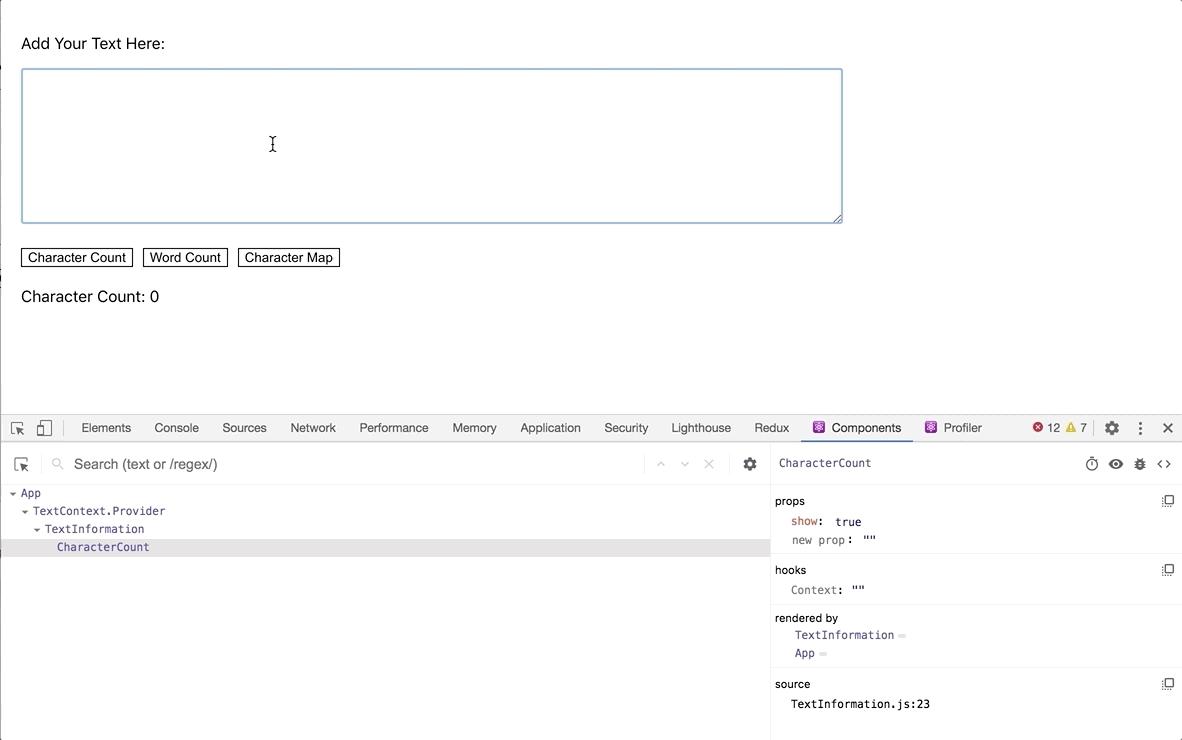
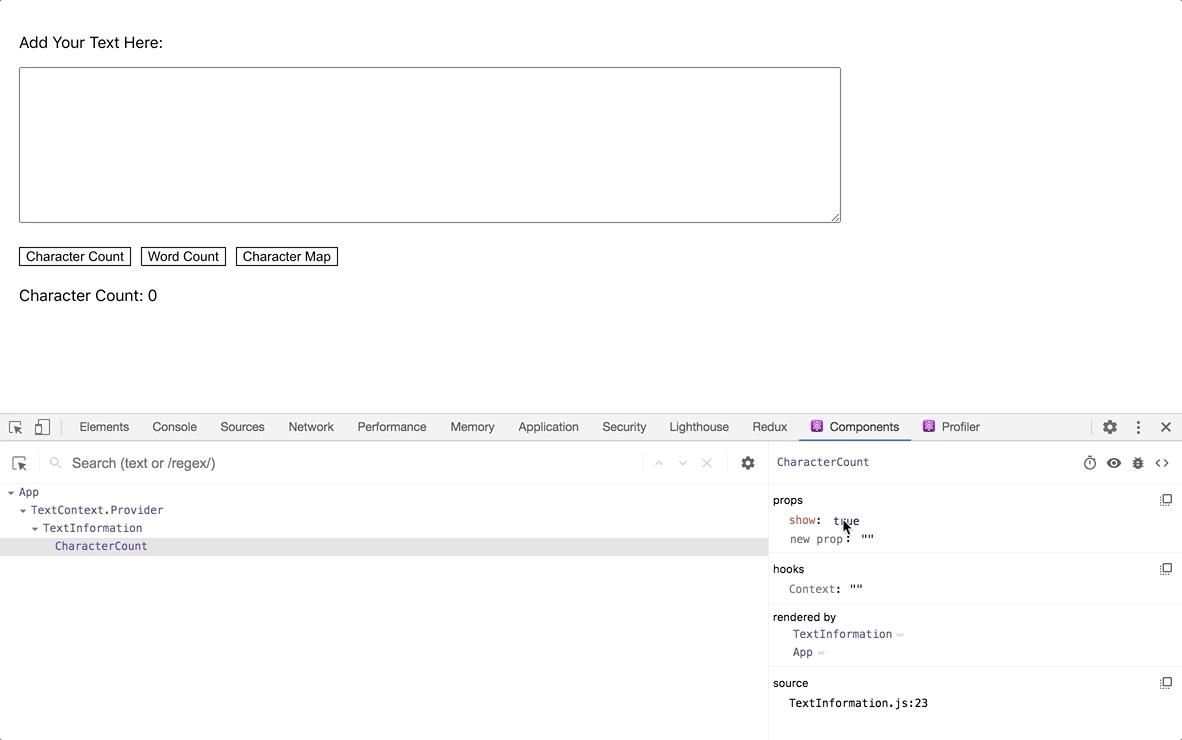
Bạn cũng có thể thêm hoặc thay đổi prop theo cách thủ công bằng cách nhấp vào thuộc tính và cập nhật giá trị:
Tiếp thep là bổ sung WordCount component.
mkdir src/components/WordCount
Tạo file tương ứng
nano src/components/WordCount/WordCount.js
# debug-tutorial/src/components/WordCount/WordCount.js

import React, { useContext } from 'react';
import PropTypes from 'prop-types';
import { TextContext } from '../App/App';

export default function WordCount({ show }) {
  const text = useContext(TextContext);

  if(!show) {
    return null;
  }

  return(
    <div>
      Word Count: {text.split(' ').length}
    </div>
  )
}

WordCount.proTypes = {
  show: PropTypes.bool.isRequired
}
Cuối cùng, tạo một Component CharacterMap.
Component này sẽ cho biết tần suất một ký tự cụ thể được sử dụng trong một khối văn bản.
Sau đó, nó sẽ sắp xếp các ký tự theo tần suất trong đoạn văn và hiển thị kết quả.
mkdir src/components/CharacterMap
Tạo file tương ứng
nano src/components/CharacterMap/CharacterMap.js
# debug-tutorial/src/components/CharacterMap/CharacterMap.js

import React, { useContext } from 'react';
import PropTypes from 'prop-types';
import { TextContext } from '../App/App';

export default function CharacterMap({ show }) {
  const text = useContext(TextContext);

  if(!show) {
    return null;
  }

  return(
    <div>
      Character Map: {text.length}
    </div>
  )
}

CharacterMap.proTypes = {
  show: PropTypes.bool.isRequired
}
Component này sẽ cần một function phức tạp hơn một chút để tạo bản đồ tần số cho mỗi chữ cái.
Bạn sẽ cần duyệt qua từng ký tự và tăng một giá trị bất cứ lúc nào có lặp lại.
Sau đó, bạn sẽ cần lấy dữ liệu đó và sắp xếp sao cho các chữ cái thường gặp nhất nằm ở đầu danh sách.
# debug-tutorial/src/components/CharacterMap/CharacterMap.js

import React, { useContext } from 'react';
import PropTypes from 'prop-types';
import { TextContext } from '../App/App';

function itemize(text){
 const letters = text.split('')
   .filter(l => l !== ' ')
   .reduce((collection, item) => {
     const letter = item.toLowerCase();
     return {
       ...collection,
       [letter]: (collection[letter] || 0) + 1
     }
   }, {})
 return Object.entries(letters)
   .sort((a, b) => b[1] - a[1]);
}

export default function CharacterMap({ show }) {
  const text = useContext(TextContext);

  if(!show) {
    return null;
  }

  return(
    <div>
     Character Map:
     {itemize(text).map(character => (
       <div key={character[0]}>
         {character[0]}: {character[1]}
       </div>
     ))}
    </div>
  )
}

CharacterMap.proTypes = {
  show: PropTypes.bool.isRequired
}
Tiếp theo, ta quay lại TextInformation.js và import những compoent còn thiếu:
nano src/components/TextInformation/TextInformation.js
# debug-tutorial/src/components/TextInformation/TextInformation.js

import React, { useReducer } from 'react';
import CharacterCount from '../CharacterCount/CharacterCount';
import CharacterMap from '../CharacterMap/CharacterMap';
import WordCount from '../WordCount/WordCount';

const reducer = (state, action) => {
  return {
    ...state,
    [action]: !state[action]
  }
}

export default function TextInformation() {
  const [tabs, toggleTabs] = useReducer(reducer, {
    characterCount: true,
    wordCount: true,
    characterMap: true
  });

  return(
    <div>
      <button onClick={() => toggleTabs('characterCount')}>Character Count</button>
      <button onClick={() => toggleTabs('wordCount')}>Word Count</button>
      <button onClick={() => toggleTabs('characterMap')}>Character Map</button>
      <CharacterCount show={tabs.characterCount} />
      <WordCount show={tabs.wordCount} />
      <CharacterMap show={tabs.characterMap} />
    </div>
  )
}
Lưu file lại và kiểm tra lại trình duyệt 2 component mới là WordCount và CharacterMap
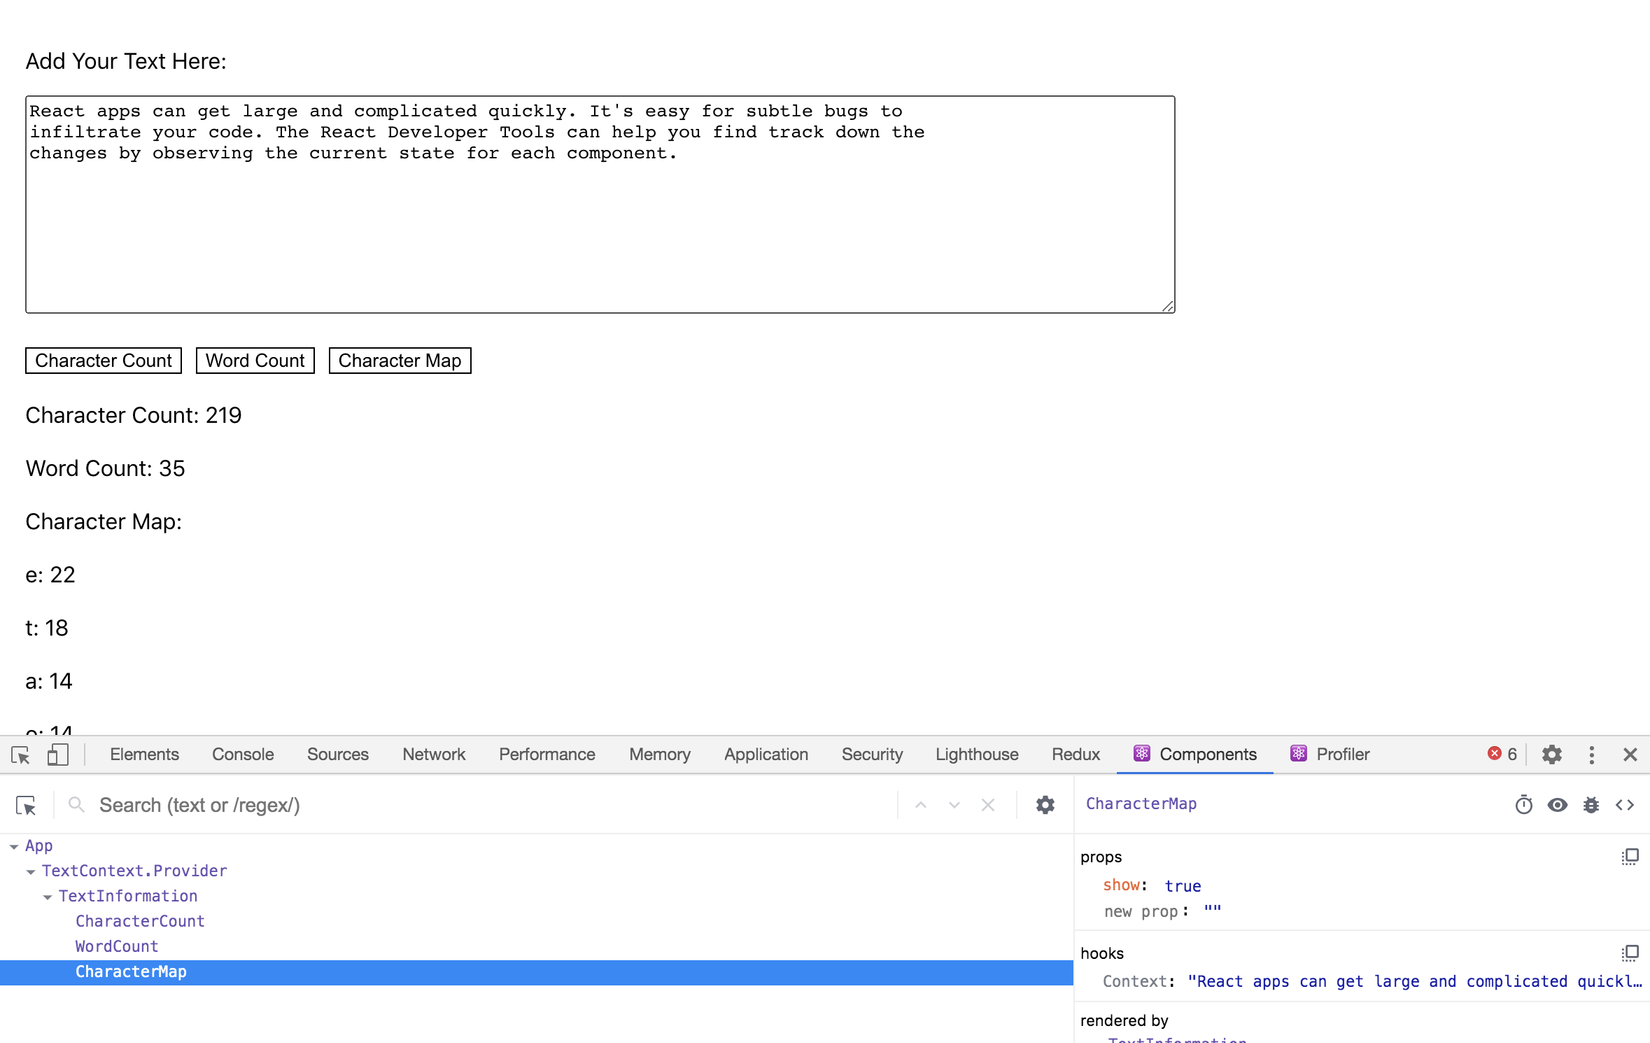
3.Tổng kết
Trong phần này, bạn đã sử dụng React Developer Tools để khám phá component tree.
Bạn cũng đã học cách xem các real time props cho từng component và cách thay đổi các props theo cách thủ công bằng React Developer Tools .
Trong phần tiếp theo, bạn sẽ sử dụng tab Profiler để xác định các thành phần dư thưa cũng như tối ưu lại chương trình của mình
Hẹn gặp lại mọi người trong phần tiếp theo


